
What is MasterPass?
MasterPass is a service that enables consumers to checkout on your site or app using any MasterPass-connected wallet. With a single integration with MasterPass, you can let consumers store and manage their payment and shipment information on any supported wallet (including our own MasterPass by MasterCard wallet). When they're ready to purchase, their information will be securely shared with your website or mobile app, speeding up the checkout process. MasterPass supports checkout on full and mobile websites, as well as Android™ and iOS™ apps.
Features
- Single integration to support all the MasterPass-connected wallets, including our own MasterPass by MasterCard wallet.
- Multi-channel support across e-commerce, mobile web, and iOS/Android apps.
- Streamlined checkout designed to reduce cart abandonment.
- Minimize fraud through proprietary features such as mobile verification.
- MasterPass by MasterCard is a secure, fast, and open service that supports all major credit cards.
The following are useful terms that you will encounter during the integration process.
Checkout Identifier
The Checkout Identifier is the ID that is used in lightbox initialization that identifies which Store Branding should be used.
Consumer Key
The Consumer Key identifies the client connecting to the MasterPass API. A developer will have a consumer key for each MasterPass environment (sandbox, production).
Checkout Resource
The Checkout Resource is used to retrieve the payload delivered by the MasterPass API that contains the customer’s billing, shipping, and payment information.
Request Token
The Request Token is an OAuth token that is used to authenticate requests to the MasterPass API.
Access Token
The Access Token is an OAuth token used to authenticate access to the Checkout Resource through the MasterPass API. The Access Token is obtained using the Request Token and the Request Verifier.
Pairing Token
The Pairing Token is an OAuth token that is used to obtain a Long Access Token.
Long Access Token
The Long Access Token is an OAuth token that is used to access the customer’s wallet information, the Pre-Checkout Data. The Long Access Token is typically stored with the customer’s account on the merchant site.
Pre-Checkout Data
The paired consumer’s masked checkout data that can be requested prior to the MasterPass checkout. This is used to allow the consumer to pre-select their checkout options on the merchant site instead of in lightbox.
3-D Secure
A protocol for providing an additional security layer for online credit and debit card transactions.
PK12 (PKCS 12)
An encrypted container for public and private keys.
Architecture
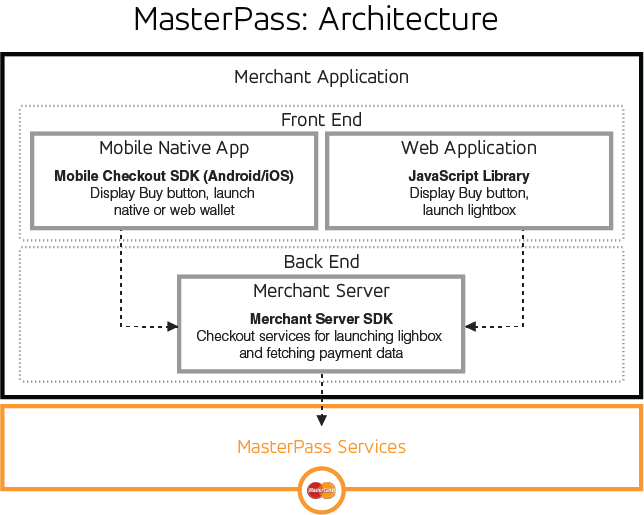
Merchant Server - SDK vs API
MasterCard offers several options for developers to perform a web integration of MasterPass. We recommend using one of our SDKs, available in Java, Ruby, C#, and PHP. If your project doesn't use one of these languages, you can instead implement our API.
Web Application
You will need to add the MasterPass Integration Script to your store's checkout page in order to invoke the user interface (Lightbox) that displays consumers' wallet information. MasterPass provides both a sandbox script (https://sandbox.masterpass.com/lightbox/Switch/integration/ MasterPass.client.js) and a production script (https://www.masterpass.com/lightbox/Switch/integration/ MasterPass.client.js). It is important that you link to these scripts rather than download them.
Mobile Native App
MasterPass also supports in-app purchases on Android apps, currently only available for merchants based in the US. To learn more about how to implement MasterPass on your Android app, go here.
User Interface
MasterPass displays the consumer's wallet options using a Lightbox, a modal window that floats on top of the merchant's web page. The Lightbox utilizes a responsive design, allowing it to resize to fit various screen sizes, including mobile devices. Only a portrait view is supported for mobile; content that does not fit the screen can be accessed by scrolling. Under certain conditions -- for instance, if the consumer is using an older browser or blocking third party cookies -- MasterPass will render a full screen display instead of the Lightbox.
Checkout Types
Merchants may select one of three different checkout types to integrate with their store. Standard Checkout provides the typical digital wallet experience, where a consumer logs into MasterPass and selects their wallet information. Additionally, MasterPass allows consumers to pair their MasterPass wallets with their merchant accounts, providing even faster checkout experiences. Connected Checkout uses pairing to display the consumer's MasterPass wallet information directly within the merchant site or app. Express Checkout also pairs the consumer's MasterPass wallet with their merchant account, with the additional advantage of allowing the consumer to bypass authentication with MasterPass, providing the fastest checkout experience.
Standard Checkout
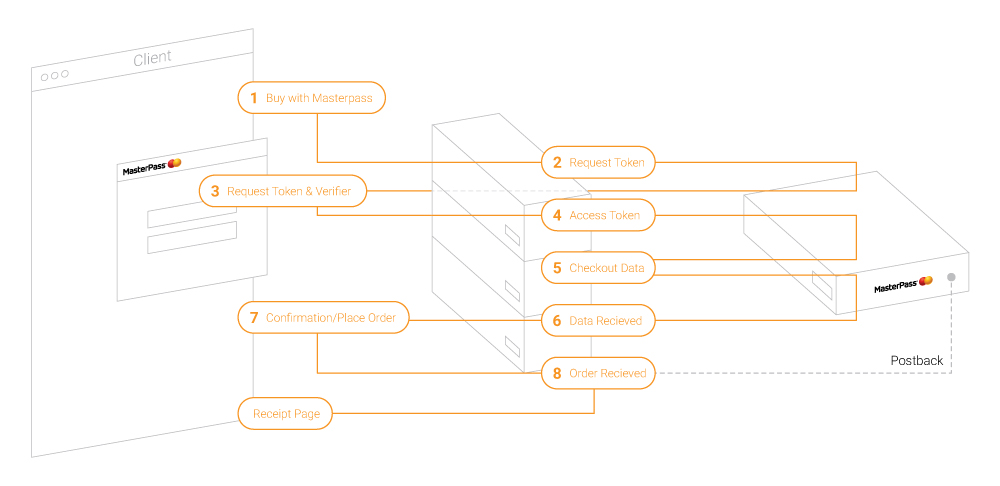
Standard Checkout is the default and most basic MasterPass checkout flow. During checkout, the consumer clicks on the “Buy with MasterPass” button. The MasterPass Lightbox is presented to the consumer where they select the payment, shipping, and rewards details to be used for the purchase. No information is shared with the merchant prior to this point. After the consumer completes their selections in Lightbox, the merchant receives the checkout information from MasterPass and uses it to create the order confirmation page. The consumer confirms the transaction and the order is placed.
Connected Checkout
Connected Checkout, currently only available outside the US, is a faster checkout option that allows the merchant to display the consumer’s wallet details directly within the merchant’s site. It requires the consumer to log into the merchant site and pair their MasterPass account, sharing their wallet data with the merchant.
During the checkout flow, if the consumer is logged in and has previously paired their account, the merchant will request a masked copy of the wallet data from MasterPass to display on the merchant site. The consumer selects from their wallet data and clicks the “Buy With MasterPass” button to confirm the order. The Lightbox interface launches to authenticate the user. After the consumer confirms the order in Lightbox, the merchant then receives the full, unmasked payment details of the consumer’s selections and uses that information to immediately place the order.
Express Checkout
Express Checkout is the fastest checkout experience, available to non-US based merchants that have previously passed a MasterPass vetting process. From the consumer’s perspective, it works like Connected Checkout, with the added convenience of not needing to sign into MasterPass -- their merchant site login is all that is required for their full MasterPass details to be released to the merchant.
During the checkout flow, if the consumer is logged in and has previously paired their account, the merchant will request a masked copy of the wallet data from MasterPass and display it on the merchant site. The consumer selects from their wallet data and clicks the Place Order button to confirm the order. The merchant then receives the consumer’s full, unmasked payment details and uses that information to place the order.
Mobile Checkout
Merchants based in the US can integrate MasterPass on their Android applications. During checkout, when the consumer taps the "Buy with MasterPass" button, the SDK provides an interface to collect payment and shipping information. The SDK also calculates shipping and tax costs for the transaction. After the consumer completes their selections, SDK completes the transaction and returns payment and shipping information for the merchant to display on their "Order Placed" screen.
Prerequisites
Before you can implement Standard Checkout, make sure that you've already completed the following:
- Completed the MasterPass Sign Up Process.
- Completed the registration process for the MasterCard Developer Zone.
- Decided whether you will complete the integration using one of our SDKs, or the API.
Java SDK Configurations
Prerequisites
The MasterPass Java SDK requires Java 1.7 or higher. If you are integrating the SDK via Maven, then Maven 3.x is required.
Integrate the MasterPass SDK
You may integrate the MasterPass SDK with your project either by using Maven, or by manually downloading and adding the required jars.
Maven Integration
1. Add MasterPass dependency to your pom.xml
2. Update your project.
If you're using Eclipse, right-click the project and select Maven > Update Project.
Manually Integrate Jars
1. Download MasterPass jars
Download mastercard.masterpass.merchant.jar and mastercard.sdk.core.jar from the MasterPass Maven repository.
2. Add mastercard.sdk.core.jar as a dependency of mastercard.masterpass.merchant.jar.
3. Add required third party jars
Resolve the following third party jar dependencies:
| Jars | Version |
|---|---|
| core | 1.47.1 |
| commons-lang3 | 3.4 |
| swagger-annotations | 1.5.0 |
| commons-codec | 1.10 |
| slf4j-api | 1.6.1 |
| slf4j-simple | 1.7.14 |
| jackson-dataformat-xml | 2.6.3 |
| woodstox-core-asl | 4.4.1 |
| truth | 0.28 |
| simple-xml | 2.7.1 |
| gson | 2.3.1 |
| okio | 1.8.0 |
| okhttp | 3.2.0 |
Configuration
1. Get private key
Prior to completing this step, the developer must have uploaded or generated a PEM encoded Certificate Request File, and generated a consumer key in the Merchant Portal as part of the onboarding process.
private static PrivateKey getPrivateKey() {
	String fileName = "example-file.p12"; // path to your p12 file
	String password = "password";         // your keystore password
	PrivateKey privateKey = null;
	try {
		KeyStore ks = KeyStore.getInstance("PKCS12");
		ks.load(new FileInputStream(fileName), password.toCharArray());
		Enumeration<String> enumeration = ks.aliases();
		String keyAlias = enumeration.nextElement();
		privateKey = (PrivateKey) ks.getKey(keyAlias, password.toCharArray());
	} catch (Exception e) {
		throw new RuntimeException(e);
	}

	return privateKey;
}
2. Configure environment
2a. Configure sandbox or production environment
Use the MasterCardApiConfig.setSandBox() method to set the environment as either sandbox or production, as shown below.
Set the hostname URL according to the MasterPass environment you want to connect to. Use "https://api.mastercard.com" for production, and "https://sandbox.api.mastercard.com" for sandbox.
MasterCardApiConfig.setSandBox(false); // to use production environment else
MasterCardApiConfig.setSandBox(true); // to use sandbox environment
MasterCardApiConfig.setConsumerKey("insert_consumer_key_here");
MasterCardApiConfig.setPrivateKey("insert_private_key_here");
2b. Optional - Configure Custom Environment
Use the ApiConfigBuilder instead of the MasterCardApiConfig to set the environment to a value other than sandbox or production.
// If developer wants to use environment configuration other than SANDBOX or PRODUCTION
ApiConfig config = new ApiConfigBuilder()
	.name("insert_environment_name_here") //for example, STAGE
	.consumerKey("insert_consumer_key_here")
	.privateKey("insert_private_key_here")
	.hostUrl("insert_environment_URL_here")
	.build();
If you choose to use the ApiConfigBuilder instead of the MasterCardApiConfig to set your environment, you will need to pass your config object as a parameter when making service calls. See the RequestTokenApi service call example below.
RequestTokenApi service call using MasterCardApiConfig
RequestTokenResponse response = RequestTokenApi.create("http://localhost:8090");RequestTokenApi service call using ApiConfigBuilder
RequestTokenResponse response = RequestTokenApi.create ("http://localhost:8090", config);Exception Handling
The Core SDK contains all of the exception classes that will be used across the Core and Merchant SDKs. The MasterPass SDK throws two types of exceptions:
- SDKValidationException: Covers all local validation exceptions, such as a null required parameter.
- SDKErrorResponseException: This exception type is used to throw all remote exceptions. It always returns a response code and an object of type com.mastercard.sdk.core.models.Errors, which needs to be caught and cast. The following sample code demonstrates how to cast this exception.
try {
	//Merchant checkout SDK call.
} catch (Exception exception) {
	if (exception instanceof SDKErrorResponseException) {
		String errorMessage;
		SDKErrorResponseException sdkException = (SDKErrorResponseException) exception;
		com.mastercard.sdk.core.models.Errors errors = (com.mastercard.sdk.core.models.Errors) sdkException.getErrorResponse();
		List <com.mastercard.sdk.core.models.Error> errorList = errors.getError();
		for (com.mastercard.sdk.core.models.Error error : errorList) {
			//developer logic to get the error details from Error object.
			errorMessage = "Source:" + error.getSource() + "\n"
			+ "ReasonCode:"+error.getReasonCode() + "\n" + "Description:"
			+ error.getDescription() + "\n" + "Recoverable:" + error.getRecoverable();
		}
	}
}
Logging
SLF4J is used for logging all messages in MasterPass. The INFO log level is handled by default. The developer must explicitly set the DEBUG and ERROR log levels to fetch those logs.
C# SDK Configurations
Prerequisites
- Visual Studio Professional Edition 2013 or higher
- .NET Framework 4.5.2
Integrate the MasterPass SDK
1. Open your project. In Solution Explorer, open "Web Project".
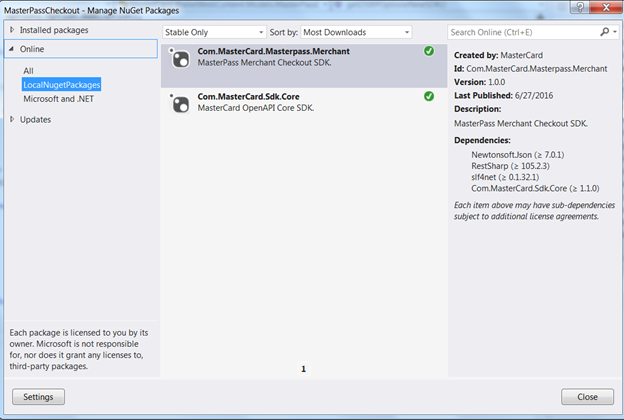
2. Right-click "reference" and select "ManageNugetPackages".
3. Search for the package with ID name "Com.MasterCard.Masterpass.Merchant". Download and install this package.
4. Download and install the Com.MasterCard.Sdk.Core package.
Configurations
Prior to completing this step, the developer must have uploaded or generated a PEM encoded Certificate Request File, and generated a consumer key in the Merchant Portal as part of the onboarding process.
Use the MasterCardApiConfiguration to set your environment as either sandbox or production. Set the hostname URL according to the MasterPass environment you want to connect to. Use "https://api.mastercard.com" for production, and "https://sandbox.api.mastercard.com" for sandbox.
private void SetConfigurations()
{
	string hostUrl = ConfigurationManager.AppSettings["ApiHostUrl"];
	string consumerKey = ConfigurationManager.AppSettings["ConsumerKey"];
	string KeystorePath = Server.MapPath(ConfigurationManager.AppSettings["KeystorePath"]);
	string KeystorePassword = ConfigurationManager.AppSettings["KeystorePassword"];
	string IsSandbox = ConfigurationManager.AppSettings["IsSandbox"];
	var privateKey = new X509Certificate2(KeystorePath, KeystorePassword).PrivateKey;
	MasterCardApiConfiguration.Sandbox = Convert.ToBoolean(IsSandbox); //set as false for production
	MasterCardApiConfiguration.ConsumerKey = consumerKey;
	MasterCardApiConfiguration.PrivateKey = privateKey;
}
Optionally, use the ApiConfigBuilder instead of the MasterCardApiConfiguration to set the environment to a value other than sandbox or production. See the following sample code to set the environment and use in an API service call.
public const string ConfigName = "Stage";
private void SetConfigurations()
{
	string hostUrl = ConfigurationManager.AppSettings["ApiHostUrl"];
	string consumerKey = ConfigurationManager.AppSettings["ConsumerKey"];
	string keystorePath = Server.MapPath(ConfigurationManager.AppSettings["KeystorePath"]); string keystorePassword = ConfigurationManager.AppSettings["KeystorePassword"];
	string IsSandbox = ConfigurationManager.AppSettings["IsSandbox"];
	var privateKey = new X509Certificate2(keystorePath, keystorePassword).PrivateKey;

	// Register the Environment Configuration with Name "Stage".
	var stageApiConfig = new ApiConfigBuilder().Name(ConfigName).HostUrl(hostUrl).ConsumerKey(consumerKey).PrivateKey(privateKey).Build();
}
If you choose to use the ApiConfigBuilder instead of the MasterCardApiConfig to set your environment, you will need to pass your config as a parameter when making service calls. See the RequestTokenApi service call example below.
RequestTokenApi service call using MasterCardApiConfig
string callback_url = "https://www.somemerchant.com/checkoutconfirm.htm";
RequestTokenResponse requestTokenResponse = RequestTokenApi.Create(callback_url);
string request_token = requestTokenResponse.OauthToken;
RequestTokenApi service call using ApiConfigBuilder
// Call the service with the registered configuration.
string callback_url = "https://www.somemerchant.com/checkoutconfirm.htm";
RequestTokenResponse requestTokenResponse = RequestTokenApi.Create(callback_url, MasterCardApiConfiguration.GetConfig(ConfigName));
string request_token = requestTokenResponse.OauthToken;
Exception Handling
The Base SDK contains all of the exception classes that will be used across the Base and Client SDKs. All exceptions thrown are Runtime Exceptions. The table below details the different exception classes.
| Location | Class Name | Class Responsibility |
|---|---|---|
| Base SDK | SdkBaseException | Base class to handle all SDK exceptions |
| Base SDK | SdkValidationException | Used for all local validation, such as a required parameter being found null |
| Base SDK | SdkSerializationException | Used for errors in serializing or de-serializing |
| Base SDK | SdkOauthException | Used for errors in Oauth string creation |
| Base SDK | SdkErrorResponseException | Used to throw all remote exceptions. It returns response code and Object of type Errors. |
Logging
Set the reference configuration shown below in the App.config or Web.config of your application.
| Logging Frameworks | Simple Logging | NLog | Log4Net |
|---|---|---|---|
| NuGet Packages Reference | Id: slf4net.Simple Version: 0.1.32.1 | Id: slf4net.NLog Version: 0.1.32.1 Id: NLog Version: 4.2.3 |
Id: slf4net.log4net Version: 0.1.32.1 Id: log4net Version: 2.0.0 |
slf4net Configuration App.config / Web.config
Simple Logging
<?xml version="1.0" encoding="utf-8"?>
<configuration>
  <configSections>
    <section name="slf4net" type="slf4net.Configuration.SlfConfigurationSection, slf4net" />
  </configSections>
  <slf4net>
    <factory type="slf4net.Factories.SimpleLoggerFactory, slf4net.Simple">
      <factory-data>
        <logger name="TraceLogger" type="slf4net.TraceLogger, slf4net.Simple" />
      </factory-data>
    </factory>
  </slf4net>

</configuration>
NLog
<?xml version="1.0" encoding="utf-8"?>

<configuration>
  <configSections>
    <section name="slf4net" type="slf4net.Configuration.SlfConfigurationSection, slf4net" />
  </configSections>
  <slf4net>
    <factory type="slf4net.NLog.NLogLoggerFactory, slf4net.NLog" />
  </slf4net>
  <runtime>
    <assemblyBinding xmlns="urn:schemas-microsoft-com:asm.v1">
      <dependentAssembly>
        <assemblyIdentity name="NLog" publicKeyToken="5120e14c03d0593c" culture="neutral" />
        <bindingRedirect oldVersion="0.0.0.0-4.0.0.0" newVersion="4.0.0.0" />
      </dependentAssembly>
    </assemblyBinding>
  </runtime>

</configuration>
Log4Net
<?xml version="1.0" encoding="utf-8"?>
<configuration>
  <configSections>
    <section name="slf4net" type="slf4net.Configuration.SlfConfigurationSection, slf4net" />
  </configSections>
  <slf4net>
    <factory type="slf4net.log4net.Log4netLoggerFactory, slf4net.log4net">

      <factory-data>
        <configFile value="log4net.config" />

        <watch value="true" />
      </factory-data>
    </factory>
  </slf4net>
</configuration>
Logging Framework Configuration File
NLog
NLog.config required in application to set the NLog framework specific configuration.
<?xml version="1.0" encoding="utf-8"?>
<nlog xmlns="http://www.nlog-project.org/schemas/NLog.xsd" xmlns:xsi="http://www.w3.org/2001/XMLSchema-instance">
  <targets>
    <target name="FileLogger" xsi:type="File" fileName="MasterPass-SDK.log" layout="${longdate} ${level:upperCase=true} ${message} (${callsite:includSourcePath=true})" />

    <target xsi:type="Trace" name="TraceLogger" />
  </targets>

  <rules>
    <logger name="*" writeTo="FileLogger,TraceLogger" minlevel="Trace" />
  </rules>
</nlog>
Log4Net
log4net.config required in application to set the log4net framework specific configuration.
<?xml version="1.0" encoding="utf-8" ?>
<configuration>
  <log4net>
    <appender name="DebugConsole" type="log4net.Appender.DebugAppender">
      <layout type="log4net.Layout.PatternLayout">
        <conversionPattern value="%date %-5level: %message%newline" />
      </layout>
    </appender>
    <appender name="RollingFileAppender" type="log4net.Appender.RollingFileAppender">
      <file value="MasterPass-SDK.log" />
      <appendToFile value="false" />
      <rollingStyle value="Size" />
      <maxSizeRollBackups value="10" />
      <maximumFileSize value="50MB" />
      <staticLogFileName value="true" />
      <layout type="log4net.Layout.PatternLayout">
        <conversionPattern value="%date %-5level[%logger]: %message%newline" />
      </layout>
    </appender>
    <root>
      <level value="ALL" />
      <appender-ref ref="DebugConsole" />
      <appender-ref ref="RollingFileAppender" />
    </root>
  </log4net>
</configuration>
Web.Config Sample Code
An example of a Web.Config file with the required configurations is shown below.
<?xml version="1.0" encoding="utf-8"?>

<!--
  For more information on how to configure your ASP.NET application, please visit
  http://go.microsoft.com/fwlink/?LinkId=152368
  -->

<configuration>

  <configSections>

    <section name="slf4net" type="slf4net.Configuration.SlfConfigurationSection, slf4net" />

  </configSections>

  <slf4net>

    <factory type="slf4net.log4net.Log4netLoggerFactory, slf4net.log4net">

      <factory-data>

        <configFile value="log4net.config" />

        <watch value="true" />

      </factory-data>

    </factory>

  </slf4net>

  <appSettings>

    .....

    <!--

    Following are the settings used by the Wallet Sample Application

    which are used to connect/interact with the Wallet API.

    -->

    <add key="ApiHostUrl" value="https://sandbox.api.mastercard.com" />

    <add key="CallbackDomain" value="http://localhost:9090" />

    <add key="CallbackPath" value="/O3_Callback" />

    <add key="ConnectedCallbackPath" value="/O3_Callback?connect=true" />

    <add key="ConsumerKey" value="cLb0tKkEJhGTITp_6ltDIibO5Wgbx4rIldeXM_jRd4b0476c!414f4859446c4a366c726a327474695545332b353049303d" />

    <add key="CheckoutIdentifier" value="a4a6x1ywxlkxzhensyvad1hepuouaesuv" />

    <add key="KeystorePath" value="~/Certs/Sandbox/414f4859446c4a366c726a327474695545332b353049303d.p12" />

    <add key="KeystorePassword" value="changeit" />

    <add key="IsSandbox" value="true" />
  </appSettings>


  .....


</configuration>
Ruby SDK Configurations
Prerequisites
Ruby 2.2 or higher is required.
Windows
To install DevKit along with Ruby, download DevKit from http://rubyinstaller.org/downloads/ and run it to extract it to a location. Then, execute rubydk.rb init and rubydk.rb install from that location to bind DevKit to the Ruby installations in your path.
cd <DEVKIT_INSTALL_DIR>
C:\DevKit>rubydk.rbinit
C:\DevKit>rubydk.rbinstall
C:\DevKit> gem source -a http://rubygems.org/
Linux
Ruby Version Manager (RVM) is the recommended way to manage Ruby versions and gems because it is popular, well-supported, and full-featured.
$sudo apt-get install curl$ \curl -sSL https://get.rvm.io | bash $rvm install <ruby version>rvmuse<ruby version>Mac OS
While Ruby comes pre-installed on a Mac, it is recommended to install Ruby using Ruby Version Manager (RVM) instead.
$ \curl -L https://get.rvm.io | bashcd ~/
sudo vim .bash_profilervm install <Ruby Version>Integrate the MasterPass SDK
Developers may either install the MasterPass SDK gem locally, or from RubyGems.org.
Installing gems locally
gem install mastercard_code_sdk-1.0.0.gem
gem install mastercard_masterpass_merchant-1.0.0.gem
Installing gems from RubyGems.org
gem install mastercard_masterpass_merchant [options]Installing mastercard_masterpass_merchant gem automatically installs the following dependencies:
- mastercard_core_sdk
- roxml
- logging
- mime-types
Options
--platform PLATFORM-v, --version VERSION--[no-]prereleaseConfigurations
Prior to completing this step, the developer must have uploaded or generated a PEM encoded Certificate Request File, and generated a consumer key in the Merchant Portal as part of the onboarding process.
Use the MasterCardApiConfiguration to set the environment as either sandbox or production, as shown in the code below:
MasterCardApiConfiguration.consumer_key = <Consumer Key>
MasterCardApiConfiguration.private_key = <Private Key>
MasterCardApiConfiguration.sandbox = false  #By default SANDBOX environment is set, Set sandbox to false to use Production environment.
Optionally, use the ApiConfigBuilder instead of the MasterCardApiConfig to set the environment to a value other than sandbox or production.
config = ApiConfigBuilder.new.name(<Environment Name>).consumer_key(<Consumer Key>).private_key(<Private Key>).host_url(<Host URL>).build
If you choose to use the ApiConfigBuilder to set your environment, you will need to pass your config object as a parameter when making service calls. See the RequestTokenApi service call sample code below.
RequestTokenApi service call using MasterCardApiConfig
request_token_response = RequestTokenApi.create("http://localhost/techbuzz/#/callback/checkout")
RequestTokenApi service call using ApiConfigBuilder
request_token_response = RequestTokenApi.create("http://localhost/techbuzz/#/callback/checkout", config)
Exception Handling
All error handling is implemented in the base SDK (masterpass_core_sdk). Error models are present in both the base SDK and the checkout SDK (mastercard_masterpass_merchant). The table below lists the various error classes used across the MasterPass SDK and their responsibilities.
| Gem | Class name | Class responsibility |
|---|---|---|
| mastercard_core_sdk | SDKBaseError | Base class to handle all SDK exceptions |
| mastercard_core_sdk | SDKValidationError | Used for all local validation, such as a required parameter being found null |
| mastercard_core_sdk | SDKConversionError | The exception raised when there is an error in conversion |
| mastercard_core_sdk | SDKOauthError | Used for errors in Oauth string creation |
| mastercard_core_sdk | SDKResponseError | Used to throw all remote exceptions. It returns response code and Object of type Errors. |
| mastercard_core_sdk | ErrorHandler | Wraps error response to error object |
The custom error object wraps error details such as source, description, recoverable, and reasons_code. The error object raised can be rescued as followed:
begin

  #TODO: Merchant checkout SDK call.

  rescue SDKResponseError => e

    errors = e.errors_object

    errors.error.each do |error|

     	 #Retrieve the error details(source, description, recoverable and reason_code) from Error object.

     	 	 error_message = "Source:"+ error.source +"\n" +
     	 	 "ReasonCode:"+error.reason_code +"\n" +
     	 	 "Description:"+error.description +"\n" +
     	 	 "Recoverable:"+error.recoverable

     	  puts error_message

    end

  end
Logging
Logging is implemented using gem logging, which features a hierarchical logging system, custom level names, multiple output destinations per log event, custom formatting, and other features. The developer must set the log level and the log destination output file:
require 'logging'
Logging.logger.root.level = :debug
Logging.logger.root.appenders = Logging.appenders.file(<Filename>)
PHP SDK Configurations
Prerequisites
Windows 7 Environment
- XAMPP Version 1.8.3 (This setup will install PHP and Apache)
- Microsoft Visual C++ 2008 Redistributable package
- Ensure openssl and curl extensions are enabled in php.ini.
- Apache rewrite module should be enabled via httpd.conf.
- Download required http client file guzzle.phar from https://github.com/guzzle/guzzle/releases/tag/6.0.0 and include in your file/project:
include_once 'guzzle.phar'; - For logging implementation, download Log4PHP library. Download and extract folder, take source code which is located in /src/main/php. Rename php folder to “logger” and keep it in project folder.
- Recommend using PHPStorm or similar IDE in order to access .phar contents.
OS X Environment
Coming soon
Integrate the MasterPass SDK
Include MasterCardCoreSDK.phar and MasterCardMasterPassMerchant.phar in your file/project:
include_once 'MasterCardCoreSDK.phar';
include_once 'MasterCardClientSDK.phar';
Configuration
1. Get private key
Prior to completing this step, the developer must have uploaded or generated a PEM encoded Certificate Request File, and generated a consumer key in the Merchant Portal as part of the onboarding process.
public function getPrivateKey($keyId){
	$fileName = "example-file.p12";	// path to your p12 file
	$password = "password"		// your keystore password
	if (!$certStore = file_get_contents($fileName)) {
		return 'Error: Unable to read the cert file.';
	}
	if (openssl_pkcs12_read($certStore, $certInfo, "password")) {
		return $certInfo['pkey'];
	}
	else {
		return 'Error: Unable to read the cert store.';
	}
}
2. Configure Environment
$hostUrl = "https://sandbox.api.mastercard.com";	// for sandbox
$hostUrl = "https://api.mastercard.com";		// for production

$apiConfigBuilder = new ApiConfigBuilder();
$apiConfigBuilder->setHostUrl($hostUrl);
$apiConfigBuilder->setConsumerKey("insert_consumerKey_here");
$apiConfigBuilder->setPrivateKey("insert_private_key_here");
$apiConfigBuilder->build();
Exception Handling
The following sample code demonstrates how to get the error details from an Error object.
try {
//Merchant checkout SDK call.
} catch (Exception $exception) {
	if ($exception instanceof SDKErrorResponseException) {
		$errors = $exception->getErrorResponse();
		$errorList = $errors->getError();
		foreach ($errorList as $error) {
			$errorMessage = "Source:" . $error->getSource() . "\n"
			. "ReasonCode:" . $error->getReasonCode() . "\n" . "Description:"
			. $error->getDescription() . "\n" . "Recoverable:" . $error->getRecoverable();
		}
	}
}
Logging
Implementation
include_once "logger/Logger.php";
Logger::configure("config.xml"); 		// Skip this step to load default configuration
$logger = Logger::getLogger('main');
$logger->info("Info message");
$logger->debug("Debug message");
$logger->error("Error message");
$logger->fatal("Fatal error");
Example Config.
<?xml version="1.0" encoding="utf-8" ?>
			<configuration xmlns="http://logging.apache.org/log4php/">
			    <appender name="default" class="LoggerAppenderDailyFile">
			        <layout class="LoggerLayoutPattern">
			            <param name="conversionPattern" value="%date %logger %-5level %msg%n" />
			        </layout>

			        <param name="file" value="logs/log-%s.log" />
			        <param name="datePattern" value="Y-m-d" />
			        <param name="append" value="true" />
			    </appender>

			    <root>
					<level value="TRACE" />
			        <appender_ref ref="default" />
			    </root>
			</configuration>
Overview
Before your developer can integrate MasterPass with your store, you will need to complete the signup process.
There are three different ways that this signup process can be completed:
- Merchants who want to integrate with MasterPass directly, without the assistance of a service provider, should choose the Direct Merchant Onboarding Model.
- Service providers who are integrating one merchant at a time should choose the Service Provider Merchant by Merchant Onboarding Model.
- Service providers who want to use file-based or API-based methods to onboard one or mutiple merchants at a time should select the File- and API-Based Merchant Onboarding Model.
To get started, contact your MasterPass representative to receive an invitation code. If you don't have a representative, fill out this form and we'll get back to you with an invitation code shortly.
Sign Up Process
- Depending on the onboarding model chosen, either the merchant, the service provider, or both will need to create an account with MasterPass.
- The merchant or service provider sets up the merchant business profile.
- The merchant or service provider will need to invite developers to create a developer account with MasterPass.
- The developer will need to create a developer account with MasterPass, and an account with MasterCard Developer Zone.
- The developer will need to create a consumer key request in the MasterCard Developer Zone.
- The merchant or service provider will need to approve the developer consumer key request.
- The developer will begin the integration process once the consumer key request has been approved.
Direct Merchant Onboarding Model
Merchant Account Registration
- Navigate to https://masterpass.com/SP/Merchant/Home. On the right-hand side of the page, select your country and click the Create an Account button.
- A modal window will appear. Submit your invitation code and click Continue.
- You will be asked if are registering as a merchant or as a service provider. Select Merchant and click Continue.
Next, you are required to complete the three-step Account Registration process.
4a. In the first step, Enter Account Information, fill out the fields to create your Merchant Account profile. Click Continue.
4b. Complete the second step of your Account Registration by selecting and answering two security questions. Click Continue.
4c. Finish the Account Registration process by filling out the fields in the Enter Business Information step. Click Finish.
Configure Merchant Information
When you have completed the Merchant Account Registration, you will be logged into your Merchant Account. From here, you will need to create your checkout identifier. Optionally, you may also set shipping profiles, set up loyalty programs, and enable 3-D Secure. You can manage all of these tasks using the left-hand navigation menu.
A checkout identifier is required to identify the merchant during all MasterPass transactions. It is also used to display the merchant's name and logo to consumers during checkout. To generate the checkout identifier, click Digital Assets in the navigation. Click Add Assets and follow the on-screen instructions. Upon saving, a checkout identifier will be generated.
NOTE: Merchants doing business in the US only should enter the display name and an alias, but should not upload a logo.
Configure Merchant Shipping Profiles
- Optional: If your store ships physical goods, you can set up to 25 shipping location profiles. A minimum of one shipping location profile is required. A default profile, set to your company's country of incorporation, has been created automatically for you. To create a new shipping location profile, click Shipping Profiles in the navigation.
- Click the Add Shipping Profile button.
- Select your organization and create a name for your new shipping location profile.
- Select a region from the list shown below. All countries in the region are automatically selected. To deselect a country, click the corresponding orange arrow for that region and uncheck the box next to the country to remove.
- Click the checkbox in the top right to set this profile as your default shipping profile.
- Click the Save button.
Add Merchant Loyalty Programs
Optional: If your store provides loyalty programs for your customers, you may configure these in your account. Please note that this feature is currently only available for merchants outside of the US.
- To set loyalty programs, click the Loyalty Program link in the navigation.
- Click the Add Loyalty Program button.
- Fill out the required fields and upload a logo .The recommended dimensions for a loyalty program logo are 65x60 pixels.
Merchant Enables 3-D Secure
- Optional: MasterPass supports 3-D Secure for MasterCard, Maestro and Visa cards. MasterCard uses a third party, Cardinal Commerce, as a Merchant Plug In (MPI) for the 3-D Secure step-up process. When set up, the 3-D Secure user interface will be involved for all checkout transactions for the selected card brand. To enable this feature, select Authentication Settings from the navigation menu.
- Click the Add Acquirer button.
- Select your organization and enter your acquirer ID (BIN) and assigned merchant ID. The Brand and Acquirer Name fields will be filled out automatically. Select your supported currencies under that acquirer.
- Click the Save button.
After you have added an acquirer, make sure to select the Advanced Checkout checkbox for each card brand to enable that brand.
NOTE: Select MasterCard for both MasterCard and Maestro acquirers.
NOTE: Cardinal Commerce must have your acquirer in their system before it can be active for 3-D secure. If you add an acquirer not yet submitted to Cardinal, you will see the item Unknown Acquirers in your list of acquirers. Click this item to view the link to download the Acquirer Certificate Request Form. Fill out and submit this form to Cardinal Commerce for processing. Acquirer setup should take 3–5 business days from submission of this form.
Add Developer(s) to Merchant Profile
- Next, you must add your developer(s) to the project. Click the Developers item in the navigation menu.
- Click the Add a Developer button.
You will be presented with three options. If you have hired a developer to complete your integration, select An Internal or Contracted Developer and click Next. The window will then present a form that collects contact information for the developer. Fill out this form and click Complete. The developer will receive an email containing instructions to complete their account registration.
3a. Optional: To invite another administrator to the project, select I'm not sure and click the Next button. To proceed with the invitation, click the Do this now button; otherwise, click Complete. If you did choose to add another administrator, you will be presented with a form that collects the administrator's contact information. After you submit the form, the administrator will receive an email containing instructions to complete their account registration.
3b. Optional: If you would instead prefer to invite a service provider to complete your integration, select A Third Party Platform Provider and click Next. Then, select your provider from the dropdown menu and click Complete. The service provider will receive an email containing instructions to complete their account registration. Your service provider should refer to the Service Provider Merchant By Merchant instructions to complete the integration.
Merchant Approves Key
- After the developer creates the key, the merchant approves the key by logging into their Merchant Account and clicking the Key Management navigation item. The merchant selects the developer that created the key request by clicking the corresponding orange arrow.
The merchant can then view any pending keys created by that developer. Click the Approve button to approve the pending key. The developer will receive email confirmation that the key was approved.
Direct Merchant Onboarding Model
MasterPass Developer Account Registration
- After the merchant invites you as a developer, you will receive two emails from MasterCard, one with a UserId and one with a password. Click the link in either email to sign into your MasterPass Developer Account with the credentials emailed to you.
- Follow the prompts to reset your password and set security questions.
- You will be taken to the Manage Development section of your MasterPass Developer Account. Your first task here is to register with the MasterCard Developer Zone. Click Start This Step to navigate to the Developer Zone and begin your registration.
- After your browser redirects to the Developer Zone, click the Register link in the top righthand corner.
- Fill out the fields in the modal window and click Sign Up.
- You will then see a message prompting you to check your inbox for a confirmation email. Click the activation link in the confirmation email to complete your registration.
Developer Creates Consumer Key
- As the developer, before you can begin the integration, you need to create a merchant-approved consumer key in order to interact with the MasterPass services. To begin this process, log into your Developer Zone Account.
- Select My Projects from the left-hand navigation.
Click the MasterPass Merchant Keys button on the top right-hand corner of the Get Started page. Follow the workflow on the page to generate MasterPass sandbox and production keys. Note: You will need to supply a PEM encoded Certificate Request File in order to get an API Key. You may use the CSR Generation Tool to easily create this file. Alternately, you can instead supply a PEM encoded Certificate Request File using a tool of your choice, such as OpenSSL or Java Keytool. Choose your preferred method and complete the steps.
Note: When naming your keys, we recommend adding the prefix "SBX_" or "PRD_" to make it easy to distinguish between sandbox and production keys.
Log into your MasterPass Developer Account and select Key Management in the navigation menu. You may be asked to provide your Developer Zone login credentials.
Click the Create Consumer Key button.
Select the environment and click Continue.
Next, click the Browse Keys button.
The key you created in the Developer Zone will appear as an option. Select this key and click Submit for Approval. The merchant will receive an email request to approve this pending key.
NOTE: The developer must create separate sandbox and production keys. Keys expire after one year, and have to be renewed by initiating the Developer Zone Key Renewal Process.
Service Provider Merchant by Merchant
Service Provider Account Registration
- Navigate to https://masterpass.com/SP/Merchant/Home. On the right-hand side of the page, select your country and click the Create an Account button.
- A modal window will appear. Submit your invitation code and click Continue.
- A popup window will ask if you are registering as a merchant or as a service provider. Select Service Provider and click Continue.
Next, you are required to complete the three-step Account Registration process.
4a. In the first step, Enter Account Information, fill out the fields to create your service provider account profile. Click Continue.
4b. Complete the second step of your Account Registration by selecting and answering two security questions. Click Continue.
4c. Finish the Account Registration process by filling out the fields in the Enter Business Information step. Click Finish.
Set Availability to Merchants
- When you have completed the Service Provider Account Registration, you will be logged into your Service Provider Account. Click the Account Settings menu item in the top righthand corner.
- Click the checkbox that reads, "I want merchants to be able to select me to perform their MasterPass implementation". This setting makes you visible to merchants seeking a service provider.
Add Developer(s) to Service Provider Profile
- Next, you must add the developer(s) who will integrate MasterPass on behalf of your merchant(s). Click the Developers item in the navigation menu.
- Click the Add a Developer button.
In the modal that appears, select An Internal or Contracted Developer and click Next. The window will then present a form that collects contact information for the developer. Fill out this form and click Complete. The developer will receive an email containing instructions to complete their account registration. See the Developer Account Registration step for more details.
3a. Optional: To invite another administrator to the project, select I'm not sure and click the Next button. To proceed with the invitation, click the Do this now button; otherwise, click Complete. If you did choose to add another administrator, you will be presented with a form that collects the administrator's contact information. After you submit the form, the administrator will receive an email containing instructions to complete their account registration.
Service Provider Approves Key
- After the developer creates the key, the service provider approves the key by logging into their Service Provider Account and clicking the Key Management navigation item. The service provider selects the developer that created the key request by clicking the corresponding orange arrow.
- The service provider can then view any pending keys created by that developer. Click the Approve button to approve the pending key. The developer will receive email confirmation that the key was approved.
Service Provider Merchant by Merchant
Merchant Registration and Setup
- Navigate to https://masterpass.com/SP/Merchant/Home. On the right-hand side of the page, select your country and click the Create an Account button.
- A modal window will appear. Submit your invitation code and click Continue.
- You will be asked if are registering as a merchant or as a service provider. Select Merchant and click Continue.
Next, you are required to complete the three-step Account Registration process.
4a. In the first step, Enter Account Information, fill out the fields to create your Merchant Account profile. Click Continue.
4b. Complete the second step of your Account Registration by selecting and answering two security questions. Click Continue.
4c. Finish the Account Registration process by filling out the fields in the Enter Business Information step. Click Finish.
Configure Merchant Information
When you have completed the Merchant Account Registration, you will be logged into your Merchant Account. From here, you will need to create your checkout identifier. Optionally, you may also set shipping profiles, set up loyalty programs, and enable 3-D Secure. You can manage all of these tasks using the left-hand navigation menu.
A checkout identifier is required to identify the merchant during all MasterPass transactions. It is also used to display the merchant's name and logo to consumers during checkout. To generate the checkout identifier, click Digital Assets in the navigation. Click Add Assets and follow the on-screen instructions. Upon saving, a checkout identifier will be generated.
NOTE: Merchants doing business in the US only should enter the display name and an alias, but should not upload a logo.
Configure Merchant Shipping Profiles
- Optional: If your store ships physical goods, you can set up to 25 shipping location profiles. A minimum of one shipping location profile is required. A default profile, set to your company's country of incorporation, has been created automatically for you. To create a new shipping location profile, click Shipping Profiles in the navigation.
- Click the Add Shipping Profile button.
- Select your organization and create a name for your new shipping location profile.
- Select a region from the list shown below. All countries in the region are automatically selected. To deselect a country, click the corresponding orange arrow for that region and uncheck the box next to the country to remove.
- Click the checkbox in the top right to set this profile as your default shipping profile.
- Click the Save button.
Add Merchant Loyalty Programs
Optional: If your store provides loyalty programs for your customers, you may configure these in your account. Please note that this feature is currently only available for merchants outside of the US.
- If your store provides loyalty programs, you may set loyalty programs by clicking the Loyalty Program link in the navigation.
- Click the Add Loyalty Program button.
- Fill out the required fields and upload a logo .The recommended dimensions for a loyalty program logo are 65x60 pixels.
Merchant Enables 3-D Secure
- Optional: MasterPass supports 3-D Secure for MasterCard, Maestro and Visa cards. MasterCard uses a third party, Cardinal Commerce, as a Merchant Plug In (MPI) for the 3-D Secure step-up process. When set up, the 3-D Secure user interface will be involved for all checkout transactions for the selected card brand. To enable this feature, select Authentication Settings from the navigation menu.
- Click the Add Acquirer button.
- Select your organization and enter your acquirer ID (BIN) and assigned merchant ID. The Brand and Acquirer Name fields will be filled out automatically. Select your supported currencies under that acquirer.
- Click the Save button.
After you have added an acquirer, make sure to select the Advanced Checkout checkbox for each card brand to enable that brand.
NOTE: Select MasterCard for both MasterCard and Maestro acquirers.
NOTE: Cardinal Commerce must have your acquirer in their system before it can be active for 3-D secure. If you add an acquirer not yet submitted to Cardinal, you will see the item Unknown Acquirers in your list of acquirers. Click this item to view the link to download the Acquirer Certificate Request Form. Fill out and submit this form to Cardinal Commerce for processing. Acquirer setup should take 3–5 business days from submission of this form.
Invite Service Provider to Perform Integration
- Next, you will select a service provider to perform your MasterPass integration. Click the Developers item in the navigation, and then click the Add a Developer button.
- Select A third party platform provider and then click Next.
- Select the service provider from the drop down list and then click Complete. The service provider will receive an email from MasterPass inviting them to handle the integration on your behalf.
Service Provider Merchant by Merchant
MasterPass Developer Account Registration
- After the service provider invites you as a developer, you will receive two emails from MasterCard, one with a UserId and one with a password. Click the link in either email to sign into your MasterPass Developer Account with the credentials emailed to you.
- Follow the prompts to reset your password and set security questions.
- Next, you will be taken to the Manage Development section of your MasterPass Developer Account. Your first task here is to register with the MasterCard Developer Zone, where you can view integration documentation and generate developer keys. Click Start This Step to navigate to the Developer Zone and begin your registration.
- After your browser redirects to the Developer Zone, click the Register link in the top righthand corner.
- Fill out the fields in the modal window and click Sign Up.
- You will then see a message prompting you to check your inbox for a confirmation email. Click the activation link in the confirmation email to complete your registration.
Developer Creates Consumer Key
- As the developer, before you can begin the integration, you need to create a consumer key in order to interact with the MasterPass services. To begin this process, log into the Developer Zone.
- Select My Projects from the left-hand navigation.
Click the MasterPass Merchant Keys button on the top right-hand corner of the Get Started page. Follow the workflow on the page to generate MasterPass sandbox and production keys. Note: You will need to supply a PEM encoded Certificate Request File in order to get an API Key. You may use the CSR Generation Tool to easily create this file. Alternately, you can instead supply a PEM encoded Certificate Request File using a tool of your choice, such as OpenSSL or Java Keytool. Choose your preferred method and complete the steps.
Log into your MasterPass Developer Account and select Key Management in the navigation menu. You may be asked to provide your Developer Zone login credentials.
Click the Create Consumer Key button.
Select the environment and click Continue.
Next, click the Browse Keys button.
The key you created in the Developer Zone will appear as an option. Select this key and click Submit for Approval. The service provider will receive an email request to approve this pending key.
NOTE: You need to create separate sandbox and production keys. Keys expire after one year, and have to be renewed by initiating the Developer Zone Key Renewal Process.
Service Provider File and API Onboarding Model
Service Provider Account Registration
- Navigate to https://masterpass.com/SP/Merchant/Home. On the right-hand side of the page, select your country and click the Create an Account button.
- A modal window will appear. Submit your invitation code and click Continue.
- A popup window will ask if you are registering as a merchant or as a service provider. Select Service Provider and click Continue.
Next, you are required to complete the three-step Account Registration process.
4a. In the first step, Enter Account Information, fill out the fields to create your service provider account profile. Click Continue.
4b. Complete the second step of your Account Registration by selecting and answering two security questions. Click Continue.
4c. Finish the Account Registration process by filling out the fields in the Enter Business Information step. Click Finish.
Service Provider Sets Merchant Shipping Locations
- Optional: If any of your merchants ship physical goods, you can set up shipping location profiles to specify where they can ship. To create a new shipping location profile, log into your Service Provider Account and click Shipping Profiles in the navigation.
- Click the Add Shipping Profile button.
- Select your organization and create a name for your new shipping location profile.
- Select a region from the list shown below. All countries in the region are automatically selected. To deselect a country, click the corresponding orange arrow for that region and uncheck the box next to the country to remove.
- Click the checkbox in the top right to set this profile as your default shipping profile.
- Click the Save button.
Add Developer(s) to Service Provider Profile
- Next, you must add the developer(s) who will integrate MasterPass on behalf of your merchant(s). Log into your Service Provider Account and click the Developers item in the navigation menu.
- Click the Add a Developer button.
In the modal that appears, select An Internal or Contracted Developer and click Next. The window will then present a form that collects contact information for the developer. Fill out this form and click Complete. The developer will receive an email containing instructions to complete their account registration. See the MasterPass Developer Account Registration step for more details.
3a. Optional: To invite another administrator to the project, select I'm not sure and click the Next button. To proceed with the invitation, click the Do this now button; otherwise, click Complete. If you did choose to add another administrator, you will be presented with a form that collects the administrator's contact information. After you submit the form, the administrator will receive an email containing instructions to complete their account registration.
Service Provider Approves Key
- After the developer creates the key, the service provider approves the key by logging into their Service Provider Account and clicking the Key Management navigation item. The service provider selects the developer that created the key request by clicking the corresponding orange arrow.
- The service provider can then view any pending keys created by that developer. Click the Approve button to approve the pending key. The developer will receive email confirmation that the key was approved.
Service Provider File and API Onboarding Model
MasterPass Developer Account Registration
- After the service provider invites you as a developer, you will receive two emails from MasterCard, one with a UserId and one with a password. Click the link in either email to sign into your MasterPass Developer Account with the credentials emailed to you.
- Follow the prompts to reset your password and set security questions.
- Next, you will be taken to the Manage Development section of your MasterPass Developer Account. Your first task here is to register with the MasterCard Developer Zone, where you can view integration documentation and generate developer keys. Click Start This Step to navigate to the Developer Zone and begin your registration.
- After your browser redirects to the Developer Zone, click the Register link in the top righthand corner.
- Fill out the fields in the modal window and click Sign Up.
- You will then see a message prompting you to check your inbox for a confirmation email. Click the activation link in the confirmation email to complete your registration.
Developer Creates Consumer Key
- As the developer, before you can begin the integration, you need to create a consumer key in order to interact with the MasterPass services. To begin this process, log into the Developer Zone.
- Select My Projects from the left-hand navigation.
Click the MasterPass Merchant Keys button on the top right-hand corner of the Get Started page. Follow the workflow on the page to generate MasterPass sandbox and production keys. Note: You will need to supply a PEM encoded Certificate Request File in order to get an API Key. You may use the CSR Generation Tool to easily create this file. Alternately, you can instead supply a PEM encoded Certificate Request File using a tool of your choice, such as OpenSSL or Java Keytool. Choose your preferred method and complete the steps.
Log into your MasterPass Developer Account and select Key Management in the navigation menu. You may be asked to provide your Developer Zone login credentials.
Click the Create Consumer Key button.
Select the environment and click Continue.
Next, click the Browse Keys button.
The key you created in the Developer Zone will appear as an option. Select this key and click Submit for Approval. The service provider will receive an email request to approve this pending key.
NOTE: You need to create separate sandbox and production keys. Keys expire after one year, and have to be renewed by initiating the Developer Zone Key Renewal Process.
File-Based Onboarding
Developers can upload XML files to add, update, or delete merchant records. Use the file templates referenced here - schema files and swagger file? and view the sample below to upload and create a project.
Create Merchant Record
Sign into your MasterPass Developer Account. Navigate to the Merchant File Upload menu item.
Click the Upload button in the top right.
First, you must add a merchant record. All merchant elements shown below (SPMerchantId, Action, Profile, CheckoutBrand) are required when adding a new merchant. Set the Action to C.
<MerchantUpload>
    <Merchant>
        <SPMerchantId>SPMerchantId1</SPMerchantId>
        <Action>C</Action>
        <Profile>
            <Name>SPMerch58401</Name>
            <DoingBusAs>SPMerch58401</DoingBusAs>
            <Address>
                <City>SPMerch58401</City>
                <Country>US</Country>
                <Line1>898 SPMerch58401</Line1>
                <PostalCode>78090</PostalCode>
            </Address>
            <Phone>
                <CountryCode>1</CountryCode>
                <Number>3734517671</Number>
            </Phone>
            <Acquirer>
                <Id>292978156</Id>
                <Name>QATESTACQ</Name>
                <AssignedMerchantId>MCQA1</AssignedMerchantId>
            </Acquirer>
        </Profile>
        <CheckoutBrand>
            <Name>SPMerch58401</Name>
            <DisplayName>SPMerch58401</DisplayName>
            <ProductionUrl>https://SPMerch58401.com</ProductionUrl>
            <SandboxUrl>https://SPMerch58401.com</SandboxUrl>
        </CheckoutBrand>
    </Merchant>
</MerchantUpload>
To upload your XML file, click the Upload button.
Click Choose File to select your XML file. Enter a brief description of the file, and click the Upload button.
When the file is finished processing, a message will display, indicating the number of successful and failed records processed. You will also receive an email notifying you that the file has been processed.
Click the Download Result File button to view the results of the XML file processing. This file contains the merchant ID and checkout identifier for each uploaded merchant.
Optional - Add Reward Program
You may add a reward program for customers to use during MasterPass transactions. Please note that this feature is only available to MasterPass consumers outside of the United States.
<MerchantUpload>
    <Merchant>
        <SPMerchantId>SPMerchantId1</SPMerchantId>
        ...
        <RewardProgram>
            <Name>RAMATSR9</Name>
            <Id>RAMATSR9</Id>
            <LogoUrl>http://www.mastercard.us/_globalAssets/img/nav/navl_logo_mastercardcom.png</LogoUrl>
        </RewardProgram>
        ...
    </Merchant>
</MerchantUpload>
Optional - Add 3D-S Authentication
Add 3D-S authentication to this merchant account to allow your merchant to complete the 3-D Secure protocol during MasterPass transactions.
NOTE: You may not have two Merchant Acquirers with both the same currency and the same CardBrand.
<MerchantUpload>
    <Merchant>
        <SPMerchantId>SPMerchantId1</SPMerchantId>
        ...
        <AuthOption>
            <CardBrand>MASTER_CARD</CardBrand>
            <Type>ALL_TRANSACTIONS</Type>
        </AuthOption>
        <MerchantAcquirer>
            <Acquirer>
                <Id>523078</Id>
                <Name>CartaSI</Name>
                <AssignedMerchantId>001</AssignedMerchantId>
            </Acquirer>
            <MerchantAcquirerBrand>
                <CardBrand>MASTER_CARD</CardBrand>
                <Currency>EUR</Currency>
            </MerchantAcquirerBrand>
        </MerchantAcquirer>
        ...
    </Merchant>
</MerchantUpload>
Optional - Validate XML Files Before Submitting
If you prefer, you may verify your file submission for schema and business rules validation before uploading it. This will allow you to identify and fix any errors before submitting your file for processing. Click the Validate File button, select your file, and click Validate Now.
1a. If your file successfully follows all rules, you will receive the message "Validation complete, no errors found."
1b. Otherwise, you will be instructed to fix your error(s) and resubmit the file. To view the errors, click the Download Result File button.
XML Schema Validation Error Message Example
<MerchantDownload>
    <Summary>
        <ErrorText>1337: String Length for
Merchant_Upload.MerchantAcquirer.Acquirer.Name needs to be greater than 1 and
less than or equal to 250 characters</ErrorText>
    </Summary>
</MerchantDownload>
Business Rule Error Codes
Error Codes Description Sample Error Message VBMU0100 Validate that a provided checkout brand data element exists. VBMU0100: minimum of one checkoutBrand required : merchant-spMerchantId=STGQA09 VBMU0101 Validate that a merchant with action code "C" does not include any brandings with checkout identifiers. VBMU0101: checkoutBrand cannot include checkout identifiers on create : checkoutId=a4a6w4vnkdeazi6c6ynxk1i6cdd6e2aki VBMU0102 Validate that a provided checkout identifier exists when using Action Code "U" within CheckoutBrandĘdata element. VBMU0102: checkoutBrand does not exist : checkoutId=a4d6x344fquvhi8ix0 v6n1i8udwvar1zv6 VBMU0110 For Merchant Action Code “U” and Merchant Acquirer Action Code “C," validate the merchant acquirer doesn’t exist in Cardinal Commerce. VBMU0110: invalid merchant acquirer actionCode during create : actionCode=U VBMU0111 For Merchant Action Code “U” and Merchant Acquirer Action Codes “U” or “D," validate the merchant acquirer does exist in Cardinal Commerce. VBMU0111: invalid merchant acquirer action code: U or D VBMU0112 Validate Profile data element exists in the MerchantUpload XML file. VBMU0112: merchant create requires profile for spMerchantId=STGQA09 VBMU0120 Validate Reward Program Name is Unique VBMU0120: reward program name must be unique: RAMAQA312, spMerchantId=STGQA09 VBMU0121 Validate Reward Program ID is Unique VBMU0121: reward program id must be unique: RAMAQA312, spMerchantId=STGQA09 VBMU0130 Validate a Merchant Acquirer is provisioned in Cardinal for a specified CardBrand. VBMU0130: no merchant acquirer for cardbrand type=MAESTRO VBMU0140 Validate SPMerchantID is Unique when applying Merchant Action Code of “C.” VBMU0140: merchantId already exists for serviceProviderId=305960760 and spMerchantId=STGQA03 VBMU0141 Validate Merchant Acquirer ID is unique when applying Merchant Action Code of “C.” VBMU0141: invalid merchant acquirer actionCode=C : acquirer record already exists : acquirerId=523078 assignedMerchantId=001test cardBrand=MASTERCARD currencyCode=EUR VBMU0142 Validate Merchant Acquirer ID exists in Cardinal Commerce. VBMU0142: acquirer id does not exist : id=88848888, cardBrand=MASTERCARD VBMU0150 Validate SPMerchantID exists for Merchant Action Codes "U" or "D". VBMU0150: merchant not found for update or delete VBMU0160 Validate the SPMerchantID is alphanumeric and less than 25 characters. VBMU0160: invalid assignedMerchantId=STGAPI21_******5681M, must be alpha-numeric and less than 25 characters in length VBMU0170 Validate the Merchant Acquirer CurrencyCode is supported by Cardinal Commerce. VBMU0170: unsupported currency code : USD VBMU0171 Validate two merchant acquirers of the same CardBrand are not configured to support the same currency by Cardinal Commerce. VBMU0171: acquirer card brand currency code pairing must be unique
Single Merchant API Onboarding
Services providers who have already completed the File-Based Onboarding step at least once have the option to use API-based onboarding to create, update, and delete merchant records directly to production. Providers may use the Single Merchant API Service, along with a production consumer key and merchant checkout id to update merchant records in real time.
- After your XML file from the File-Based Onboarding process has been submitted, confirm that an Open Feed Project appears at the top of the project list of your Developer Account.
- Get the Project ID from the Open Feed Project.
- Using the same schema as you used in the File-Based Onboarding, create your XML file. Only a single merchant may be added or updated at a time.
- Follow the example shown below to make a Single Merchant API service call.
Use the following parameters to make your HTTP request:
- checkoutproject: Your Project ID from Step 2. Use the URL format https://api.mastercard.com/masterpasspsp/v6/checkoutproject/projectID/file.
- oauth_body_hash: SHA1 hash of the message body.
- oauth_consumer_key: Your consumer key that was generated during the onboarding process.
- oauth_nonce: Unique alphanumeric string generated from code.
- oauth_signature_method: OAuth signature method. Value should be RSA-SHA1.
- oauth_timestamp: Current timestamp.
- oauth_version: OAuth version. Value should be 1.0.
Signature Base String - Single Merchant API
POST&https%3A%2F%2F.api.mastercard.com%2Fmasterpasspsp%2Fv6%2Fcheckoutproject%2
F[0-9]+%2Ffile&oauth_body_hash%3D8K9uhveZjVdZW8AIYiXpR70KCtk%253D%26oauth_consumer_ke%3DcLb0
tKkEJhGTITp_6ltDIibO5Wgbx4rIldeXM_jRd4b0476c%2521414f4859446c4a366c726a32747469
5545332b353049303d%26oauth_nonce%3DDEAEB1CD-CA03-405D-A7B4-
B4263CB5A305%26oauth_signature_method%3DRSASHA1%26oauth_timestamp%3D1380049711%26oauth_version%3D1.0
HTTP Request Example - Single Merchant API
POST&https%3A%2F%2Fapi.mastercard.com%2Fitf%2Fmasterpasspsp%2Fv6%2Fcheckoutproj
ect%2F285415568%2Ffile&oauth_body_hash%3DCWrePW5A%252BKMde7DxI5mBp
NVr%252Fok%253D%26oauth_consumer_key%3DewdIBgRu1i6uCoFjuWGU4BNGDb0Udvh26N_mYah6
8efd62f9%252141496b7a452f35764d715752755579436b70467871476f3d%26oauth_nonce%3D1
7157164231493%26oauth_signature_method%3DRSASHA1%26oauth_timestamp%3D1432749165%26oauth_version%3D1.0
Merchant Upload Request - Single Merchant API
<?xml version="1.0" encoding="UTF-8"?>
<MerchantUpload>
 <Merchant>
 <SPMerchantId>STGQA09</SPMerchantId>
 <Action>C</Action>
 <CheckoutBrand>
 <Name>STGQA09</Name>
 <DisplayName>STGQA09</DisplayName>
 <ProductionUrl>https://STGQA09.com</ProductionUrl>
  <SandboxUrl>https://STGQA09.com</SandboxUrl>
 <LogoUrl>http://www.mastercard.us/_globalAssets/img/nav/-
navl_logo_mastercardcom.png</LogoUrl>
 </CheckoutBrand>
 </Merchant>
</MerchantUpload>
Optional - Single Merchant API Validation
If desired, service providers may also use the Validate Merchant API Service to verify their submissions. This will allow you to identify and fix any errors before submitting your file for processing. Use the following sample code to assist you in making your Validation API call.
Signature Base String - Single Merchant API Validation
POST&https%3A%2F%2F.api.mastercard.com%2Fmasterpasspsp%2Fv6%2Fcheckoutproject%2
F[0-9]+%2Ffile&oauth_body_hash%3D8K9uhveZjVdZW8AIYiXpR70KCtk%253D%26oauth_consumer_ke%3DcLb0
tKkEJhGTITp_6ltDIibO5Wgbx4rIldeXM_jRd4b0476c%2521414f4859446c4a366c726a32747469
5545332b353049303d%26oauth_nonce%3DDEAEB1CD-CA03-405D-A7B4-
B4263CB5A305%26oauth_signature_method%3DRSASHA1%26oauth_timestamp%3D1380049711%26oauth_version%3D1.0
HTTP Request Example - Single Merchant API Validation
POST&https%3A%2F%2Fapi.mastercard.com%2Fitf%2Fmasterpasspsp%2Fv6%2Fcheckoutproj
ect%2F285415568%2Ffile%2Fvalidation&oauth_body_hash%3DCWrePW5A%252BKMde7DxI5mBp
NVr%252Fok%253D%26oauth_consumer_key%3DewdIBgRu1i6uCoFjuWGU4BNGDb0Udvh26N_mYah6
8efd62f9%252141496b7a452f35764d715752755579436b70467871476f3d%26oauth_nonce%3D1
7157164231493%26oauth_signature_method%3DRSASHA1%26oauth_timestamp%3D1432749165%26oauth_version%3D1.0
Merchant Upload Response - Validation
<?xml version="1.0" encoding="UTF-8"?>
<ValidateFileResponse>
 <ValidatedMerchant>
 <MerchantId>STGQA09</MerchantId>
 <ErrorText>VBMU0140: merchantId already exists for
serviceProviderId=285415466 and spMerchantId=STGQA09</ErrorText>
 </ValidatedMerchant>
</ValidateFileResponse>
Add jQuery to your site
<script src=”https://ajax.googleapis.com/ajax/libs/jquery/1.10.2/jquery.min.js” type=”text/javascript”></script>
Add MasterPass Client Javascript to the page appropriate to the desired MasterPass environment
<!-- Sandbox -->
<script src=”https://sandbox.static.masterpass.com/dyn/js/switch/integration/
MasterPass.client.js” type=”text/javascript”></script>

<!-- Production -->
<script src=”https://static.masterpass.com/dyn/js/switch/integration/
MasterPass.client.js” type=”text/javascript”></script>
Initiate Lightbox
Standard Checkout
// initiate lightbox
MasterPass.client.checkout({
    requestToken : configurationState.requestToken,
    callbackUrl : configurationState.callbackUrl,
    successCallback : internalSuccessCallback,
    cancelCallback : internalCancelCallback,
    failureCallback : internalFailureCallback,
    suppressShippingAddressEnable : false,
    merchantCheckoutId : configurationState.checkoutId.checkoutId,
    allowedCardTypes : [“visa”, “master”, “amex”, ”discover”],
    loyaltyEnabled : true,
    allowedLoyaltyPrograms : [“reward1”, “reward3”],
    shippingLocationProfile : “SP-0001,default”,
    requestBasicCheckout : configurationState.authLevelBasic,
    version : configurationState.xmlVersion
};
Pair during Standard Checkout
// initiate lightbox
MasterPass.client.checkout({
    requestToken : configurationState.requestToken,
    callbackUrl : configurationState.callbackUrl,
    successCallback : internalSuccessCallback,
    cancelCallback : internalCancelCallback,
    failureCallback : internalFailureCallback,
    suppressShippingAddressEnable : false,
    merchantCheckoutId : configurationState.checkoutId.checkoutId,
    allowedCardTypes : [“visa”, “master”, “amex”, ”discover”],
    loyaltyEnabled : true,
    allowedLoyaltyPrograms : [“reward1”, “reward3”],
    shippingLocationProfile : “SP-0001,default”,
    requestBasicCheckout : configurationState.authLevelBasic,
    version : configurationState.xmlVersion,
    requestPairing : true,
    requestExpressCheckout : false,  // set to true when pairing for Express Checkout
    requestedDataTypes : [“PROFILE”, “ADDRESS”, “CARD”, “REWARD_PROGRAM”],
    pairingRequestToken : "insert_pairing_request_token"

};
Pair
// initiate lightbox
MasterPass.client.checkout({
    requestToken : configurationState.requestToken,
    callbackUrl : configurationState.callbackUrl,
    successCallback : internalSuccessCallback,
    cancelCallback : internalCancelCallback,
    failureCallback : internalFailureCallback,
    suppressShippingAddressEnable : false,
    merchantCheckoutId : configurationState.checkoutId.checkoutId,
    allowedCardTypes : [“visa”, “master”, “amex”, ”discover”],
    loyaltyEnabled : true,
    allowedLoyaltyPrograms : [“reward1”, “reward3”],
    shippingLocationProfile : “SP-0001,default”,
    requestBasicCheckout : configurationState.authLevelBasic,
    version : configurationState.xmlVersion,
    requestPairing : true,
    requestExpressCheckout : false,  // set to true when pairing for Express Checkout
    requestedDataTypes : [“PROFILE”, “ADDRESS”, “CARD”, “REWARD_PROGRAM”],
    pairingRequestToken : "insert_pairing_request_token"

};
<script src=”https://ajax.googleapis.com/ajax/libs/jquery/1.10.2/jquery.min.js” type=”text/javascript”></script><!-- Sandbox -->
<script src=”https://sandbox.static.masterpass.com/dyn/js/switch/integration/
MasterPass.client.js” type=”text/javascript”></script>
<!-- Production -->
<script src=”https://static.masterpass.com/dyn/js/switch/integration/
MasterPass.client.js” type=”text/javascript”></script>Initiate Lightbox
Standard Checkout
// initiate lightbox
MasterPass.client.checkout({
requestToken : configurationState.requestToken,
callbackUrl : configurationState.callbackUrl,
successCallback : internalSuccessCallback,
cancelCallback : internalCancelCallback,
failureCallback : internalFailureCallback,
suppressShippingAddressEnable : false,
merchantCheckoutId : configurationState.checkoutId.checkoutId,
allowedCardTypes : [“visa”, “master”, “amex”, ”discover”],
loyaltyEnabled : true,
allowedLoyaltyPrograms : [“reward1”, “reward3”],
shippingLocationProfile : “SP-0001,default”,
requestBasicCheckout : configurationState.authLevelBasic,
version : configurationState.xmlVersion
};Pair during Standard Checkout
// initiate lightbox
MasterPass.client.checkout({
requestToken : configurationState.requestToken,
callbackUrl : configurationState.callbackUrl,
successCallback : internalSuccessCallback,
cancelCallback : internalCancelCallback,
failureCallback : internalFailureCallback,
suppressShippingAddressEnable : false,
merchantCheckoutId : configurationState.checkoutId.checkoutId,
allowedCardTypes : [“visa”, “master”, “amex”, ”discover”],
loyaltyEnabled : true,
allowedLoyaltyPrograms : [“reward1”, “reward3”],
shippingLocationProfile : “SP-0001,default”,
requestBasicCheckout : configurationState.authLevelBasic,
version : configurationState.xmlVersion,
requestPairing : true,
requestExpressCheckout : false, // set to true when pairing for Express Checkout
requestedDataTypes : [“PROFILE”, “ADDRESS”, “CARD”, “REWARD_PROGRAM”],
pairingRequestToken : "insert_pairing_request_token"
};Pair
// initiate lightbox
MasterPass.client.checkout({
requestToken : configurationState.requestToken,
callbackUrl : configurationState.callbackUrl,
successCallback : internalSuccessCallback,
cancelCallback : internalCancelCallback,
failureCallback : internalFailureCallback,
suppressShippingAddressEnable : false,
merchantCheckoutId : configurationState.checkoutId.checkoutId,
allowedCardTypes : [“visa”, “master”, “amex”, ”discover”],
loyaltyEnabled : true,
allowedLoyaltyPrograms : [“reward1”, “reward3”],
shippingLocationProfile : “SP-0001,default”,
requestBasicCheckout : configurationState.authLevelBasic,
version : configurationState.xmlVersion,
requestPairing : true,
requestExpressCheckout : false, // set to true when pairing for Express Checkout
requestedDataTypes : [“PROFILE”, “ADDRESS”, “CARD”, “REWARD_PROGRAM”],
pairingRequestToken : "insert_pairing_request_token"
};Standard Checkout Integration
1. Call Request Token Service
Call the Request Token Service to generate the request token that will be used to invoke the MasterPass Lightbox. Pass a callback_url that the browser will redirect to when the Lightbox closes.
The Request Token Service must be called before the consumer clicks the Buy with MasterPass button.
String callback_url = "https://www.somemerchant.com/checkoutconfirm.htm";
RequestTokenResponse requestTokenResponse = RequestTokenApi.create(callback_url);
String request_token = requestTokenResponse.getOauthToken();
2. Call Shopping Cart Service
The Shopping Cart Service enables shopping cart data to be displayed to users as they proceed through the MasterPass login and checkout. This service requires the request token from Step 1.
Each ShoppingCartItem must have a description, quantity, and value. Value is represented as an integer (for example, USD 100.00 is 10000), and is calculated as the cost of a single item multiplied by the quantity of that item. A ShoppingCartItem may also have an optional imageURL.
The Shopping Cart Service must be called before the consumer clicks the Buy with MasterPass button.
//Create an instance of ShoppingCartRequest
ShoppingCartRequest shoppingCartRequest = new ShoppingCartRequest()
		.shoppingCart(new ShoppingCart()
			.subtotal(11900L)
			.currencyCode("USD")
			.shoppingCartItem(new ShoppingCartItem()
				.value(1900L)
				.description("This is one item")
				.quantity(1))

			.shoppingCartItem(new ShoppingCartItem()
				.imageURL("https://somemerchant.com/someimage")
				.value(10000L)
				.description("Five items")
				.quantity(5)))
		.oAuthToken(request_token);

//Call the ShoppingCartService with required params
ShoppingCartResponse shoppingCartResponse = ShoppingCartApi.create(shoppingCartRequest);
3. Call Merchant Initialization Service
The Merchant Initialization Service is used to secure Lightbox connections between the merchant site and MasterPass. The originUrl identifies the origin of the page that will initialize the Lightbox. This service requires the request token from Step 1.
The Merchant Initialization Service must be called before the consumer clicks the Buy with MasterPass button.
//Create an instance of MerchantInitializationRequest
MerchantInitializationRequest merchantInitializationRequest = new MerchantInitializationRequest()
        .originUrl("https://somemerchant.com")
        .oAuthToken(request_token);

//Call the MerchantInitializationApi with required params
MerchantInitializationResponse merchantInitializationResponse = MerchantInitializationApi.create(merchantInitializationRequest);
4. Invoke MasterPass UI (Lightbox) for checkout
On the Checkout Page of the merchant's website, add the Buy with MasterPass button to your HTML (see MasterPass Branding to customize size and locale).
<img src="https://www.mastercard.com/mc_us/wallet/img/en/US/mcpp_wllt_btn_chk_147x034px.png"/>Import jQuery, and add the MasterPass Integration Script for either the sandbox or the production environment
<!-- url to sandbox MasterPass Lightbox -->
 <script type="text/javascript" src=" https://sandbox.masterpass.com/
lightbox/Switch/integration/MasterPass.client.js "></script>
 <!-- url to production MasterPass Lightbox -->
 <!-- <script type="text/javascript" src=" https://masterpass.com/lightbox/
Switch/integration/MasterPass.client.js "></script> -->
 <!-- url to jquery 1.10.2 -->
 <script type="text/javascript" src="https://ajax.googleapis.com/ajax/libs/
jquery/1.10.2/jquery.min.js"></script>
Invoke the MasterPass lightbox when the user clicks the Buy with MasterPass button.
<script type="text/javascript" language="Javascript">
    MasterPass.client.checkout({
         "requestToken":"insert_request_token_here",                      //required
         "callbackUrl":"http://www.somemerchant.com/checkoutcomplete.htm",//required
         "merchantCheckoutId":"insert_checkout_id_here",                  //required
         "allowedCardTypes":["master,amex,diners,discover,maestro,visa"], //optional
         "version":"v6",                                                  //optional
         "successCallback": function(mpLightboxResponse){ ... },          //optional
         "failureCallback": function(mpLightboxResponse){ ... },          //optional
         "cancelCallback": function(mpLightboxResponse){ ... }            //optional
    });
</script>- requestToken: The request token generated in Step 1.
- callbackUrl: The merchant URL to which the browser will redirect when the Lightbox closes.
- merchantCheckoutId: The unique checkout identifier obtained during the Merchant Onboarding process.
- allowedCardTypes: Card types accepted by the merchant (default is all card types).
- version: MasterPass API version (default is v6).
- successCallback: The function that will be called if the MasterPass flow ends successfully.
- failureCallback: The function that will be called if the MasterPass flow ends in failure.
- cancelCallback: The function that will be called if the user cancels the MasterPass flow.
5. Redirect to callback URL or call callback function
After the consumer completes checkout, MasterPass returns data to the merchant. By default, MasterPass redirects the browser to the callback URL, returning the data via URL parameters. Optionally, if callback functions were provided in Step 4, MasterPass returns control to the page that initiated the Lightbox, and the data is passed to the callback function.
Under certain conditions, the MasterPass UI may be forced to run in Full Screen display instead of launching the Lightbox. When this occurs, the browser will be redirected to the callback URL when the MasterPass flow is complete, even if callback functions were supplied.
On Success
On Success, MasterPass returns the following parameters:
- mpstatus: String that indicates whether the MasterPass flow resulted in success, failure, or cancel.
- checkout_resource_url: The API URL that will be used to retrieve checkout information in Step 7.
- oauth_verifier: The verifier token that is used to retrieve the access token in Step 6.
- oauth_token: The request token that is used to retrieve the access token in Step 6. This token has the same value as the request token that is generated in Step 1.
Example Callback URL (Success)
http://www.somemerchant.com/checkoutcomplete.htm
?mpstatus=success
&checkout_resource_url=https%3A%2F%2Fsandbox.api.mastercard.com%2Fmasterpass\%2Fv6%2Fcheckout%2F10189977%3Fwallet%3Dphw
&oauth_verifier=6c50838e31b7441e6eafa2229385452889255b13
&oauth_token=d6fa60984308aebb6183d44fb9688fb9dc8332dc
Example Callback URL (Cancel)
http://www.somemerchant.com/checkoutcomplete.htm
?mpstatus=cancel
Example Callback URL (Failure)
http://www.somemerchant.com/checkoutcomplete.htm
?mpstatus=failure
Example Callback Function (Success)
function handleCallbackSuccess (data) {
    callYourServerWith(data.oauth_token, data.oauth_verifier, data.checkout_resource_url);
}
6. Call Access Token Service
If the checkout was completed successfully, call the Access Token Service to retrieve an access token. You will need the request token and the verifier token received in Step 5.
AccessTokenResponse accessTokenResponse = AccessTokenApi.create(request_token, verifier_token);
String accessToken = accessTokenResponse.getOauthToken();
7. Retrieve payment, shipping data, rewards and 3DS details
Use the checkout resource URL received in Step 5 and the access token from Step 6 to retrieve the constomer’s payment, shipping, reward and 3-D Secure information from MasterPass.
int startIndex = checkoutResourceUrl.lastIndexOf('/') + 1;
int endIndex = checkoutResourceUrl.indexOf('?') != -1 ?
		checkoutResourceUrl.indexOf('?')
		: checkoutResourceUrl.length();
String checkoutId = checkoutResourceUrl.substring(startIndex, endIndex);

Checkout checkout = CheckoutApi.show(checkoutId, accessToken);

Card card = checkout.getCard();
Address billingAddress = card.getBillingAddress();
Contact contact = checkout.getContact();
AuthenticationOptions authOptions = checkout.getAuthenticationOptions();
String preCheckoutTransactionId = checkout.getPreCheckoutTransactionId();
RewardProgram rewardProgram = checkout.getRewardProgram();
ShippingAddress shippingAddress = checkout.getShippingAddress();
String transactionId = checkout.getTransactionId();
String walletId = checkout.getWalletID();
8. Process payment through a payment gateway
Using the information retrieved in Step 7, process the payment through the merchant's payment gateway.
9. Log transactions with MasterPass
After the payment has been processed in Step 8, make a service call to communicate the result of the transaction to MasterPass.
//Create an instance of MerchantTransactions
MerchantTransactions request = new MerchantTransactions()
        .merchantTransactions(new MerchantTransaction()
            .transactionId("4549794")                         //from Step 7
            .purchaseDate("2014-08-01T14:52:57.539-05:00")
            .expressCheckoutIndicator(false)                //from Step 7
            .approvalCode("888888")                         // authorization code returned by payment gateway
            .transactionStatus(TransactionStatusEnum.valueOf("Success"))
            .orderAmount(1229L)                              // total charged to card
            .preCheckoutTransactionId("a4a6x55-rgb1c5-hyaqkemj-1-hybxhplo-947")
            .currency("USD")
            .consumerKey("0zMKpm0nFtUv8lLXT97jDRo2bp4vNF8MFYyt3R5R87e3f3f4!414b48675861677159682b563745776b593652377939673d")); //generated during onboarding process

//Call the PostbackService with required params
MerchantTransactions response = PostbackApi.create(request);
Standard Checkout Integration
1. Call Request Token Service
Call the Request Token Service to generate the request token that will be used to invoke the MasterPass Lightbox. Pass a callback_url that the browser will redirect to when the Lightbox closes.
The Request Token Service must be called before the consumer clicks the Buy with MasterPass button.
string callback_url = "https://www.somemerchant.com/checkoutconfirm.htm";
RequestTokenResponse requestTokenResponse = RequestTokenApi.Create(callback_url);
string request_token = requestTokenResponse.OauthToken;
2. Call Shopping Cart Service
The Shopping Cart Service enables shopping cart data to be displayed to users as they proceed through the MasterPass login and checkout. This service requires the request token from Step 1.
Each ShoppingCartItem must have a description, quantity, and value. Value is represented as an integer (for example, USD 100.00 is 10000), and is calculated as the cost of a single item multiplied by the quantity of that item. A ShoppingCartItem may also have an optional imageURL.
The Shopping Cart Service must be called before the consumer clicks the Buy with MasterPass button.
//Create an instance of ShoppingCartRequest
ShoppingCartRequest shoppingCartRequest = new ShoppingCartRequest();
ShoppingCart shoppingCart = new ShoppingCart();
List<ShoppingCartItem> shoppingCartItems = new List<ShoppingCartItem>();
shoppingCartItems.Add(new ShoppingCartItem
{
    Value = 1900L,
    Description = "This is one item",
    Quantity = 1
});
shoppingCartItems.Add(new ShoppingCartItem
{
    ImageURL = "https://somemerchant.com/someimage",
    Value = 10000L,
    Description = "Five items",
    Quantity = 5
});

shoppingCart.Subtotal = 11900L;
shoppingCart.CurrencyCode = "USD";
shoppingCart.ShoppingCartItem = shoppingCartItems;

shoppingCartRequest.ShoppingCart = shoppingCart;
shoppingCartRequest.OAuthToken = request_token;

//Call the ShoppingCartService with required params
ShoppingCartResponse shoppingCartResponse = ShoppingCartApi.Create(shoppingCartRequest);
3. Call Merchant Initialization Service
The Merchant Initialization Service is used to secure Lightbox connections between the merchant site and MasterPass. The originUrl identifies the origin of the page that will initialize the Lightbox. This service requires the request token from Step 1.
The Merchant Initialization Service must be called before the consumer clicks the Buy with MasterPass button.
//Create an instance of MerchantInitializationRequest
MerchantInitializationRequest merchantInitializationRequest = new MerchantInitializationRequest
{
    OriginUrl = "https://somemerchant.com",
    OAuthToken = request_token
};

//Call the MerchantInitializationApi with required params
MerchantInitializationResponse merchantInitializationResponse = MerchantInitializationApi.Create(merchantInitializationRequest);
4. Invoke MasterPass UI (Lightbox) for checkout
On the Checkout Page of the merchant's website, add the Buy with MasterPass button to your HTML (see MasterPass Branding to customize size and locale).
<img src="https://www.mastercard.com/mc_us/wallet/img/en/US/mcpp_wllt_btn_chk_147x034px.png"/>Import jQuery, and add the MasterPass Integration Script for either the sandbox or the production environment
<!-- url to sandbox MasterPass Lightbox -->
 <script type="text/javascript" src=" https://sandbox.masterpass.com/
lightbox/Switch/integration/MasterPass.client.js "></script>
 <!-- url to production MasterPass Lightbox -->
 <!-- <script type="text/javascript" src=" https://masterpass.com/lightbox/
Switch/integration/MasterPass.client.js "></script> -->
 <!-- url to jquery 1.10.2 -->
 <script type="text/javascript" src="https://ajax.googleapis.com/ajax/libs/
jquery/1.10.2/jquery.min.js"></script>
Invoke the MasterPass lightbox when the user clicks the Buy with MasterPass button.
<script type="text/javascript" language="Javascript">
    MasterPass.client.checkout({
         "requestToken":"insert_request_token_here",                      //required
         "callbackUrl":"http://www.somemerchant.com/checkoutcomplete.htm",//required
         "merchantCheckoutId":"insert_checkout_id_here",                  //required
         "allowedCardTypes":["master,amex,diners,discover,maestro,visa"], //optional
         "version":"v6",                                                  //optional
         "successCallback": function(mpLightboxResponse){ ... },          //optional
         "failureCallback": function(mpLightboxResponse){ ... },          //optional
         "cancelCallback": function(mpLightboxResponse){ ... }            //optional
    });
</script>- requestToken: The request token generated in Step 1.
- callbackUrl: The merchant URL to which the browser will redirect when the Lightbox closes.
- merchantCheckoutId: The unique checkout identifier obtained during the Merchant Onboarding process.
- allowedCardTypes: Card types accepted by the merchant (default is all card types).
- version: MasterPass API version (default is v6).
- successCallback: The function that will be called if the MasterPass flow ends successfully.
- failureCallback: The function that will be called if the MasterPass flow ends in failure.
- cancelCallback: The function that will be called if the user cancels the MasterPass flow.
5. Redirect to callback URL or call callback function
After the consumer completes checkout, MasterPass returns data to the merchant. By default, MasterPass redirects the browser to the callback URL, returning the data via URL parameters. Optionally, if callback functions were provided in Step 4, MasterPass returns control to the page that initiated the Lightbox, and the data is passed to the callback function.
Under certain conditions, the MasterPass UI may be forced to run in Full Screen display instead of launching the Lightbox. When this occurs, the browser will be redirected to the callback URL when the MasterPass flow is complete, even if callback functions were supplied.
On Success
On Success, MasterPass returns the following parameters:
- mpstatus: String that indicates whether the MasterPass flow resulted in success, failure, or cancel.
- checkout_resource_url: The API URL that will be used to retrieve checkout information in Step 7.
- oauth_verifier: The verifier token that is used to retrieve the access token in Step 6.
- oauth_token: The request token that is used to retrieve the access token in Step 6. This token has the same value as the request token that is generated in Step 1.
Example Callback URL (Success)
http://www.somemerchant.com/checkoutcomplete.htm
?mpstatus=success
&checkout_resource_url=https%3A%2F%2Fsandbox.api.mastercard.com%2Fmasterpass\%2Fv6%2Fcheckout%2F10189977%3Fwallet%3Dphw
&oauth_verifier=6c50838e31b7441e6eafa2229385452889255b13
&oauth_token=d6fa60984308aebb6183d44fb9688fb9dc8332dc
Example Callback URL (Cancel)
http://www.somemerchant.com/checkoutcomplete.htm
?mpstatus=cancel
Example Callback URL (Failure)
http://www.somemerchant.com/checkoutcomplete.htm
?mpstatus=failure
Example Callback Function (Success)
function handleCallbackSuccess (data) {
    callYourServerWith(data.oauth_token, data.oauth_verifier, data.checkout_resource_url);
}
6. Call Access Token Service
If the checkout was completed successfully, call the Access Token Service to retrieve an access token. You will need the request token and the verifier token received in Step 5.
AccessTokenResponse accessTokenResponse = AccessTokenApi.Create(request_token, verifier_token);
string accessToken = accessTokenResponse.OauthToken;
7. Retrieve payment, shipping data, rewards and 3DS details
Use the checkout resource URL received in Step 5 and the access token from Step 6 to retrieve the constomer’s payment, shipping, reward and 3-D Secure information from MasterPass.
string checkoutId = checkoutResourceUrl.IndexOf('?') != -1 ? checkoutResourceUrl.Substring(checkoutResourceUrl.LastIndexOf('/') + 1).Split('?')[0] : checkoutResourceUrl.Substring(checkoutResourceUrl.LastIndexOf('/') + 1);

Checkout checkout = CheckoutApi.Show(checkoutId, accessToken);

Card card = checkout.Card;
Address billingAddress = card.BillingAddress;
Contact contact = checkout.Contact;
AuthenticationOptions authOptions = checkout.AuthenticationOptions;
string preCheckoutTransactionId = checkout.PreCheckoutTransactionId;
RewardProgram rewardProgram = checkout.RewardProgram;
ShippingAddress shippingAddress = checkout.ShippingAddress;
string transactionId = checkout.TransactionId;
string walletId = checkout.WalletID;
8. Process payment through a payment gateway
Using the information retrieved in Step 7, process the payment through the merchant's payment gateway.
9. Log transactions with MasterPass
After the payment has been processed in Step 8, make a service call to communicate the result of the transaction to MasterPass.
//Create an instance of MerchantTransactions
MerchantTransactions objMerchantTransactions = new MerchantTransactions();
List<MerchantTransaction> merchantTransactions = new List<MerchantTransaction>();
MerchantTransaction merchantTransaction = new MerchantTransaction
{
    TransactionId = "4549794", // from Step 7
    PurchaseDate = "2014-08-01T14:52:57.539-05:00",
    ExpressCheckoutIndicator = false,
    ApprovalCode = "888888",  // authorization code returned by payment gateway
    TransactionStatus = "Success",
    OrderAmount = 1229L, // total charged to card
    PreCheckoutTransactionId = "a4a6x55-rgb1c5-hyaqkemj-1-hybxhplo-947",
    Currency = "USD",
    ConsumerKey = "0zMKpm0nFtUv8lLXT97jDRo2bp4vNF8MFYyt3R5R87e3f3f4!414b48675861677159682b563745776b593652377939673d" //generated during onboarding process
};

merchantTransactions.Add(merchantTransaction);

objMerchantTransactions._MerchantTransactions = merchantTransactions;

//Call the PostbackService with required params
MerchantTransactions response = PostbackApi.Create(objMerchantTransactions);
Standard Checkout Integration
1. Call Request Token Service
Call the Request Token Service to generate the request token that will be used to invoke the MasterPass Lightbox. Pass a callback_url that the browser will redirect to when the Lightbox closes.
The Request Token Service must be called before the consumer clicks the Buy with MasterPass button.
callback_url = "https://www.somemerchant.com/checkoutconfirm.htm"
request_token_response = MastercardCoreSdk::Api::RequestTokenApi.create(callback_url)
request_token = request_token_response.oauth_token;
2. Call Shopping Cart Service
The Shopping Cart Service enables shopping cart data to be displayed to users as they proceed through the MasterPass login and checkout. This service requires the request token from Step 1.
Each shopping_cart_item must have a description, quantity, and value. Value is represented as an integer (for example, USD 100.00 is 10000), and is calculated as the cost of a single item multiplied by the quantity of that item. A shopping_cart_item may also have an optional image_url.
The Shopping Cart Service must be called before the consumer clicks the Buy with MasterPass button.
shopping_cart_request = MastercardMasterpassMerchant::ShoppingCartRequest.new(
    :o_auth_token => request_token,
    :shopping_cart => MastercardMasterpassMerchant::ShoppingCart.new(
        :currency_code => 'USD',
        :subtotal => '11900',
        :shopping_cart_item => [
            MastercardMasterpassMerchant::ShoppingCartItem.new(
                :description => 'One Item',
                :quantity => 1,
                :value => 1900
            ),
            MastercardMasterpassMerchant::ShoppingCartItem.new(
                :description => 'Five of an Item',
                :quantity => 5,
                :value => 10000,
                :image_url => 'http://somemerchant.com/someimage'
            )
        ]
    )
)

shopping_cart_response = MastercardMasterpassMerchant::Api::ShoppingCartApi.create(shopping_cart_request)
3. Call Merchant Initialization Service
The Merchant Initialization Service is used to secure Lightbox connections between the merchant site and MasterPass. The origin_url identifies the origin of the page that will initialize the Lightbox. This service requires the request token from Step 1.
The Merchant Initialization Service must be called before the consumer clicks the Buy with MasterPass button.
merchant_init_request = MastercardMasterpassMerchant::MerchantInitializationRequest.new(
    :o_auth_token => request_token,
    :origin_url => 'https://somemerchant.com'
)

merchant_init_response = MastercardMasterpassMerchant::Api::MerchantInitializationApi.create(merchant_init_request)
4. Invoke MasterPass UI (Lightbox) for checkout
On the Checkout Page of the merchant's website, add the Buy with MasterPass button to your HTML (see MasterPass Branding to customize size and locale).
<img src="https://www.mastercard.com/mc_us/wallet/img/en/US/mcpp_wllt_btn_chk_147x034px.png"/>Import jQuery, and add the MasterPass Integration Script for either the sandbox or the production environment
<!-- url to sandbox MasterPass Lightbox -->
 <script type="text/javascript" src=" https://sandbox.masterpass.com/
lightbox/Switch/integration/MasterPass.client.js "></script>
 <!-- url to production MasterPass Lightbox -->
 <!-- <script type="text/javascript" src=" https://masterpass.com/lightbox/
Switch/integration/MasterPass.client.js "></script> -->
 <!-- url to jquery 1.10.2 -->
 <script type="text/javascript" src="https://ajax.googleapis.com/ajax/libs/
jquery/1.10.2/jquery.min.js"></script>
Invoke the MasterPass lightbox when the user clicks the Buy with MasterPass button.
<script type="text/javascript" language="Javascript">
    MasterPass.client.checkout({
         "requestToken":"insert_request_token_here",                      //required
         "callbackUrl":"http://www.somemerchant.com/checkoutcomplete.htm",//required
         "merchantCheckoutId":"insert_checkout_id_here",                  //required
         "allowedCardTypes":["master,amex,diners,discover,maestro,visa"], //optional
         "version":"v6",                                                  //optional
         "successCallback": function(mpLightboxResponse){ ... },          //optional
         "failureCallback": function(mpLightboxResponse){ ... },          //optional
         "cancelCallback": function(mpLightboxResponse){ ... }            //optional
    });
</script>- requestToken: The request token generated in Step 1.
- callbackUrl: The merchant URL to which the browser will redirect when the Lightbox closes.
- merchantCheckoutId: The unique checkout identifier obtained during the Merchant Onboarding process.
- allowedCardTypes: Card types accepted by the merchant (default is all card types).
- version: MasterPass API version (default is v6).
- successCallback: The function that will be called if the MasterPass flow ends successfully.
- failureCallback: The function that will be called if the MasterPass flow ends in failure.
- cancelCallback: The function that will be called if the user cancels the MasterPass flow.
5. Redirect to callback URL or call callback function
After the consumer completes checkout, MasterPass returns data to the merchant. By default, MasterPass redirects the browser to the callback URL, returning the data via URL parameters. Optionally, if callback functions were provided in Step 4, MasterPass returns control to the page that initiated the Lightbox, and the data is passed to the callback function.
Under certain conditions, the MasterPass UI may be forced to run in Full Screen display instead of launching the Lightbox. When this occurs, the browser will be redirected to the callback URL when the MasterPass flow is complete, even if callback functions were supplied.
On Success
On Success, MasterPass returns the following parameters:
- mpstatus: String that indicates whether the MasterPass flow resulted in success, failure, or cancel.
- checkout_resource_url: The API URL that will be used to retrieve checkout information in Step 7.
- oauth_verifier: The verifier token that is used to retrieve the access token in Step 6.
- oauth_token: The request token that is used to retrieve the access token in Step 6. This token has the same value as the request token that is generated in Step 1.
Example Callback URL (Success)
http://www.somemerchant.com/checkoutcomplete.htm
?mpstatus=success
&checkout_resource_url=https%3A%2F%2Fsandbox.api.mastercard.com%2Fmasterpass\%2Fv6%2Fcheckout%2F10189977%3Fwallet%3Dphw
&oauth_verifier=6c50838e31b7441e6eafa2229385452889255b13
&oauth_token=d6fa60984308aebb6183d44fb9688fb9dc8332dc
Example Callback URL (Cancel)
http://www.somemerchant.com/checkoutcomplete.htm
?mpstatus=cancel
Example Callback URL (Failure)
http://www.somemerchant.com/checkoutcomplete.htm
?mpstatus=failure
Example Callback Function (Success)
function handleCallbackSuccess (data) {
    callYourServerWith(data.oauth_token, data.oauth_verifier, data.checkout_resource_url);
}
6. Call Access Token Service
If the checkout was completed successfully, call the Access Token Service to retrieve an access token. You will need the request token and the verifier token received in Step 5.
access_token_response = MastercardCoreSdk::Api::AccessTokenApi.create(verifier_token, request_token)
access_token = access_token_response.oauth_token
}
7. Retrieve payment, shipping data, rewards and 3DS details
Use the checkout resource URL received in Step 5 and the access token from Step 6 to retrieve the constomer’s payment, shipping, reward and 3-D Secure information from MasterPass.
start_index = checkout_resource_url.rindex('/') + 1
end_index = checkout_resource_url.index('?').nil? ? -1 : checkout_resource_url.index('?')
path_id = checkout_resource_url[start_index..end_index]

checkout = MastercardMasterpassMerchant::Api::CheckoutApi.show(path_id, access_token)
card = checkout.card
billing_address = card.billing_address
contact = checkout.contact
auth_options = checkout.authentication_options
precheckout_transaction_id = checkout.pre_checkout_transaction_id
reward_program = checkout.reward_program
shipping_address = checkout.shipping_address
transaction_id = checkout.transaction_id
wallet_id = checkout.wallet_id
8. Process payment through a payment gateway
Using the information retrieved in Step 7, process the payment through the merchant's payment gateway.
9. Log transactions with MasterPass
After the payment has been processed in Step 8, make a service call to communicate the result of the transaction to MasterPass.
merchant_transactions = MastercardMasterpassMerchant::MerchantTransactions.new(
    :merchant_transactions => [
        MastercardMasterpassMerchant::MerchantTransaction.new(
            :transaction_id => 4549794,
            :consumer_key => '0zMKpm0nFtUv8lLXT97jDRo2bp4vNF8MFYyt3R5R87e3f3f4!414b48675861677159682b563745776b593652377939673d',
            :currency => 'USD',
            :order_amount => 1800,
            :transaction_status => 'Success',
            :approval_code => '888888',
            :pre_checkout_transaction_id => 'a4a6x55-rgb1c5-hyaqkemj-1-hybxhplo-947',
            :express_checkout_indicator => false,
            :purchase_date => '2016-06-23T15:09:32+00:00'
        )
    ]
)

merchant_trans_response = MastercardMasterpassMerchant::Api::PostbackApi.create(merchant_transactions)
Standard Checkout Integration
1. Call Request Token Service
Call the Request Token Service to generate the request token that will be used to invoke the MasterPass Lightbox. Pass a callbackUrl that the browser will redirect to when the Lightbox closes.
The Request Token Service must be called before the consumer clicks the Buy with MasterPass button.
$callbackUrl = "https://www.somemerchant.com/checkoutconfirm.htm";
$requestTokenResponse = RequestTokenApi::create($callbackUrl);
$requestToken = $requestTokenResponse->getOauthToken();
2. Call Shopping Cart Service
The Shopping Cart Service enables shopping cart data to be displayed to users as they proceed through the MasterPass login and checkout. This service requires the request token from Step 1.
Each ShoppingCartItem must have a description, quantity, and value. Value is represented as an integer (for example, USD 100.00 is 10000), and is calculated as the cost of a single item multiplied by the quantity of that item. A ShoppingCartItem may also have an optional ImageURL.
The Shopping Cart Service must be called before the consumer clicks the Buy with MasterPass button.
//Build Out ShoppingCartRequest object
$shoppingCartItem1 = new ShoppingCartItem(
	array(
		"Value" => 700,
		"Description" => "This is one item",
		"Quantity" => 1,
		"ImageURL" => "https://somemerchant.com/someimage"
	)
);

$shoppingCartItem2 = new ShoppingCartItem(
	array(
		"Value" => 300,
		"Description" => "This is another item",
		"Quantity" => 1,
		"ImageURL" => "https://somemerchant.com/someotherimage"
		)
);

$shoppingCart = new ShoppingCart(
	array(
		"CurrencyCode" => "USD",
		"Subtotal" => 1000,
		"ShoppingCartItem" => array($shoppingCartItem1, $shoppingCartItem2)
	)
);

$shoppingCartRequest = new ShoppingCartRequest(
	array(
		"OAuthToken" => $requestToken,
		"OriginUrl" => $callbackDomain,
		"ShoppingCart" => $shoppingCart,
	)
);

//Call the ShoppingCartService with required params
$shoppingCartResponse = ShoppingCartApi::create($shoppingCartRequest);
3. Call Merchant Initialization Service
The Merchant Initialization Service is used to secure Lightbox connections between the merchant site and MasterPass. The OriginUrl identifies the origin of the page that will initialize the Lightbox. This service requires the request token from Step 1.
The Merchant Initialization Service must be called before the consumer clicks the Buy with MasterPass button.
//Create an instance of MerchantInitializationRequest
$merchantInitializationRequest = new MerchantInitializationRequest(
	array(
		"OriginUrl" => "https://somemerchant.com",
		"OAuthToken" => $requestToken
	)
);

//Call the MerchantInitializationApi with required params
$merchantInitializationResponse = MerchantInitializationApi::create($merchantInitializationRequest);
4. Invoke MasterPass UI (Lightbox) for checkout
On the Checkout Page of the merchant's website, add the Buy with MasterPass button to your HTML (see MasterPass Branding to customize size and locale).
<img src="https://www.mastercard.com/mc_us/wallet/img/en/US/mcpp_wllt_btn_chk_147x034px.png"/>Import jQuery, and add the MasterPass Integration Script for either the sandbox or the production environment
<!-- url to sandbox MasterPass Lightbox -->
 <script type="text/javascript" src=" https://sandbox.masterpass.com/
lightbox/Switch/integration/MasterPass.client.js "></script>
 <!-- url to production MasterPass Lightbox -->
 <!-- <script type="text/javascript" src=" https://masterpass.com/lightbox/
Switch/integration/MasterPass.client.js "></script> -->
 <!-- url to jquery 1.10.2 -->
 <script type="text/javascript" src="https://ajax.googleapis.com/ajax/libs/
jquery/1.10.2/jquery.min.js"></script>
Invoke the MasterPass lightbox when the user clicks the Buy with MasterPass button.
<script type="text/javascript" language="Javascript">
    MasterPass.client.checkout({
         "requestToken":"insert_request_token_here",                      //required
         "callbackUrl":"http://www.somemerchant.com/checkoutcomplete.htm",//required
         "merchantCheckoutId":"insert_checkout_id_here",                  //required
         "allowedCardTypes":["master,amex,diners,discover,maestro,visa"], //optional
         "version":"v6",                                                  //optional
         "successCallback": function(mpLightboxResponse){ ... },          //optional
         "failureCallback": function(mpLightboxResponse){ ... },          //optional
         "cancelCallback": function(mpLightboxResponse){ ... }            //optional
    });
</script>- requestToken: The request token generated in Step 1.
- callbackUrl: The merchant URL to which the browser will redirect when the Lightbox closes.
- merchantCheckoutId: The unique checkout identifier obtained during the Merchant Onboarding process.
- allowedCardTypes: Card types accepted by the merchant (default is all card types).
- version: MasterPass API version (default is v6).
- successCallback: The function that will be called if the MasterPass flow ends successfully.
- failureCallback: The function that will be called if the MasterPass flow ends in failure.
- cancelCallback: The function that will be called if the user cancels the MasterPass flow.
5. Redirect to callback URL or call callback function
After the consumer completes checkout, MasterPass returns data to the merchant. By default, MasterPass redirects the browser to the callback URL, returning the data via URL parameters. Optionally, if callback functions were provided in Step 4, MasterPass returns control to the page that initiated the Lightbox, and the data is passed to the callback function.
Under certain conditions, the MasterPass UI may be forced to run in Full Screen display instead of launching the Lightbox. When this occurs, the browser will be redirected to the callback URL when the MasterPass flow is complete, even if callback functions were supplied.
On Success
On Success, MasterPass returns the following parameters:
- mpstatus: String that indicates whether the MasterPass flow resulted in success, failure, or cancel.
- checkout_resource_url: The API URL that will be used to retrieve checkout information in Step 7.
- oauth_verifier: The verifier token that is used to retrieve the access token in Step 6.
- oauth_token: The request token that is used to retrieve the access token in Step 6. This token has the same value as the request token that is generated in Step 1.
Example Callback URL (Success)
http://www.somemerchant.com/checkoutcomplete.htm
?mpstatus=success
&checkout_resource_url=https%3A%2F%2Fsandbox.api.mastercard.com%2Fmasterpass\%2Fv6%2Fcheckout%2F10189977%3Fwallet%3Dphw
&oauth_verifier=6c50838e31b7441e6eafa2229385452889255b13
&oauth_token=d6fa60984308aebb6183d44fb9688fb9dc8332dc
Example Callback URL (Cancel)
http://www.somemerchant.com/checkoutcomplete.htm
?mpstatus=cancel
Example Callback URL (Failure)
http://www.somemerchant.com/checkoutcomplete.htm
?mpstatus=failure
Example Callback Function (Success)
function handleCallbackSuccess (data) {
    callYourServerWith(data.oauth_token, data.oauth_verifier, data.checkout_resource_url);
}
6. Call Access Token Service
If the checkout was completed successfully, call the Access Token Service to retrieve an access token. You will need the request token and the verifier token received in Step 5.
$accessTokenResponse = AccessTokenApi::create(requestToken, verifierToken);
$accessToken = $accessTokenResponse->getOauthToken();
7. Retrieve payment, shipping data, rewards and 3DS details
Use the checkout resource URL received in Step 5 and the access token from Step 6 to retrieve the constomer’s payment, shipping, reward and 3-D Secure information from MasterPass.
$explodedURL = explode("/", $checkoutResourceUrl);
$checkoutId = array_pop($explodedURL);
if(strpos($checkoutId, "?") !== false){
    $checkoutId = explode($checkoutId, "?")[0];
}

$logger->info($checkoutId);

$checkout = CheckoutApi::show($checkoutId, $accessToken);

$card = $checkout->getCard();
$billingAddress = $card->getBillingAddress();
$contact = $checkout->getContact();
$authOptions = checkout->getAuthenticationOptions();
$preCheckoutTransactionId = checkout->getPreCheckoutTransactionId();
$rewardProgram = checkout->getRewardProgram();
$shippingAddress = checkout->getShippingAddress();
$transactionId = checkout->getTransactionId();
$walletId = checkout->getWalletID();
8. Process payment through a payment gateway
Using the information retrieved in Step 7, process the payment through the merchant's payment gateway.
9. Log transactions with MasterPass
After the payment has been processed in Step 8, make a service call to communicate the result of the transaction to MasterPass.
//Create an instance of MerchantTransactions

$merchantTransaction = new MerchantTransaction(
	array(
		"TransactionId" => "4549794",
		"ConsumerKey" => "0zMKpm0nFtUv8lLXT97jDRo2bp4vNF8MFYyt3R5R87e3f3f4!414b48675861677159682b563745776b593652377939673d", //generated during onboarding process
		"Currency" => "USD",
		"OrderAmount" => 500, // total charged to card
		"TransactionStatus" => "Success",
		"ApprovalCode" => "888888", // authorization code returned by payment gateway
		"PrecheckoutTransactionId" => "a4a6x55-rgb1c5-hyaqkemj-1-hybxhplo-947",
		"ExpressCheckoutIndicator" => false,
		"PurchaseDate" => date("Y/m/d H:i:s")
	)
);
$request = new MerchantTransactions(array("MerchantTransactions" => array($merchantTransaction)));

//Call the PostbackService with required params
$response = PostbackApi::create($request);Connected Checkout Integration
Pairing During Checkout
1. Call Request Token Service (2 times)
Call the Request Token Service twice. The first call generates a pairing request token, which will be used to gain the long access token needed to pair the consumer's wallet and merchant account.
The second call generates a checkout request token that will be used to invoke the MasterPass Lightbox. Pass a callback_url that the browser will redirect to when the Lightbox closes.
The Request Token Service calls must be made before the consumer clicks the Buy with MasterPass button.
String callback_url = "https://www.somemerchant.com/checkoutconfirm.htm";

RequestTokenResponse pairingResponse = RequestTokenApi.create(callback_url);
String pairing_request_token = pairingResponse.getOauthToken();

RequestTokenResponse checkoutResponse = RequestTokenApi.create(callback_url);
String checkout_request_token = checkoutResponse.getOauthToken();
2. Call Shopping Cart Service
The Shopping Cart Service enables shopping cart data to be displayed to users as they proceed through the MasterPass login and checkout. This service requires the checkout request token from Step 1.
Each ShoppingCartItem must have a description, quantity, and value. Value is represented as an integer (for example, USD 100.00 is 10000), and is calculated as the cost of a single item multiplied by the quantity of that item. A ShoppingCartItem may also have an optional imageURL.
The Shopping Cart Service must be called before the consumer clicks the Buy with MasterPass button.
//Create an instance of ShoppingCartRequest
ShoppingCartRequest shoppingCartRequest = new ShoppingCartRequest()
		.shoppingCart(new ShoppingCart()
			.subtotal(11900L)
			.currencyCode("USD")
			.shoppingCartItem(new ShoppingCartItem()
				.value(1900L)
				.description("This is one item")
				.quantity(1))

			.shoppingCartItem(new ShoppingCartItem()
				.imageURL("https://somemerchant.com/someimage")
				.value(10000L)
				.description("Five items")
				.quantity(5)))
		.oAuthToken(request_token);

//Call the ShoppingCartService with required params
ShoppingCartResponse shoppingCartResponse = ShoppingCartApi.create(shoppingCartRequest);
3. Call Merchant Initialization Service
The Merchant Initialization Service is used to secure Lightbox connections between the merchant and MasterPass. The originUrl identifies the origin of the page that will initialize the Lightbox. This service requires the checkout request token from Step 1.
The Merchant Initialization Service must be called before the consumer clicks the Buy with MasterPass button.
//Create an instance of MerchantInitializationRequest
MerchantInitializationRequest merchantInitializationRequest = new MerchantInitializationRequest()
		.originUrl("https://somemerchant.com")
		.oAuthToken(checkout_request_token);

//Call the MerchantInitializationApi with required params
MerchantInitializationResponse merchantInitializationResponse = MerchantInitializationApi.create(merchantInitializationRequest);
4. Invoke MasterPass UI (Lightbox) for checkout
On the Checkout Page of the merchant's website, add the Buy with MasterPass button to your HTML (see MasterPass Branding to customize size and locale).
<img src="https://www.mastercard.com/mc_us/wallet/img/en/US/mcpp_wllt_btn_chk_147x034px.png"/>Import jQuery, and add the MasterPass Integration Script for either the sandbox or the production environment.
<!-- url to jquery 1.10.2 -->
  <script type="text/javascript" src="https://ajax.googleapis.com/ajax/libs/
jquery/1.10.2/jquery.min.js"></script>

<!-- url to sandbox MasterPass Lightbox -->
  <script type="text/javascript" src=" https://sandbox.masterpass.com/
lightbox/Switch/integration/MasterPass.client.js "></script>

<!-- url to production MasterPass Lightbox -->
  <!-- <script type="text/javascript" src=" https://masterpass.com/lightbox/
Switch/integration/MasterPass.client.js "></script> -->
Invoke the MasterPass lightbox when the user clicks the Buy with MasterPass button.
<script type="text/javascript" language="Javascript">
    MasterPass.client.checkout({
       "requestPairing":true,                                                      //required
       "requestToken":"insert_checkout_request_token_here",                        //required
       "pairingRequestToken":"insert_pairing_request_token_here",                  //required
       "callbackUrl":"http://www.somemerchant.com/checkoutcomplete.htm",           //required
       "merchantCheckoutId":"insert_checkout_id_here",                             //required
       "requestedDataTypes":["REWARD_PROGRAM", "ADDRESS", "PROFILE", "CARD"],      //required
       "allowedCardTypes":["master","amex","diners","discover","maestro","visa"],  //optional
       "version":"v6",                                                             //optional
       "successCallback": function(mpLightboxResponse){ ... },                     //optional
       "failureCallback": function(mpLightboxResponse){ ... },                     //optional
       "cancelCallback": function(mpLightboxResponse){ ... }                       //optional
    });
</script>- requestPairing: To enable pairing, value must be true.
- requestToken: The checkout request token generated in Step 1.
- pairingRequestToken: The pairing request token generated in Step 1.
- callbackUrl: The merchant URL to which the browser will redirect when the Lightbox closes.
- merchantCheckoutId: The unique checkout identifier obtained during the merchant onboarding process.
- requestedDataTypes: The data types the merchant requests for pairing. PROFILE and CARD are required.
- allowedCardTypes: Card types accepted by the merchant (default is all card types).
- version: MasterPass API version (default is v6).
- successCallback: The function that will be called if the MasterPass Lightbox flow ends successfully.
- failureCallback: The function that will be called if the MasterPass Lightbox flow ends in failure.
- cancelCallback: The function that will be called if the user cancels the MasterPass Lightbox flow.
5. Redirect to callback URL or call callback function
After the consumer completes checkout, MasterPass returns data to the merchant. By default, MasterPass redirects the browser to the callback URL, returning the data via URL parameters. Optionally, if callback functions were provided in Step 4, MasterPass returns control to the page that initiated the Lightbox, and the data is passed to the callback function.
Under certain conditions, the MasterPass UI may be forced to run in Full Screen display instead of launching the Lightbox. When this occurs, the browser will redirect to the callback URL when the MasterPass flow is complete, even if callback functions were supplied.
On success
On success, MasterPass returns the following parameters:
- mpstatus: String that indicates whether the MasterPass flow resulted in success, failure, or cancel.
- checkout_resource_url: The API URL that will be used to retrieve checkout information in Step 7.
- oauth_verifier: The checkout verifier token that is used to retrieve the access token in Step 6.
- oauth_token: The checkout request token that is used to retrieve the access token in Step 6. This token has the same value as the checkout request token that is generated in Step 1.
- pairing_verifier: The pairing verifier token that is used to retrieve the long access token in Step 6.
- pairing_token: The pairing request token used to retrieve the long access token in Step 6.
Example Callback URL (Success)
http://www.somemerchant.com/checkoutcomplete.htm
?mpstatus=success
&checkout_resource_url=https%3A%2F%2Fstage.api.mastercard.com%2Fmasterpass%2Fv6%2Fcheckout%2F
10706241%3Fwallet%3Dphw
&oauth_verifier=fbe45bcad30299c93765b1fb4b45bab208f84458
&oauth_token=d9382e34e0721a68a9952110cecdf89517e45498
&pairing_verifier=6c50838e31b7441e6eafa2229385452889255b13
&pairing_token=35b2a0cf87f8160fcb5d24996a12edb7cce4c530
Example Callback URL (Cancel)
http://www.somemerchant.com/checkoutcomplete.htm
?mpstatus=cancel
Example Callback URL (Failure)
http://www.somemerchant.com/checkoutcomplete.htm
?mpstatus=failure
6. Call Access Token Service (2 times)
If the checkout was completed successfully, the next step is to make two Access Token Service calls. The first call uses the checkout request token and the checkout verifier token from Step 5 to retrieve a checkout access token. This checkout access token will be used in the next step to retrieve checkout data from the current transaction.
The second call uses the pairing request token and the pairing verifier token from Step 5 to retrieve a long access token. The long access token will be used to retrieve pre-checkout data for this consumer in future transactions.
AccessTokenResponse checkoutAccessTokenResponse = AccessTokenApi.create(oauth_checkout_request_token, oauth_checkout_verifier_token);
String checkout_access_token = checkoutAccessTokenResponse.getOauthToken();

AccessTokenResponse longAccessTokenResponse = AccessTokenApi.create(oauth_pairing_request_token, oauth_pairing_verifier_token);
String long_access_token = longAccessTokenResponse.getOauthToken(); // store for future requests
7. Retrieve payment, shipping data, rewards and 3DS details
Use the checkout resource URL received in Step 5 and the checkout access token from Step 6 to retrieve the consumer’s payment, shipping, reward and 3-D Secure information from MasterPass.
int startIndex = checkoutResourceUrl.lastIndexOf('/') + 1;
int endIndex = checkoutResourceUrl.indexOf('?') != -1 ?
		checkoutResourceUrl.indexOf('?')
		: checkoutResourceUrl.length();
String checkoutId = checkoutResourceUrl.substring(startIndex, endIndex);

Checkout checkout = CheckoutApi.show(checkoutId, accessToken);

Card card = checkout.getCard();
Address billingAddress = card.getBillingAddress();
Contact contact = checkout.getContact();
AuthenticationOptions authOptions = checkout.getAuthenticationOptions();
String preCheckoutTransactionId = checkout.getPreCheckoutTransactionId();
RewardProgram rewardProgram = checkout.getRewardProgram();
ShippingAddress shippingAddress = checkout.getShippingAddress();
String transactionId = checkout.getTransactionId();
String walletId = checkout.getWalletID();
8. Process payment through a payment gateway
Using the data retrieved in Step 7, process the payment through the merchant's payment gateway.
9. Log transactions with MasterPass
After the payment has been processed in Step 8, make a service call to communicate the result of the transaction to MasterPass.
//Create an instance of MerchantTransactions
MerchantTransactions request = new MerchantTransactions()
		.merchantTransactions(new MerchantTransaction()
			.transactionId("4549794")                        // from Step 7
			.purchaseDate("2014-08-01T14:52:57.539-05:00")
			.expressCheckoutIndicator(false)                 // from Step 7
			.approvalCode("888888")                          // authorization code returned by payment gateway
			.transactionStatus(TransactionStatusEnum.valueOf("Success"))
			.orderAmount(1229L)                              // total charged to card
			.preCheckoutTransactionId("a4a6x55-rgb1c5-hyaqkemj-1-hybxhplo-947")
			.currency("USD")
			.consumerKey("0zMKpm0nFtUv8lLXT97jDRo2bp4vNF8MFYyt3R5R87e3f3f4!414b48675861677159682b563745776b593652377939673d")); //generated during onboarding process

//Call the PostbackService with required params
MerchantTransactions response = PostbackApi.create(request);
Pairing without Checkout
1. Call Request Token Service
Call the Request Token Service to generate the pairing request token that will be used to invoke the MasterPass Lightbox. Pass a callback_url that the browser will redirect to when the Lightbox closes.
The Request Token Service must be called before the consumer clicks the Connect with MasterPass button.
String callback_url = "https://www.somemerchant.com/pairingcomplete.htm";
RequestTokenResponse requestTokenResponse = RequestTokenApi.create(callback_url);
String pairing_request_token = requestTokenResponse.getOauthToken();
2. Call Merchant Initialization Service
The Merchant Initialization Service is used to secure Lightbox connections between the merchant site and MasterPass. The originUrl identifies the origin of the page that will initialize the Lightbox. This service requires the pairing request token from Step 1.
//Create an instance of MerchantInitializationRequest
MerchantInitializationRequest merchantInitializationRequest = new MerchantInitializationRequest()
		.originUrl("https://somemerchant.com")
		.oAuthToken(pairing_request_token);

//Call the MerchantInitializationApi with required params
MerchantInitializationResponse merchantInitializationResponse = MerchantInitializationApi.create(merchantInitializationRequest);
3. Invoke MasterPass UI (Lightbox) for pairing
Add the Connect with MasterPass button to the merchant site (for example, on the user account page) (see MasterPass Branding to customize size and locale).
<img src="https://www.mastercard.com/mc_us/wallet/img/en/US/mp_connect_with_button_126px.png"/>Import jQuery, and add the MasterPass Integration Script for either the sandbox or the production environment.
<!-- url to jquery 1.10.2 -->
 <script type="text/javascript" src="https://ajax.googleapis.com/ajax/libs/
jquery/1.10.2/jquery.min.js"></script>

<!-- url to sandbox MasterPass Lightbox -->
 <script type="text/javascript" src=" https://sandbox.masterpass.com/
lightbox/Switch/integration/MasterPass.client.js "></script>

<!-- url to production MasterPass Lightbox -->
 <!-- <script type="text/javascript" src=" https://masterpass.com/lightbox/
Switch/integration/MasterPass.client.js "></script> -->
Invoke the MasterPass lightbox when the user clicks the Connect with MasterPass button.
<script type="text/javascript" language="Javascript">
    MasterPass.client.connect({
       "requestPairing":true,                                            //required
       "pairingRequestToken":"insert_pairing_request_token_here",        //required
       "callbackUrl":"http://www.somemerchant.com/pairingcomplete.htm", //required
       "merchantCheckoutId":"insert_checkout_id_here",                   //required
       "requestedDataTypes":["REWARD_PROGRAM", "ADDRESS", "PROFILE", "CARD"],  //required
       "version":"v6"                                                    //optional
       "successCallback": function(mpLightboxResponse){ ... },           //optional
       "failureCallback": function(mpLightboxResponse){ ... },           //optional
       "cancelCallback": function(mpLightboxResponse){ ... }             //optional
    });
</script>- requestPairing: To enable pairing, value must be true.
- pairingRequestToken: Your pairing request token generated in Step 1.
- callbackUrl: The merchant URL to which the browser will redirect when the Lightbox closes.
- merchantCheckoutId: The unique checkout identifier obtained during the Merchant Onboarding process.
- requestedDataTypes: The data types the merchant requests for pairing. PROFILE and CARD are required.
- version: MasterPass API version (default is v6).
- successCallback: The function that will be called if the MasterPass flow ends successfully.
- failureCallback: The function that will be called if the MasterPass flow ends in failure.
- cancelCallback: The function that will be called if the user cancels the MasterPass flow.
4. Redirect to callback URL or call callback function
After the lightbox closes, MasterPass returns data to the merchant. By default, MasterPass redirects the browser to the callback URL, returning the data via URL parameters. Optionally, if callback functions were provided in Step 4, MasterPass returns control to the page that initiated the Lightbox, and the data is passed to the callback function.
Under certain conditions, the MasterPass UI may be forced to run in Full Screen display instead of launching the Lightbox. When this occurs, the browser will redirect to the callback URL when the MasterPass flow is complete, even if callback functions were supplied.
Example Callback URL (Success)
On Success, MasterPass returns the following parameters:
- mpstatus: String that indicates whether the MasterPass flow resulted in success, failure, or cancel.
- pairing_verifier: The pairing verifier token that is used to retrieve the long access token in Step 6.
- pairing_token: The pairing request token used to retrieve the long access token in Step 6.
http://www.somemerchant.com/pairingcomplete.htm
?mpstatus=success
&pairing_verifier=6c50838e31b7441e6eafa2229385452889255b13
&pairing_token=35b2a0cf87f8160fcb5d24996a12edb7cce4c530
Example Callback URL (Cancel)
http://www.somemerchant.com/pairingcomplete.htm
?mpstatus=cancel
Example Callback URL (Failure)
http://www.somemerchant.com/pairingcomplete.htm
?mpstatus=failure
Example Callback Function (Success)
function handleCallbackSuccess (data) {
    document.getElementById('pairingToken').value=data.pairing_token;
    document.getElementById('pairingVerifer').value=data.pairing_verifier;
}
5. Call Access Token Service
If the pairing was completed successfully, call the Access Token Service to retrieve a long access token. You will need the pairing request token and the pairing verifier token received in Step 4.
The long access token will be used to retrieve pre-checkout data for this consumer in the future. Store the long access token with this user's merchant account data so that it can be retrieved anytime the user logs into the merchant site.
AccessTokenResponse accessTokenResponse = AccessTokenApi.create(pairing_request_token, pairing_verifier_token);
String long_access_token = accessTokenResponse.getOauthToken(); // store for future requests
Checkout after Pairing
1. Consumer logs onto merchant site
A consumer's long access token should have been stored with their account data for the merchant's site. When the consumer logs into their merchant site account, get their long access token.
2. Call PreCheckout Data Service
Use the consumer's long access token to retrieve pre-checkout data. The data types returned will be the types that were requested via the requestedDataTypes parameter when the Lightbox was invoked (Step 4 of Pairing During Checkout or Step 3 of Pairing Without Checkout).
String[] requestedDataTypes = {"REWARD_PROGRAM", "ADDRESS", "PROFILE", "CARD"};

PrecheckoutDataRequest preCheckoutDataRequest = new PrecheckoutDataRequest();
PairingDataTypes pairingDataTypes = new PairingDataTypes();
for(int i = 0; i < requestedDataTypes.length; i++){
	pairingDataTypes.pairingDataType(new PairingDataType().type(TypeEnum.valueOf(requestedDataTypes[i])));
}
preCheckoutDataRequest.pairingDataTypes(pairingDataTypes);

PrecheckoutDataResponse response = PrecheckoutDataApi.create(long_access_token, preCheckoutDataRequest);
3. Consumer makes card/shipping address selection
Display the wallet data retrieved in Step 2 to the consumer, and prompt the consumer to select from it. Save the selected cardId, shippingId, and (if applicable) rewardId to be used on the Place Order page of the merchant site.
4. Call Request Token Service
Call the Request Token Service to generate the request token that will be used to invoke the MasterPass Lightbox. Pass a callback_url that the browser will redirect to when the Lightbox closes.
The Request Token Service must be called before creating the Buy with MasterPass button.
String callback_url = "https://www.somemerchant.com/checkoutconfirm.htm";
RequestTokenResponse requestTokenResponse = RequestTokenApi.create(callback_url);
String request_token = requestTokenResponse.getOauthToken();
5. Call Shopping Cart Service
The Shopping Cart Service enables shopping cart data to be displayed to users as they proceed through the MasterPass login and checkout. This service requires the request token from Step 4.
Each ShoppingCartItem must have a description, quantity, and value. Value is represented as an integer (for example, USD 100.00 is 10000), and is calculated as the cost of a single item multiplied by the quantity of that item. A ShoppingCartItem may also have an optional imageURL.
The Shopping Cart Service must be called before creating the Buy with MasterPass button.
//Create an instance of ShoppingCartRequest
ShoppingCartRequest shoppingCartRequest = new ShoppingCartRequest()
		.shoppingCart(new ShoppingCart()
			.subtotal(11900L)
			.currencyCode("USD")
			.shoppingCartItem(new ShoppingCartItem()
				.value(1900L)
				.description("This is one item")
				.quantity(1))

			.shoppingCartItem(new ShoppingCartItem()
				.imageURL("https://somemerchant.com/someimage")
				.value(10000L)
				.description("Five items")
				.quantity(5)))
		.oAuthToken(request_token);

//Call the ShoppingCartService with required params
ShoppingCartResponse shoppingCartResponse = ShoppingCartApi.create(shoppingCartRequest);
6. Call Merchant Initialization Service
The Merchant Initialization Service is used to secure Lightbox connections between the merchant site and MasterPass. The originUrl identifies the origin of the page that will invoke the Lightbox. This service requires the request token from Step 4.
The Merchant Initialization Service must be called before creating the Buy with MasterPass button.
//Create an instance of MerchantInitializationRequest
MerchantInitializationRequest merchantInitializationRequest = new MerchantInitializationRequest()
		.originUrl("https://somemerchant.com")
		.oAuthToken(request_token);

//Call the MerchantInitializationApi with required params
MerchantInitializationResponse merchantInitializationResponse = MerchantInitializationApi.create(merchantInitializationRequest);
7. Create Buy With MasterPass Button
Import jQuery, and add the MasterPass Integration Script for either the sandbox or the production environment
 <!-- url to jquery 1.10.2 -->
 <script type="text/javascript" src="https://ajax.googleapis.com/ajax/libs/
jquery/1.10.2/jquery.min.js"></script>

<!-- url to sandbox MasterPass Lightbox -->
 <script type="text/javascript" src=" https://sandbox.masterpass.com/
lightbox/Switch/integration/MasterPass.client.js "></script>

<!-- url to production MasterPass Lightbox -->
 <!-- <script type="text/javascript" src=" https://masterpass.com/lightbox/
Switch/integration/MasterPass.client.js "></script> -->
On the Place Order page of the merchant's website, create the Buy with MasterPass button using the cardId, addressId, and rewardId from Step 3 and the request token from Step 4.
<script type="text/javascript" language="Javascript">
MasterPass.client.checkout({
     "requestToken":"insert_request_token_here",                       //required
     "callbackUrl":"http://www.somemerchant.com/checkoutcomplete.htm", //required
     "merchantCheckoutId":"insert_checkout_id_here",                   //required
     "cardId":"insert_selected_card_id_here",                          //required
     "shippingId":"insert_selected_shipping_address_id_here",          //required
     "precheckoutTransactionId":"insert_prechechout_txn_id_here",      //required
     "walletName":"insert_wallet_name_here",                           //required
     "consumerWalletId":"insert_consumer_walletid_here",               //required
     "loyaltyId":"insert_loyalty_id_here",                             //optional
     "requireShippingDestination": "true"                              //optional
     "version":"v6",                                                   //optional
     "successCallback": function(mpLightboxResponse){ ... },           //optional
     "failureCallback": function(mpLightboxResponse){ ... },           //optional
     "cancelCallback": function(mpLightboxResponse){ ... }             //optional
});
</script>- requestToken: The request token generated in Step 4.
- callbackUrl: The merchant URL to which the browser will redirect when the Lightbox closes.
- merchantCheckoutId: The unique checkout identifier obtained during the Merchant Onboarding process.
- cardId: The identifier of the selected card collected in Step 3.
- shippingId: The identifier of the shipping information collected in Step 3.
- precheckoutTransactionId: The pre-checkout transaction identifier collected in Step 3.
- walletName: The consumer's wallet name collected in Step 3.
- consumerWalletId: The consumer's wallet identifier collected in Step 3.
- loyaltyId: The rewardId, optionally collected in Step 3.
- requireShippingDestination: Denotes whether the consumer's shipping information is required.
- version: MasterPass API version (default is v6).
- successCallback: The function that will be called if the MasterPass flow ends successfully.
- failureCallback: The function that will be called if the MasterPass flow ends in failure.
- cancelCallback: The function that will be called if the user cancels the MasterPass flow.
8. Redirect to callback URL or call callback function
After the consumer completes checkout, MasterPass returns data to the merchant. By default, MasterPass redirects the browser to the callback URL, returning the data via URL parameters. Optionally, if callback functions were provided in Step 4, MasterPass returns control to the page that initiated the Lightbox, and the data is passed to the callback function.
Under certain conditions, the MasterPass UI may be forced to run in Full Screen display instead of launching the Lightbox. When this occurs, the browser will redirected to the callback URL when the MasterPass flow is complete, even if callback functions were supplied.
on Success
On Success, MasterPass returns the following parameters:
- mpstatus: String that indicates whether the MasterPass flow resulted in success, failure, or cancel.
- checkout_resource_url: The API URL that will be used to retrieve checkout information in Step 10.
- oauth_verifier: The verifier token that is used in conjunction with the request token to retrieve the access token in Step 9.
- oauth_token: The request token that is used in conjunction with the verifier token to retrieve the access token in Step 9. This token has the same value as the request token that is generated in Step 1.
Example Callback URL (Success)
http://www.somemerchant.com/checkoutcomplete.htm
?mpstatus=success
&checkout_resource_url=https%3A%2F%2Fsandbox.api.mastercard.com%2Fmasterpass\%2Fv6%2Fcheckout%2F10189977%3Fwallet%3Dphw
&oauth_verifier=6c50838e31b7441e6eafa2229385452889255b13
&oauth_token=d6fa60984308aebb6183d44fb9688fb9dc8332dc
Example Callback URL (Cancel)
http://www.somemerchant.com/checkoutcomplete.htm
?mpstatus=cancel
Example Callback URL (Failure)
http://www.somemerchant.com/checkoutcomplete.htm
?mpstatus=failure
Example Callback Function (Success)
function handleCallbackSuccess (data) {
    callYourServerWith(data.oauth_token, data.oauth_verifier, data.checkout_resource_url);
}
9. Call Access Token Service
If the checkout was completed successfully, call the Access Token Service to retrieve an access token. You will need the request token and the verifier token received in Step 8.
As there is no need to retrieve a long access token again, only this one call to the Access Token Service will be made.
AccessTokenResponse accessTokenResponse = AccessTokenApi.create(request_token, verifier_token);
String accessToken = accessTokenResponse.getOauthToken();
10. Retrieve Payment, Shipping Data, Rewards and 3-D Secure Details
Use the Checkout Resource URL received in Step 8 and the access token from Step 9 to retrieve the constomer’s payment, shipping, reward and 3-D Secure information from MasterPass.
int startIndex = checkoutResourceUrl.lastIndexOf('/') + 1;
int endIndex = checkoutResourceUrl.indexOf('?') != -1 ?
		checkoutResourceUrl.indexOf('?')
		: checkoutResourceUrl.length();
String checkoutId = checkoutResourceUrl.substring(startIndex, endIndex);

Checkout checkout = CheckoutApi.show(checkoutId, accessToken);

Card card = checkout.getCard();
Address billingAddress = card.getBillingAddress();
Contact contact = checkout.getContact();
AuthenticationOptions authOptions = checkout.getAuthenticationOptions();
String preCheckoutTransactionId = checkout.getPreCheckoutTransactionId();
RewardProgram rewardProgram = checkout.getRewardProgram();
ShippingAddress shippingAddress = checkout.getShippingAddress();
String transactionId = checkout.getTransactionId();
String walletId = checkout.getWalletID();
11. Process Payment through a payment gateway
Using the data retrieved in Step 10, process the payment through the merchant's payment gateway.
12. Log Transactions with MasterPass
After the payment has been processed in Step 11, make a service call to communicate the result of the transaction to MasterPass.
//Create an instance of MerchantTransactions
MerchantTransactions request = new MerchantTransactions()
		.merchantTransactions(new MerchantTransaction()
			.transactionId("4549794")
			.purchaseDate("2014-08-01T14:52:57.539-05:00")
			.expressCheckoutIndicator(false)
			.approvalCode("888888")                          // authorization code returned by payment gateway
			.transactionStatus(TransactionStatusEnum.valueOf("Success"))
			.orderAmount(1229L)                              // total charged to card
			.preCheckoutTransactionId("a4a6x55-rgb1c5-hyaqkemj-1-hybxhplo-947")
			.currency("USD")
			.consumerKey("0zMKpm0nFtUv8lLXT97jDRo2bp4vNF8MFYyt3R5R87e3f3f4!414b48675861677159682b563745776b593652377939673d")); //generated during onboarding process

//Call the PostbackService with required params
MerchantTransactions response = PostbackApi.create(request);
Connected Checkout Integration
Pairing During Checkout
1. Call Request Token Service (2 times)
Call the Request Token Service twice. The first call generates a pairing request token, which will be used to gain the long access token needed to pair the consumer's wallet and merchant account.
The second call generates a checkout request token that will be used to invoke the MasterPass Lightbox. Pass a callback_url that the browser will redirect to when the Lightbox closes.
The Request Token Service calls must be made before the consumer clicks the Buy with MasterPass button.
string callback_url = "https://www.somemerchant.com/pairingcomplete.htm";
RequestTokenResponse requestTokenResponse = RequestTokenApi.Create(callback_url);
string pairing_request_token = requestTokenResponse.OauthToken;
RequestTokenResponse requestTokenResponse = RequestTokenApi.Create(callback_url);
string request_token = requestTokenResponse.OauthToken;
2. Call Shopping Cart Service
The Shopping Cart Service enables shopping cart data to be displayed to users as they proceed through the MasterPass login and checkout. This service requires the checkout request token from Step 1.
Each ShoppingCartItem must have a description, quantity, and value. Value is represented as an integer (for example, USD 100.00 is 10000), and is calculated as the cost of a single item multiplied by the quantity of that item. A ShoppingCartItem may also have an optional imageURL.
The Shopping Cart Service must be called before the consumer clicks the Buy with MasterPass button.
//Create an instance of ShoppingCartRequest
ShoppingCartRequest shoppingCartRequest = new ShoppingCartRequest();
ShoppingCart shoppingCart = new ShoppingCart();
List<ShoppingCartItem> shoppingCartItems = new List<ShoppingCartItem>();
shoppingCartItems.Add(new ShoppingCartItem
{
	Value = 1900L,
	Description = "This is one item",
	Quantity = 1
});
shoppingCartItems.Add(new ShoppingCartItem
{
    ImageURL = "https://somemerchant.com/someimage",
    Value = 10000L,
    Description = "Five items",
    Quantity = 5
});

shoppingCart.Subtotal = 11900L;
shoppingCart.CurrencyCode = "USD";
shoppingCart.ShoppingCartItem = shoppingCartItems;

shoppingCartRequest.ShoppingCart = shoppingCart;
shoppingCartRequest.OAuthToken = request_token;

//Call the ShoppingCartService with required params
ShoppingCartResponse shoppingCartResponse = ShoppingCartApi.Create(shoppingCartRequest);
3. Call Merchant Initialization Service
The Merchant Initialization Service is used to secure Lightbox connections between the merchant and MasterPass. The originUrl identifies the origin of the page that will initialize the Lightbox. This service requires the checkout request token from Step 1.
The Merchant Initialization Service must be called before the consumer clicks the Buy with MasterPass button.
//Create an instance of MerchantInitializationRequest
MerchantInitializationRequest merchantInitializationRequest = new MerchantInitializationRequest
{
    OriginUrl = "https://somemerchant.com",
    OAuthToken = request_token
};

//Call the MerchantInitializationApi with required params
MerchantInitializationResponse merchantInitializationResponse = MerchantInitializationApi.Create(merchantInitializationRequest);
4. Invoke MasterPass UI (Lightbox) for checkout
On the Checkout Page of the merchant's website, add the Buy with MasterPass button to your HTML (see MasterPass Branding to customize size and locale).
<img src="https://www.mastercard.com/mc_us/wallet/img/en/US/mcpp_wllt_btn_chk_147x034px.png"/>Import jQuery, and add the MasterPass Integration Script for either the sandbox or the production environment.
<!-- url to jquery 1.10.2 -->
  <script type="text/javascript" src="https://ajax.googleapis.com/ajax/libs/
jquery/1.10.2/jquery.min.js"></script>

<!-- url to sandbox MasterPass Lightbox -->
  <script type="text/javascript" src=" https://sandbox.masterpass.com/
lightbox/Switch/integration/MasterPass.client.js "></script>

<!-- url to production MasterPass Lightbox -->
  <!-- <script type="text/javascript" src=" https://masterpass.com/lightbox/
Switch/integration/MasterPass.client.js "></script> -->
Invoke the MasterPass lightbox when the user clicks the Buy with MasterPass button.
<script type="text/javascript" language="Javascript">
    MasterPass.client.checkout({
       "requestPairing":true,                                                      //required
       "requestToken":"insert_checkout_request_token_here",                        //required
       "pairingRequestToken":"insert_pairing_request_token_here",                  //required
       "callbackUrl":"http://www.somemerchant.com/checkoutcomplete.htm",           //required
       "merchantCheckoutId":"insert_checkout_id_here",                             //required
       "requestedDataTypes":["REWARD_PROGRAM", "ADDRESS", "PROFILE", "CARD"],      //required
       "allowedCardTypes":["master","amex","diners","discover","maestro","visa"],  //optional
       "version":"v6",                                                             //optional
       "successCallback": function(mpLightboxResponse){ ... },                     //optional
       "failureCallback": function(mpLightboxResponse){ ... },                     //optional
       "cancelCallback": function(mpLightboxResponse){ ... }                       //optional
    });
</script>- requestPairing: To enable pairing, value must be true.
- requestToken: The checkout request token generated in Step 1.
- pairingRequestToken: The pairing request token generated in Step 1.
- callbackUrl: The merchant URL to which the browser will redirect when the Lightbox closes.
- merchantCheckoutId: The unique checkout identifier obtained during the merchant onboarding process.
- requestedDataTypes: The data types the merchant requests for pairing. PROFILE and CARD are required.
- allowedCardTypes: Card types accepted by the merchant (default is all card types).
- version: MasterPass API version (default is v6).
- successCallback: The function that will be called if the MasterPass Lightbox flow ends successfully.
- failureCallback: The function that will be called if the MasterPass Lightbox flow ends in failure.
- cancelCallback: The function that will be called if the user cancels the MasterPass Lightbox flow.
5. Redirect to callback URL or call callback function
After the consumer completes checkout, MasterPass returns data to the merchant. By default, MasterPass redirects the browser to the callback URL, returning the data via URL parameters. Optionally, if callback functions were provided in Step 4, MasterPass returns control to the page that initiated the Lightbox, and the data is passed to the callback function.
Under certain conditions, the MasterPass UI may be forced to run in Full Screen display instead of launching the Lightbox. When this occurs, the browser will redirect to the callback URL when the MasterPass flow is complete, even if callback functions were supplied.
On success
On success, MasterPass returns the following parameters:
- mpstatus: String that indicates whether the MasterPass flow resulted in success, failure, or cancel.
- checkout_resource_url: The API URL that will be used to retrieve checkout information in Step 7.
- oauth_verifier: The checkout verifier token that is used to retrieve the access token in Step 6.
- oauth_token: The checkout request token that is used to retrieve the access token in Step 6. This token has the same value as the checkout request token that is generated in Step 1.
- pairing_verifier: The pairing verifier token that is used to retrieve the long access token in Step 6.
- pairing_token: The pairing request token used to retrieve the long access token in Step 6.
Example Callback URL (Success)
http://www.somemerchant.com/checkoutcomplete.htm
?mpstatus=success
&checkout_resource_url=https%3A%2F%2Fstage.api.mastercard.com%2Fmasterpass%2Fv6%2Fcheckout%2F
10706241%3Fwallet%3Dphw
&oauth_verifier=fbe45bcad30299c93765b1fb4b45bab208f84458
&oauth_token=d9382e34e0721a68a9952110cecdf89517e45498
&pairing_verifier=6c50838e31b7441e6eafa2229385452889255b13
&pairing_token=35b2a0cf87f8160fcb5d24996a12edb7cce4c530
Example Callback URL (Cancel)
http://www.somemerchant.com/checkoutcomplete.htm
?mpstatus=cancel
Example Callback URL (Failure)
http://www.somemerchant.com/checkoutcomplete.htm
?mpstatus=failure
6. Call Access Token Service (2 times)
If the checkout was completed successfully, the next step is to make two Access Token Service calls. The first call uses the checkout request token and the checkout verifier token from Step 5 to retrieve a checkout access token. This checkout access token will be used in the next step to retrieve checkout data from the current transaction.
The second call uses the pairing request token and the pairing verifier token from Step 5 to retrieve a long access token. The long access token will be used to retrieve pre-checkout data for this consumer in future transactions.
AccessTokenResponse accessTokenResponse = AccessTokenApi.Create(request_token, verifier_token);
string accessToken = accessTokenResponse.OauthToken;

AccessTokenResponse accessTokenResponse = AccessTokenApi.Create(pairing_request_token, pairing_verifier_token);
string long_access_token = accessTokenResponse.OauthToken; // store for future requests
7. Retrieve payment, shipping data, rewards and 3DS details
Use the checkout resource URL received in Step 5 and the checkout access token from Step 6 to retrieve the consumer’s payment, shipping, reward and 3-D Secure information from MasterPass.
string checkoutId = checkoutResourceUrl.IndexOf('?') != -1 ? checkoutResourceUrl.Substring(checkoutResourceUrl.LastIndexOf('/') + 1).Split('?')[0] : checkoutResourceUrl.Substring(checkoutResourceUrl.LastIndexOf('/') + 1);

Checkout checkout = CheckoutApi.Show(checkoutId, accessToken);

Card card = checkout.Card;
Address billingAddress = card.BillingAddress;
Contact contact = checkout.Contact;
AuthenticationOptions authOptions = checkout.AuthenticationOptions;
string preCheckoutTransactionId = checkout.PreCheckoutTransactionId;
RewardProgram rewardProgram = checkout.RewardProgram;
ShippingAddress shippingAddress = checkout.ShippingAddress;
string transactionId = checkout.TransactionId;
string walletId = checkout.WalletID;
8. Process payment through a payment gateway
Using the data retrieved in Step 7, process the payment through the merchant's payment gateway.
9. Log transactions with MasterPass
After the payment has been processed in Step 8, make a service call to communicate the result of the transaction to MasterPass.
//Create an instance of MerchantTransactions
MerchantTransactions objMerchantTransactions = new MerchantTransactions();
List<MerchantTransaction> merchantTransactions = new List<MerchantTransaction>();
MerchantTransaction merchantTransaction = new MerchantTransaction
{
    TransactionId = "4549794", // from Step 7
    PurchaseDate = "2014-08-01T14:52:57.539-05:00",
    ExpressCheckoutIndicator = false,
    ApprovalCode = "888888",  // authorization code returned by payment gateway
    TransactionStatus = "Success",
    OrderAmount = 1229L, // total charged to card
    PreCheckoutTransactionId = "a4a6x55-rgb1c5-hyaqkemj-1-hybxhplo-947",
    Currency = "USD",
    ConsumerKey = "0zMKpm0nFtUv8lLXT97jDRo2bp4vNF8MFYyt3R5R87e3f3f4!414b48675861677159682b563745776b593652377939673d" //generated during onboarding process
};

merchantTransactions.Add(merchantTransaction);

objMerchantTransactions._MerchantTransactions = merchantTransactions;

//Call the PostbackService with required params
MerchantTransactions response = PostbackApi.Create(objMerchantTransactions);
Pairing without Checkout
1. Call Request Token Service
Call the Request Token Service to generate the pairing request token that will be used to invoke the MasterPass Lightbox. Pass a callback_url that the browser will redirect to when the Lightbox closes.
The Request Token Service must be called before the consumer clicks the Connect with MasterPass button.
string callback_url = "https://www.somemerchant.com/pairingcomplete.htm";
RequestTokenResponse requestTokenResponse = RequestTokenApi.Create(callback_url);
string pairing_request_token = requestTokenResponse.OauthToken;
2. Call Merchant Initialization Service
The Merchant Initialization Service is used to secure Lightbox connections between the merchant site and MasterPass. The originUrl identifies the origin of the page that will initialize the Lightbox. This service requires the pairing request token from Step 1.
//Create an instance of MerchantInitializationRequest
MerchantInitializationRequest merchantInitializationRequest = new MerchantInitializationRequest
{
    OriginUrl = "https://somemerchant.com",
    OAuthToken = request_token
};

//Call the MerchantInitializationApi with required params
MerchantInitializationResponse merchantInitializationResponse = MerchantInitializationApi.Create(merchantInitializationRequest);
3. Invoke MasterPass UI (Lightbox) for pairing
Add the Connect with MasterPass button to the merchant site (for example, on the user account page) (see MasterPass Branding to customize size and locale).
<img src="https://www.mastercard.com/mc_us/wallet/img/en/US/mp_connect_with_button_126px.png"/>Import jQuery, and add the MasterPass Integration Script for either the sandbox or the production environment.
<!-- url to jquery 1.10.2 -->
 <script type="text/javascript" src="https://ajax.googleapis.com/ajax/libs/
jquery/1.10.2/jquery.min.js"></script>

<!-- url to sandbox MasterPass Lightbox -->
 <script type="text/javascript" src=" https://sandbox.masterpass.com/
lightbox/Switch/integration/MasterPass.client.js "></script>

<!-- url to production MasterPass Lightbox -->
 <!-- <script type="text/javascript" src=" https://masterpass.com/lightbox/
Switch/integration/MasterPass.client.js "></script> -->
Invoke the MasterPass lightbox when the user clicks the Connect with MasterPass button.
<script type="text/javascript" language="Javascript">
    MasterPass.client.connect({
       "requestPairing":true,                                            //required
       "pairingRequestToken":"insert_pairing_request_token_here",        //required
       "callbackUrl":"http://www.somemerchant.com/pairingcomplete.htm", //required
       "merchantCheckoutId":"insert_checkout_id_here",                   //required
       "requestedDataTypes":["REWARD_PROGRAM", "ADDRESS", "PROFILE", "CARD"],  //required
       "version":"v6"                                                    //optional
       "successCallback": function(mpLightboxResponse){ ... },           //optional
       "failureCallback": function(mpLightboxResponse){ ... },           //optional
       "cancelCallback": function(mpLightboxResponse){ ... }             //optional
    });
</script>- requestPairing: To enable pairing, value must be true.
- pairingRequestToken: Your pairing request token generated in Step 1.
- callbackUrl: The merchant URL to which the browser will redirect when the Lightbox closes.
- merchantCheckoutId: The unique checkout identifier obtained during the Merchant Onboarding process.
- requestedDataTypes: The data types the merchant requests for pairing. PROFILE and CARD are required.
- version: MasterPass API version (default is v6).
- successCallback: The function that will be called if the MasterPass flow ends successfully.
- failureCallback: The function that will be called if the MasterPass flow ends in failure.
- cancelCallback: The function that will be called if the user cancels the MasterPass flow.
4. Redirect to callback URL or call callback function
After the lightbox closes, MasterPass returns data to the merchant. By default, MasterPass redirects the browser to the callback URL, returning the data via URL parameters. Optionally, if callback functions were provided in Step 4, MasterPass returns control to the page that initiated the Lightbox, and the data is passed to the callback function.
Under certain conditions, the MasterPass UI may be forced to run in Full Screen display instead of launching the Lightbox. When this occurs, the browser will redirect to the callback URL when the MasterPass flow is complete, even if callback functions were supplied.
Example Callback URL (Success)
On Success, MasterPass returns the following parameters:
- mpstatus: String that indicates whether the MasterPass flow resulted in success, failure, or cancel.
- pairing_verifier: The pairing verifier token that is used to retrieve the long access token in Step 6.
- pairing_token: The pairing request token used to retrieve the long access token in Step 6.
http://www.somemerchant.com/pairingcomplete.htm
?mpstatus=success
&pairing_verifier=6c50838e31b7441e6eafa2229385452889255b13
&pairing_token=35b2a0cf87f8160fcb5d24996a12edb7cce4c530
Example Callback URL (Cancel)
http://www.somemerchant.com/pairingcomplete.htm
?mpstatus=cancel
Example Callback URL (Failure)
http://www.somemerchant.com/pairingcomplete.htm
?mpstatus=failure
Example Callback Function (Success)
function handleCallbackSuccess (data) {
    document.getElementById('pairingToken').value=data.pairing_token;
    document.getElementById('pairingVerifer').value=data.pairing_verifier;
}
5. Call Access Token Service
If the pairing was completed successfully, call the Access Token Service to retrieve a long access token. You will need the pairing request token and the pairing verifier token received in Step 4.
The long access token will be used to retrieve pre-checkout data for this consumer in the future. Store the long access token with this user's merchant account data so that it can be retrieved anytime the user logs into the merchant site.
AccessTokenResponse accessTokenResponse = AccessTokenApi.Create(pairing_request_token, pairing_verifier_token);
string long_access_token = accessTokenResponse.OauthToken; // store for future requests
Checkout after Pairing
1. Consumer logs onto merchant site
A consumer's long access token should have been stored with their account data for the merchant's site. When the consumer logs into their merchant site account, get their long access token.
2. Call PreCheckout Data Service
Use the consumer's long access token to retrieve pre-checkout data. The data types returned will be the types that were requested via the requestedDataTypes parameter when the Lightbox was invoked (Step 4 of Pairing During Checkout or Step 3 of Pairing Without Checkout).
string[] requestedDataTypes = { "REWARD_PROGRAM", "ADDRESS", "PROFILE", "CARD" };
PrecheckoutDataRequest preCheckoutDataRequest = new PrecheckoutDataRequest();
List<PairingDataType> lstPairingDataType = new List<PairingDataType>();
//foreach (var item in requestedDataTypes)
//{
//    lstPairingDataType.Add(new PairingDataType
//    {
//        Type = item
//    });
//}
lstPairingDataType = requestedDataTypes.Select(item => new PairingDataType() { Type = item }).ToList();

preCheckoutDataRequest.PairingDataTypes.PairingDataType = lstPairingDataType;

PrecheckoutDataResponse response = PrecheckoutDataApi.Create(long_access_token, preCheckoutDataRequest);
3. Consumer makes card/shipping address selection
Display the wallet data retrieved in Step 2 to the consumer, and prompt the consumer to select from it. Save the selected cardId, shippingId, and (if applicable) rewardId to be used on the Place Order page of the merchant site.
4. Call Request Token Service
Call the Request Token Service to generate the request token that will be used to invoke the MasterPass Lightbox. Pass a callback_url that the browser will redirect to when the Lightbox closes.
The Request Token Service must be called before creating the Buy with MasterPass button.
string callback_url = "https://www.somemerchant.com/checkoutconfirm.htm";
RequestTokenResponse requestTokenResponse = RequestTokenApi.Create(callback_url);
string request_token = requestTokenResponse.OauthToken;
5. Call Shopping Cart Service
The Shopping Cart Service enables shopping cart data to be displayed to users as they proceed through the MasterPass login and checkout. This service requires the request token from Step 4.
Each ShoppingCartItem must have a description, quantity, and value. Value is represented as an integer (for example, USD 100.00 is 10000), and is calculated as the cost of a single item multiplied by the quantity of that item. A ShoppingCartItem may also have an optional imageURL.
The Shopping Cart Service must be called before creating the Buy with MasterPass button.
//Create an instance of ShoppingCartRequest
ShoppingCartRequest shoppingCartRequest = new ShoppingCartRequest();
ShoppingCart shoppingCart = new ShoppingCart();
List<ShoppingCartItem> shoppingCartItems = new List<ShoppingCartItem>();
shoppingCartItems.Add(new ShoppingCartItem
{
    Value = 1900L,
    Description = "This is one item",
    Quantity = 1
});
shoppingCartItems.Add(new ShoppingCartItem
{
    ImageURL = "https://somemerchant.com/someimage",
    Value = 10000L,
    Description = "Five items",
    Quantity = 5
});

shoppingCart.Subtotal = 11900L;
shoppingCart.CurrencyCode = "USD";
shoppingCart.ShoppingCartItem = shoppingCartItems;

shoppingCartRequest.ShoppingCart = shoppingCart;
shoppingCartRequest.OAuthToken = request_token;

//Call the ShoppingCartService with required params
ShoppingCartResponse shoppingCartResponse = ShoppingCartApi.Create(shoppingCartRequest);
6. Call Merchant Initialization Service
The Merchant Initialization Service is used to secure Lightbox connections between the merchant site and MasterPass. The originUrl identifies the origin of the page that will invoke the Lightbox. This service requires the request token from Step 4.
The Merchant Initialization Service must be called before creating the Buy with MasterPass button.
//Create an instance of MerchantInitializationRequest
MerchantInitializationRequest merchantInitializationRequest = new MerchantInitializationRequest
{
    OriginUrl = "https://somemerchant.com",
    OAuthToken = request_token
};

//Call the MerchantInitializationApi with required params
MerchantInitializationResponse merchantInitializationResponse = MerchantInitializationApi.Create(merchantInitializationRequest);
7. Create Buy With MasterPass Button
Import jQuery, and add the MasterPass Integration Script for either the sandbox or the production environment
 <!-- url to jquery 1.10.2 -->
 <script type="text/javascript" src="https://ajax.googleapis.com/ajax/libs/
jquery/1.10.2/jquery.min.js"></script>

<!-- url to sandbox MasterPass Lightbox -->
 <script type="text/javascript" src=" https://sandbox.masterpass.com/
lightbox/Switch/integration/MasterPass.client.js "></script>

<!-- url to production MasterPass Lightbox -->
 <!-- <script type="text/javascript" src=" https://masterpass.com/lightbox/
Switch/integration/MasterPass.client.js "></script> -->
On the Place Order page of the merchant's website, create the Buy with MasterPass button using the cardId, addressId, and rewardId from Step 3 and the request token from Step 4.
<script type="text/javascript" language="Javascript">
MasterPass.client.checkout({
     "requestToken":"insert_request_token_here",                       //required
     "callbackUrl":"http://www.somemerchant.com/checkoutcomplete.htm", //required
     "merchantCheckoutId":"insert_checkout_id_here",                   //required
     "cardId":"insert_selected_card_id_here",                          //required
     "shippingId":"insert_selected_shipping_address_id_here",          //required
     "precheckoutTransactionId":"insert_prechechout_txn_id_here",      //required
     "walletName":"insert_wallet_name_here",                           //required
     "consumerWalletId":"insert_consumer_walletid_here",               //required
     "loyaltyId":"insert_loyalty_id_here",                             //optional
     "requireShippingDestination": "true"                              //optional
     "version":"v6",                                                   //optional
     "successCallback": function(mpLightboxResponse){ ... },           //optional
     "failureCallback": function(mpLightboxResponse){ ... },           //optional
     "cancelCallback": function(mpLightboxResponse){ ... }             //optional
});
</script>- requestToken: The request token generated in Step 4.
- callbackUrl: The merchant URL to which the browser will redirect when the Lightbox closes.
- merchantCheckoutId: The unique checkout identifier obtained during the Merchant Onboarding process.
- cardId: The identifier of the selected card collected in Step 3.
- shippingId: The identifier of the shipping information collected in Step 3.
- precheckoutTransactionId: The pre-checkout transaction identifier collected in Step 3.
- walletName: The consumer's wallet name collected in Step 3.
- consumerWalletId: The consumer's wallet identifier collected in Step 3.
- loyaltyId: The rewardId, optionally collected in Step 3.
- requireShippingDestination: Denotes whether the consumer's shipping information is required.
- version: MasterPass API version (default is v6).
- successCallback: The function that will be called if the MasterPass flow ends successfully.
- failureCallback: The function that will be called if the MasterPass flow ends in failure.
- cancelCallback: The function that will be called if the user cancels the MasterPass flow.
8. Redirect to callback URL or call callback function
After the consumer completes checkout, MasterPass returns data to the merchant. By default, MasterPass redirects the browser to the callback URL, returning the data via URL parameters. Optionally, if callback functions were provided in Step 4, MasterPass returns control to the page that initiated the Lightbox, and the data is passed to the callback function.
Under certain conditions, the MasterPass UI may be forced to run in Full Screen display instead of launching the Lightbox. When this occurs, the browser will redirected to the callback URL when the MasterPass flow is complete, even if callback functions were supplied.
on Success
On Success, MasterPass returns the following parameters:
- mpstatus: String that indicates whether the MasterPass flow resulted in success, failure, or cancel.
- checkout_resource_url: The API URL that will be used to retrieve checkout information in Step 10.
- oauth_verifier: The verifier token that is used in conjunction with the request token to retrieve the access token in Step 9.
- oauth_token: The request token that is used in conjunction with the verifier token to retrieve the access token in Step 9. This token has the same value as the request token that is generated in Step 1.
Example Callback URL (Success)
http://www.somemerchant.com/checkoutcomplete.htm
?mpstatus=success
&checkout_resource_url=https%3A%2F%2Fsandbox.api.mastercard.com%2Fmasterpass\%2Fv6%2Fcheckout%2F10189977%3Fwallet%3Dphw
&oauth_verifier=6c50838e31b7441e6eafa2229385452889255b13
&oauth_token=d6fa60984308aebb6183d44fb9688fb9dc8332dc
Example Callback URL (Cancel)
http://www.somemerchant.com/checkoutcomplete.htm?mpstatus=cancelExample Callback URL (Failure)
http://www.somemerchant.com/checkoutcomplete.htm?mpstatus=failureExample Callback Function (Success)
function handleCallbackSuccess (data) {
    callYourServerWith(data.oauth_token, data.oauth_verifier, data.checkout_resource_url);
}
9. Call Access Token Service
If the checkout was completed successfully, call the Access Token Service to retrieve an access token. You will need the request token and the verifier token received in Step 8.
As there is no need to retrieve a long access token again, only this one call to the Access Token Service will be made.
AccessTokenResponse accessTokenResponse = AccessTokenApi.Create(request_token, verifier_token);
string accessToken = accessTokenResponse.OauthToken;
10. Retrieve Payment, Shipping Data, Rewards and 3-D Secure Details
Use the Checkout Resource URL received in Step 8 and the access token from Step 9 to retrieve the constomer’s payment, shipping, reward and 3-D Secure information from MasterPass.
string checkoutId = checkoutResourceUrl.IndexOf('?') != -1 ? checkoutResourceUrl.Substring(checkoutResourceUrl.LastIndexOf('/') + 1).Split('?')[0] : checkoutResourceUrl.Substring(checkoutResourceUrl.LastIndexOf('/') + 1);

Checkout checkout = CheckoutApi.Show(checkoutId, accessToken);

Card card = checkout.Card;
Address billingAddress = card.BillingAddress;
Contact contact = checkout.Contact;
AuthenticationOptions authOptions = checkout.AuthenticationOptions;
string preCheckoutTransactionId = checkout.PreCheckoutTransactionId;
RewardProgram rewardProgram = checkout.RewardProgram;
ShippingAddress shippingAddress = checkout.ShippingAddress;
string transactionId = checkout.TransactionId;
string walletId = checkout.WalletID;
11. Process Payment through a payment gateway
Using the data retrieved in Step 10, process the payment through the merchant's payment gateway.
12. Log Transactions with MasterPass
After the payment has been processed in Step 11, make a service call to communicate the result of the transaction to MasterPass.
//Create an instance of MerchantTransactions
MerchantTransactions objMerchantTransactions = new MerchantTransactions();
List<MerchantTransaction> merchantTransactions = new List<MerchantTransaction>();
MerchantTransaction merchantTransaction = new MerchantTransaction
{
    TransactionId = "4549794", // from Step 7
    PurchaseDate = "2014-08-01T14:52:57.539-05:00",
    ExpressCheckoutIndicator = false,
    ApprovalCode = "888888",  // authorization code returned by payment gateway
    TransactionStatus = "Success",
    OrderAmount = 1229L, // total charged to card
    PreCheckoutTransactionId = "a4a6x55-rgb1c5-hyaqkemj-1-hybxhplo-947",
    Currency = "USD",
    ConsumerKey = "0zMKpm0nFtUv8lLXT97jDRo2bp4vNF8MFYyt3R5R87e3f3f4!414b48675861677159682b563745776b593652377939673d" //generated during onboarding process
};

merchantTransactions.Add(merchantTransaction);

objMerchantTransactions._MerchantTransactions = merchantTransactions;

//Call the PostbackService with required params
MerchantTransactions response = PostbackApi.Create(objMerchantTransactions);
Connected Checkout Integration
Pairing During Checkout
1. Call Request Token Service (2 times)
Call the Request Token Service twice. The first call generates a pairing request token, which will be used to gain the long access token needed to pair the consumer's wallet and merchant account.
The second call generates a checkout request token that will be used to invoke the MasterPass Lightbox. Pass a callback_url that the browser will redirect to when the Lightbox closes.
The Request Token Service calls must be made before the consumer clicks the Buy with MasterPass button.
callback_url = "https://www.somemerchant.com/checkoutconfirm.htm"
pairing_token_response = MastercardCoreSdk::Api::RequestTokenApi.create(callback_url)
pairing_request_token = pairing_token_response.oauth_token;

request_token_response = MastercardCoreSdk::Api::RequestTokenApi.create(callback_url)
request_token = request_token_response.oauth_token;
2. Call Shopping Cart Service
The Shopping Cart Service enables shopping cart data to be displayed to users as they proceed through the MasterPass login and checkout. This service requires the checkout request token from Step 1.
Each shopping_cart_item must have a description, quantity, and value. Value is represented as an integer (for example, USD 100.00 is 10000), and is calculated as the cost of a single item multiplied by the quantity of that item. A shopping_cart_item may also have an optional image_url.
The Shopping Cart Service must be called before the consumer clicks the Buy with MasterPass button.
shopping_cart_request = MastercardMasterpassMerchant::ShoppingCartRequest.new(
    :o_auth_token => request_token,
    :shopping_cart => MastercardMasterpassMerchant::ShoppingCart.new(
        :currency_code => 'USD',
        :subtotal => '11900',
        :shopping_cart_item => [
            MastercardMasterpassMerchant::ShoppingCartItem.new(
                :description => 'One Item',
                :quantity => 1,
                :value => 1900
            ),
            MastercardMasterpassMerchant::ShoppingCartItem.new(
                :description => 'Five of an Item',
                :quantity => 5,
                :value => 10000,
                :image_url => 'http://somemerchant.com/someimage'
            )
        ]
    )
)

shopping_cart_response = MastercardMasterpassMerchant::Api::ShoppingCartApi.create(shopping_cart_request)
3. Call Merchant Initialization Service
The Merchant Initialization Service is used to secure Lightbox connections between the merchant and MasterPass. The originUrl identifies the origin of the page that will initialize the Lightbox. This service requires the checkout request token from Step 1.
The Merchant Initialization Service must be called before the consumer clicks the Buy with MasterPass button.
merchant_init_request = MastercardMasterpassMerchant::MerchantInitializationRequest.new(
    :o_auth_token => request_token,
    :origin_url => 'https://somemerchant.com'
)

merchant_init_response = MastercardMasterpassMerchant::Api::MerchantInitializationApi.create(merchant_init_request)
4. Invoke MasterPass UI (Lightbox) for checkout
On the Checkout Page of the merchant's website, add the Buy with MasterPass button to your HTML (see MasterPass Branding to customize size and locale).
<img src="https://www.mastercard.com/mc_us/wallet/img/en/US/mcpp_wllt_btn_chk_147x034px.png"/>Import jQuery, and add the MasterPass Integration Script for either the sandbox or the production environment.
<!-- url to jquery 1.10.2 -->
  <script type="text/javascript" src="https://ajax.googleapis.com/ajax/libs/
jquery/1.10.2/jquery.min.js"></script>

<!-- url to sandbox MasterPass Lightbox -->
  <script type="text/javascript" src=" https://sandbox.masterpass.com/
lightbox/Switch/integration/MasterPass.client.js "></script>

<!-- url to production MasterPass Lightbox -->
  <!-- <script type="text/javascript" src=" https://masterpass.com/lightbox/
Switch/integration/MasterPass.client.js "></script> -->
Invoke the MasterPass lightbox when the user clicks the Buy with MasterPass button.
<script type="text/javascript" language="Javascript">
    MasterPass.client.checkout({
       "requestPairing":true,                                                      //required
       "requestToken":"insert_checkout_request_token_here",                        //required
       "pairingRequestToken":"insert_pairing_request_token_here",                  //required
       "callbackUrl":"http://www.somemerchant.com/checkoutcomplete.htm",           //required
       "merchantCheckoutId":"insert_checkout_id_here",                             //required
       "requestedDataTypes":["REWARD_PROGRAM", "ADDRESS", "PROFILE", "CARD"],      //required
       "allowedCardTypes":["master","amex","diners","discover","maestro","visa"],  //optional
       "version":"v6",                                                             //optional
       "successCallback": function(mpLightboxResponse){ ... },                     //optional
       "failureCallback": function(mpLightboxResponse){ ... },                     //optional
       "cancelCallback": function(mpLightboxResponse){ ... }                       //optional
    });
</script>- requestPairing: To enable pairing, value must be true.
- requestToken: The checkout request token generated in Step 1.
- pairingRequestToken: The pairing request token generated in Step 1.
- callbackUrl: The merchant URL to which the browser will redirect when the Lightbox closes.
- merchantCheckoutId: The unique checkout identifier obtained during the merchant onboarding process.
- requestedDataTypes: The data types the merchant requests for pairing. PROFILE and CARD are required.
- allowedCardTypes: Card types accepted by the merchant (default is all card types).
- version: MasterPass API version (default is v6).
- successCallback: The function that will be called if the MasterPass Lightbox flow ends successfully.
- failureCallback: The function that will be called if the MasterPass Lightbox flow ends in failure.
- cancelCallback: The function that will be called if the user cancels the MasterPass Lightbox flow.
5. Redirect to callback URL or call callback function
After the consumer completes checkout, MasterPass returns data to the merchant. By default, MasterPass redirects the browser to the callback URL, returning the data via URL parameters. Optionally, if callback functions were provided in Step 4, MasterPass returns control to the page that initiated the Lightbox, and the data is passed to the callback function.
Under certain conditions, the MasterPass UI may be forced to run in Full Screen display instead of launching the Lightbox. When this occurs, the browser will redirect to the callback URL when the MasterPass flow is complete, even if callback functions were supplied.
On success
On success, MasterPass returns the following parameters:
- mpstatus: String that indicates whether the MasterPass flow resulted in success, failure, or cancel.
- checkout_resource_url: The API URL that will be used to retrieve checkout information in Step 7.
- oauth_verifier: The checkout verifier token that is used to retrieve the access token in Step 6.
- oauth_token: The checkout request token that is used to retrieve the access token in Step 6. This token has the same value as the checkout request token that is generated in Step 1.
- pairing_verifier: The pairing verifier token that is used to retrieve the long access token in Step 6.
- pairing_token: The pairing request token used to retrieve the long access token in Step 6.
Example Callback URL (Success)
http://www.somemerchant.com/checkoutcomplete.htm
?mpstatus=success
&checkout_resource_url=https%3A%2F%2Fstage.api.mastercard.com%2Fmasterpass%2Fv6%2Fcheckout%2F
10706241%3Fwallet%3Dphw
&oauth_verifier=fbe45bcad30299c93765b1fb4b45bab208f84458
&oauth_token=d9382e34e0721a68a9952110cecdf89517e45498
&pairing_verifier=6c50838e31b7441e6eafa2229385452889255b13
&pairing_token=35b2a0cf87f8160fcb5d24996a12edb7cce4c530
Example Callback URL (Cancel)
http://www.somemerchant.com/checkoutcomplete.htm
?mpstatus=cancel
Example Callback URL (Failure)
http://www.somemerchant.com/checkoutcomplete.htm
?mpstatus=failure
6. Call Access Token Service (2 times)
If the checkout was completed successfully, the next step is to make two Access Token Service calls. The first call uses the checkout request token and the checkout verifier token from Step 5 to retrieve a checkout access token. This checkout access token will be used in the next step to retrieve checkout data from the current transaction.
The second call uses the pairing request token and the pairing verifier token from Step 5 to retrieve a long access token. The long access token will be used to retrieve pre-checkout data for this consumer in future transactions.
access_token_response = MastercardCoreSdk::Api::AccessTokenApi.create(verifier_token, request_token)
access_token = access_token_response.oauth_token

long_access_token_response = MastercardCoreSdk::Api::AccessTokenApi.create(pairing_verifier_token, pairing_request_token)
long_access_token = long_access_token_response.oauth_token
7. Retrieve payment, shipping data, rewards and 3DS details
Use the checkout resource URL received in Step 5 and the checkout access token from Step 6 to retrieve the consumer’s payment, shipping, reward and 3-D Secure information from MasterPass.
start_index = checkout_resource_url.rindex('/') + 1
end_index = checkout_resource_url.index('?').nil? ? -1 : checkout_resource_url.index('?')
path_id = checkout_resource_url[start_index..end_index]

checkout = MastercardMasterpassMerchant::Api::CheckoutApi.show(path_id, access_token)
card = checkout.card
billing_address = card.billing_address
contact = checkout.contact
auth_options = checkout.authentication_options
precheckout_transaction_id = checkout.pre_checkout_transaction_id
reward_program = checkout.reward_program
shipping_address = checkout.shipping_address
transaction_id = checkout.transaction_id
wallet_id = checkout.wallet_id
8. Process payment through a payment gateway
Using the data retrieved in Step 7, process the payment through the merchant's payment gateway.
9. Log transactions with MasterPass
After the payment has been processed in Step 8, make a service call to communicate the result of the transaction to MasterPass.
merchant_transactions = MastercardMasterpassMerchant::MerchantTransactions.new(
    :merchant_transactions => [
        MastercardMasterpassMerchant::MerchantTransaction.new(
            :transaction_id => 4549794,
            :consumer_key => '0zMKpm0nFtUv8lLXT97jDRo2bp4vNF8MFYyt3R5R87e3f3f4!414b48675861677159682b563745776b593652377939673d',
            :currency => 'USD',
            :order_amount => 1800,
            :transaction_status => 'Success',
            :approval_code => '888888',
            :pre_checkout_transaction_id => 'a4a6x55-rgb1c5-hyaqkemj-1-hybxhplo-947',
            :express_checkout_indicator => false,
            :purchase_date => '2016-06-23T15:09:32+00:00'
        )
    ]
)

merchant_trans_response = MastercardMasterpassMerchant::Api::PostbackApi.create(merchant_transactions)
Pairing without Checkout
1. Call Request Token Service
Call the Request Token Service to generate the pairing request token that will be used to invoke the MasterPass Lightbox. Pass a callback_url that the browser will redirect to when the Lightbox closes.
The Request Token Service must be called before the consumer clicks the Connect with MasterPass button.
callback_url = "https://www.somemerchant.com/checkoutconfirm.htm"
pairing_token_response = MastercardCoreSdk::Api::RequestTokenApi.create(callback_url)
pairing_request_token = pairing_token_response.oauth_token;
2. Call Merchant Initialization Service
The Merchant Initialization Service is used to secure Lightbox connections between the merchant site and MasterPass. The origin_url identifies the origin of the page that will initialize the Lightbox. This service requires the pairing request token from Step 1.
merchant_init_request = MastercardMasterpassMerchant::MerchantInitializationRequest.new(
    :o_auth_token => pairing_request_token,
    :origin_url => 'https://somemerchant.com'
)

merchant_init_response = MastercardMasterpassMerchant::Api::MerchantInitializationApi.create(merchant_init_request)
3. Invoke MasterPass UI (Lightbox) for pairing
Add the Connect with MasterPass button to the merchant site (for example, on the user account page) (see MasterPass Branding to customize size and locale).
<img src="https://www.mastercard.com/mc_us/wallet/img/en/US/mp_connect_with_button_126px.png"/>Import jQuery, and add the MasterPass Integration Script for either the sandbox or the production environment.
<!-- url to jquery 1.10.2 -->
 <script type="text/javascript" src="https://ajax.googleapis.com/ajax/libs/
jquery/1.10.2/jquery.min.js"></script>

<!-- url to sandbox MasterPass Lightbox -->
 <script type="text/javascript" src=" https://sandbox.masterpass.com/
lightbox/Switch/integration/MasterPass.client.js "></script>

<!-- url to production MasterPass Lightbox -->
 <!-- <script type="text/javascript" src=" https://masterpass.com/lightbox/
Switch/integration/MasterPass.client.js "></script> -->
Invoke the MasterPass lightbox when the user clicks the Connect with MasterPass button.
<script type="text/javascript" language="Javascript">
    MasterPass.client.connect({
       "requestPairing":true,                                            //required
       "pairingRequestToken":"insert_pairing_request_token_here",        //required
       "callbackUrl":"http://www.somemerchant.com/pairingcomplete.htm", //required
       "merchantCheckoutId":"insert_checkout_id_here",                   //required
       "requestedDataTypes":["REWARD_PROGRAM", "ADDRESS", "PROFILE", "CARD"],  //required
       "version":"v6"                                                    //optional
       "successCallback": function(mpLightboxResponse){ ... },           //optional
       "failureCallback": function(mpLightboxResponse){ ... },           //optional
       "cancelCallback": function(mpLightboxResponse){ ... }             //optional
    });
</script>- requestPairing: To enable pairing, value must be true.
- pairingRequestToken: Your pairing request token generated in Step 1.
- callbackUrl: The merchant URL to which the browser will redirect when the Lightbox closes.
- merchantCheckoutId: The unique checkout identifier obtained during the Merchant Onboarding process.
- requestedDataTypes: The data types the merchant requests for pairing. PROFILE and CARD are required.
- version: MasterPass API version (default is v6).
- successCallback: The function that will be called if the MasterPass flow ends successfully.
- failureCallback: The function that will be called if the MasterPass flow ends in failure.
- cancelCallback: The function that will be called if the user cancels the MasterPass flow.
4. Redirect to callback URL or call callback function
After the lightbox closes, MasterPass returns data to the merchant. By default, MasterPass redirects the browser to the callback URL, returning the data via URL parameters. Optionally, if callback functions were provided in Step 4, MasterPass returns control to the page that initiated the Lightbox, and the data is passed to the callback function.
Under certain conditions, the MasterPass UI may be forced to run in Full Screen display instead of launching the Lightbox. When this occurs, the browser will redirect to the callback URL when the MasterPass flow is complete, even if callback functions were supplied.
Example Callback URL (Success)
On Success, MasterPass returns the following parameters:
- mpstatus: String that indicates whether the MasterPass flow resulted in success, failure, or cancel.
- pairing_verifier: The pairing verifier token that is used to retrieve the long access token in Step 6.
- pairing_token: The pairing request token used to retrieve the long access token in Step 6.
http://www.somemerchant.com/pairingcomplete.htm
?mpstatus=success
&pairing_verifier=6c50838e31b7441e6eafa2229385452889255b13
&pairing_token=35b2a0cf87f8160fcb5d24996a12edb7cce4c530
Example Callback URL (Cancel)
http://www.somemerchant.com/pairingcomplete.htm
?mpstatus=cancel
Example Callback URL (Failure)
http://www.somemerchant.com/pairingcomplete.htm
?mpstatus=failure
Example Callback Function (Success)
function handleCallbackSuccess (data) {
    document.getElementById('pairingToken').value=data.pairing_token;
    document.getElementById('pairingVerifer').value=data.pairing_verifier;
}
5. Call Access Token Service
If the pairing was completed successfully, call the Access Token Service to retrieve a long access token. You will need the pairing request token and the pairing verifier token received in Step 4.
The long access token will be used to retrieve pre-checkout data for this consumer in the future. Store the long access token with this user's merchant account data so that it can be retrieved anytime the user logs into the merchant site.
long_access_token_response = MastercardCoreSdk::Api::AccessTokenApi.create(pairing_verifier_token, pairing_request_token)
long_access_token = long_access_token_response.oauth_token
Checkout after Pairing
1. Consumer logs onto merchant site
A consumer's long access token should have been stored with their account data for the merchant's site. When the consumer logs into their merchant site account, get their long access token.
2. Call PreCheckout Data Service
Use the consumer's long access token to retrieve pre-checkout data. The data types returned will be the types that were requested via the requestedDataTypes parameter when the Lightbox was invoked (Step 4 of Pairing During Checkout or Step 3 of Pairing Without Checkout).
requested_data_types = ['REWARD_PROGRAM', 'ADDRESS', 'PROFILE', 'CARD']
pairing_data_types = []
requested_data_types.each do |data_type|
  pairing_data_type = MastercardMasterpassMerchant::PairingDataType.new
  pairing_data_type.type = data_type
  pairing_data_types.append(pairing_data_type)
end

pre_checkout_data_request = MastercardMasterpassMerchant::PrecheckoutDataRequest.new(
    :pairing_data_types => MastercardMasterpassMerchant::PairingDataTypes.new(
        :pairing_data_type => pairing_data_types
    )
)

response = MastercardMasterpassMerchant::Api::PrecheckoutDataApi.create(long_access_token, pre_checkout_data_request)
3. Consumer makes card/shipping address selection
Display the wallet data retrieved in Step 2 to the consumer, and prompt the consumer to select from it. Save the selected cardId, shippingId, and (if applicable) rewardId to be used on the Place Order page of the merchant site.
4. Call Request Token Service
Call the Request Token Service to generate the request token that will be used to invoke the MasterPass Lightbox. Pass a callback_url that the browser will redirect to when the Lightbox closes.
The Request Token Service must be called before creating the Buy with MasterPass button.
callback_url = "https://www.somemerchant.com/checkoutconfirm.htm"
request_token_response = MastercardCoreSdk::Api::RequestTokenApi.create(callback_url)
request_token = request_token_response.oauth_token;
5. Call Shopping Cart Service
The Shopping Cart Service enables shopping cart data to be displayed to users as they proceed through the MasterPass login and checkout. This service requires the request token from Step 4.
Each shopping_cart_item must have a description, quantity, and value. Value is represented as an integer (for example, USD 100.00 is 10000), and is calculated as the cost of a single item multiplied by the quantity of that item. A shopping_cart_item may also have an optional image_url.
The Shopping Cart Service must be called before creating the Buy with MasterPass button.
shopping_cart_request = MastercardMasterpassMerchant::ShoppingCartRequest.new(
    :o_auth_token => request_token,
    :shopping_cart => MastercardMasterpassMerchant::ShoppingCart.new(
        :currency_code => 'USD',
        :subtotal => '11900',
        :shopping_cart_item => [
            MastercardMasterpassMerchant::ShoppingCartItem.new(
                :description => 'One Item',
                :quantity => 1,
                :value => 1900
            ),
            MastercardMasterpassMerchant::ShoppingCartItem.new(
                :description => 'Five of an Item',
                :quantity => 5,
                :value => 10000,
                :image_url => 'http://somemerchant.com/someimage'
            )
        ]
    )
)

shopping_cart_response = MastercardMasterpassMerchant::Api::ShoppingCartApi.create(shopping_cart_request)
6. Call Merchant Initialization Service
The Merchant Initialization Service is used to secure Lightbox connections between the merchant site and MasterPass. The originUrl identifies the origin of the page that will invoke the Lightbox. This service requires the request token from Step 4.
The Merchant Initialization Service must be called before creating the Buy with MasterPass button.
merchant_init_request = MastercardMasterpassMerchant::MerchantInitializationRequest.new(
    :o_auth_token => request_token,
    :origin_url => 'https://somemerchant.com'
)

merchant_init_response = MastercardMasterpassMerchant::Api::MerchantInitializationApi.create(merchant_init_request)
7. Create Buy With MasterPass Button
Import jQuery, and add the MasterPass Integration Script for either the sandbox or the production environment
 <!-- url to jquery 1.10.2 -->
 <script type="text/javascript" src="https://ajax.googleapis.com/ajax/libs/
jquery/1.10.2/jquery.min.js"></script>

<!-- url to sandbox MasterPass Lightbox -->
 <script type="text/javascript" src=" https://sandbox.masterpass.com/
lightbox/Switch/integration/MasterPass.client.js "></script>

<!-- url to production MasterPass Lightbox -->
 <!-- <script type="text/javascript" src=" https://masterpass.com/lightbox/
Switch/integration/MasterPass.client.js "></script> -->
On the Place Order page of the merchant's website, create the Buy with MasterPass button using the cardId, addressId, and rewardId from Step 3 and the request token from Step 4.
<script type="text/javascript" language="Javascript">
MasterPass.client.checkout({
     "requestToken":"insert_request_token_here",                       //required
     "callbackUrl":"http://www.somemerchant.com/checkoutcomplete.htm", //required
     "merchantCheckoutId":"insert_checkout_id_here",                   //required
     "cardId":"insert_selected_card_id_here",                          //required
     "shippingId":"insert_selected_shipping_address_id_here",          //required
     "precheckoutTransactionId":"insert_prechechout_txn_id_here",      //required
     "walletName":"insert_wallet_name_here",                           //required
     "consumerWalletId":"insert_consumer_walletid_here",               //required
     "loyaltyId":"insert_loyalty_id_here",                             //optional
     "requireShippingDestination": "true"                              //optional
     "version":"v6",                                                   //optional
     "successCallback": function(mpLightboxResponse){ ... },           //optional
     "failureCallback": function(mpLightboxResponse){ ... },           //optional
     "cancelCallback": function(mpLightboxResponse){ ... }             //optional
});
</script>- requestToken: The request token generated in Step 4.
- callbackUrl: The merchant URL to which the browser will redirect when the Lightbox closes.
- merchantCheckoutId: The unique checkout identifier obtained during the Merchant Onboarding process.
- cardId: The identifier of the selected card collected in Step 3.
- shippingId: The identifier of the shipping information collected in Step 3.
- precheckoutTransactionId: The pre-checkout transaction identifier collected in Step 3.
- walletName: The consumer's wallet name collected in Step 3.
- consumerWalletId: The consumer's wallet identifier collected in Step 3.
- loyaltyId: The rewardId, optionally collected in Step 3.
- requireShippingDestination: Denotes whether the consumer's shipping information is required.
- version: MasterPass API version (default is v6).
- successCallback: The function that will be called if the MasterPass flow ends successfully.
- failureCallback: The function that will be called if the MasterPass flow ends in failure.
- cancelCallback: The function that will be called if the user cancels the MasterPass flow.
8. Redirect to callback URL or call callback function
After the consumer completes checkout, MasterPass returns data to the merchant. By default, MasterPass redirects the browser to the callback URL, returning the data via URL parameters. Optionally, if callback functions were provided in Step 4, MasterPass returns control to the page that initiated the Lightbox, and the data is passed to the callback function.
Under certain conditions, the MasterPass UI may be forced to run in Full Screen display instead of launching the Lightbox. When this occurs, the browser will redirected to the callback URL when the MasterPass flow is complete, even if callback functions were supplied.
On Success
On Success, MasterPass returns the following parameters:
- mpstatus: String that indicates whether the MasterPass flow resulted in success, failure, or cancel.
- checkout_resource_url: The API URL that will be used to retrieve checkout information in Step 10.
- oauth_verifier: The verifier token that is used in conjunction with the request token to retrieve the access token in Step 9.
- oauth_token: The request token that is used in conjunction with the verifier token to retrieve the access token in Step 9. This token has the same value as the request token that is generated in Step 1.
Example Callback URL (Success)
http://www.somemerchant.com/checkoutcomplete.htm
?mpstatus=success
&checkout_resource_url=https%3A%2F%2Fsandbox.api.mastercard.com%2Fmasterpass\%2Fv6%2Fcheckout%2F10189977%3Fwallet%3Dphw
&oauth_verifier=6c50838e31b7441e6eafa2229385452889255b13
&oauth_token=d6fa60984308aebb6183d44fb9688fb9dc8332dc
Example Callback URL (Cancel)
http://www.somemerchant.com/checkoutcomplete.htm
?mpstatus=cancel
Example Callback URL (Failure)
http://www.somemerchant.com/checkoutcomplete.htm
?mpstatus=failure
Example Callback Function (Success)
function handleCallbackSuccess (data) {
    callYourServerWith(data.oauth_token, data.oauth_verifier, data.checkout_resource_url);
}
9. Call Access Token Service
If the checkout was completed successfully, call the Access Token Service to retrieve an access token. You will need the request token and the verifier token received in Step 8.
As there is no need to retrieve a long access token again, only this one call to the Access Token Service will be made.
access_token_response = MastercardCoreSdk::Api::AccessTokenApi.create(verifier_token, request_token)
access_token = access_token_response.oauth_token
10. Retrieve Payment, Shipping Data, Rewards and 3-D Secure Details
Use the Checkout Resource URL received in Step 8 and the access token from Step 9 to retrieve the constomer’s payment, shipping, reward and 3-D Secure information from MasterPass.
start_index = checkout_resource_url.rindex('/') + 1
end_index = checkout_resource_url.index('?').nil? ? -1 : checkout_resource_url.index('?')
path_id = checkout_resource_url[start_index..end_index]

checkout = MastercardMasterpassMerchant::Api::CheckoutApi.show(path_id, access_token)
card = checkout.card
billing_address = card.billing_address
contact = checkout.contact
auth_options = checkout.authentication_options
precheckout_transaction_id = checkout.pre_checkout_transaction_id
reward_program = checkout.reward_program
shipping_address = checkout.shipping_address
transaction_id = checkout.transaction_id
wallet_id = checkout.wallet_id
11. Process Payment through a payment gateway
Using the data retrieved in Step 10, process the payment through the merchant's payment gateway.
12. Log Transactions with MasterPass
After the payment has been processed in Step 11, make a service call to communicate the result of the transaction to MasterPass.
merchant_transactions = MastercardMasterpassMerchant::MerchantTransactions.new(
    :merchant_transactions => [
        MastercardMasterpassMerchant::MerchantTransaction.new(
            :transaction_id => 4549794,
            :consumer_key => '0zMKpm0nFtUv8lLXT97jDRo2bp4vNF8MFYyt3R5R87e3f3f4!414b48675861677159682b563745776b593652377939673d',
            :currency => 'USD',
            :order_amount => 1800,
            :transaction_status => 'Success',
            :approval_code => '888888',
            :pre_checkout_transaction_id => 'a4a6x55-rgb1c5-hyaqkemj-1-hybxhplo-947',
            :express_checkout_indicator => false,
            :purchase_date => '2016-06-23T15:09:32+00:00'
        )
    ]
)

merchant_trans_response = MastercardMasterpassMerchant::Api::PostbackApi.create(merchant_transactions)
Connected Checkout Integration
Pairing During Checkout
1. Call Request Token Service (2 times)
Call the Request Token Service twice. The first call generates a pairing request token, which will be used to gain the long access token needed to pair the consumer's wallet and merchant account.
The second call generates a checkout request token that will be used to invoke the MasterPass Lightbox. Pass a callbackUrl that the browser will redirect to when the Lightbox closes.
The Request Token Service calls must be made before the consumer clicks the Buy with MasterPass button.
$callbackUrl = "https://www.somemerchant.com/checkoutconfirm.htm";

$pairingResponse = RequestTokenApi::create($callbackUrl);
$pairingRequestToken = $pairingResponse->getOauthToken();

$checkoutResponse = RequestTokenApi::create($callbackUrl);
$checkoutRequestToken = $checkoutResponse::getOauthToken();
2. Call Shopping Cart Service
The Shopping Cart Service enables shopping cart data to be displayed to users as they proceed through the MasterPass login and checkout. This service requires the checkout request token from Step 1.
Each ShoppingCartItem must have a description, quantity, and value. Value is represented as an integer (for example, USD 100.00 is 10000), and is calculated as the cost of a single item multiplied by the quantity of that item. A ShoppingCartItem may also have an optional ImageURL.
The Shopping Cart Service must be called before the consumer clicks the Buy with MasterPass button.
//Build Out ShoppingCartRequest object
$shoppingCartItem1 = new ShoppingCartItem(
	array(
		"Value" => 700,
		"Description" => "This is one item",
		"Quantity" => 1,
		"ImageURL" => "https://somemerchant.com/someimage"
	)
);

$shoppingCartItem2 = new ShoppingCartItem(
	array(
		"Value" => 300,
		"Description" => "This is another item",
		"Quantity" => 1,
		"ImageURL" => "https://somemerchant.com/someotherimage"
	)
);

$shoppingCart = new ShoppingCart(
	array(
		"CurrencyCode" => "USD",
		"Subtotal" => 1000,
		"ShoppingCartItem" => array($shoppingCartItem1, $shoppingCartItem2)
	)
);

$shoppingCartRequest = new ShoppingCartRequest(
	array(
		"OAuthToken" => $requestToken,
		"OriginUrl" => $callbackDomain,
		"ShoppingCart" => $shoppingCart,
	)
);

//Call the ShoppingCartService with required params
$shoppingCartResponse = ShoppingCartApi::create($shoppingCartRequest);
3. Call Merchant Initialization Service
The Merchant Initialization Service is used to secure Lightbox connections between the merchant and MasterPass. The OriginUrl identifies the origin of the page that will initialize the Lightbox. This service requires the checkout request token from Step 1.
The Merchant Initialization Service must be called before the consumer clicks the Buy with MasterPass button.
//Create an instance of MerchantInitializationRequest
$merchantInitializationRequest = new MerchantInitializationRequest(
	array(
		"OriginUrl" => "https://somemerchant.com",
		"OAuthToken" => $checkoutRequestToken
	)
);

//Call the MerchantInitializationApi with required params
$merchantInitializationResponse = MerchantInitializationApi::create($merchantInitializationRequest);
4. Invoke MasterPass UI (Lightbox) for checkout
On the Checkout Page of the merchant's website, add the Buy with MasterPass button to your HTML (see MasterPass Branding to customize size and locale).
<img src="https://www.mastercard.com/mc_us/wallet/img/en/US/mcpp_wllt_btn_chk_147x034px.png"/>Import jQuery, and add the MasterPass Integration Script for either the sandbox or the production environment.
<!-- url to jquery 1.10.2 -->
  <script type="text/javascript" src="https://ajax.googleapis.com/ajax/libs/
jquery/1.10.2/jquery.min.js"></script>

<!-- url to sandbox MasterPass Lightbox -->
  <script type="text/javascript" src=" https://sandbox.masterpass.com/
lightbox/Switch/integration/MasterPass.client.js "></script>

<!-- url to production MasterPass Lightbox -->
  <!-- <script type="text/javascript" src=" https://masterpass.com/lightbox/
Switch/integration/MasterPass.client.js "></script> -->
Invoke the MasterPass lightbox when the user clicks the Buy with MasterPass button.
<script type="text/javascript" language="Javascript">
    MasterPass.client.checkout({
       "requestPairing":true,                                                      //required
       "requestToken":"insert_checkout_request_token_here",                        //required
       "pairingRequestToken":"insert_pairing_request_token_here",                  //required
       "callbackUrl":"http://www.somemerchant.com/checkoutcomplete.htm",           //required
       "merchantCheckoutId":"insert_checkout_id_here",                             //required
       "requestedDataTypes":["REWARD_PROGRAM", "ADDRESS", "PROFILE", "CARD"],      //required
       "allowedCardTypes":["master","amex","diners","discover","maestro","visa"],  //optional
       "version":"v6",                                                             //optional
       "successCallback": function(mpLightboxResponse){ ... },                     //optional
       "failureCallback": function(mpLightboxResponse){ ... },                     //optional
       "cancelCallback": function(mpLightboxResponse){ ... }                       //optional
    });
</script>- requestPairing: To enable pairing, value must be true.
- requestToken: The checkout request token generated in Step 1.
- pairingRequestToken: The pairing request token generated in Step 1.
- callbackUrl: The merchant URL to which the browser will redirect when the Lightbox closes.
- merchantCheckoutId: The unique checkout identifier obtained during the merchant onboarding process.
- requestedDataTypes: The data types the merchant requests for pairing. PROFILE and CARD are required.
- allowedCardTypes: Card types accepted by the merchant (default is all card types).
- version: MasterPass API version (default is v6).
- successCallback: The function that will be called if the MasterPass Lightbox flow ends successfully.
- failureCallback: The function that will be called if the MasterPass Lightbox flow ends in failure.
- cancelCallback: The function that will be called if the user cancels the MasterPass Lightbox flow.
5. Redirect to callback URL or call callback function
After the consumer completes checkout, MasterPass returns data to the merchant. By default, MasterPass redirects the browser to the callback URL, returning the data via URL parameters. Optionally, if callback functions were provided in Step 4, MasterPass returns control to the page that initiated the Lightbox, and the data is passed to the callback function.
Under certain conditions, the MasterPass UI may be forced to run in Full Screen display instead of launching the Lightbox. When this occurs, the browser will redirect to the callback URL when the MasterPass flow is complete, even if callback functions were supplied.
On success
On success, MasterPass returns the following parameters:
- mpstatus: String that indicates whether the MasterPass flow resulted in success, failure, or cancel.
- checkout_resource_url: The API URL that will be used to retrieve checkout information in Step 7.
- oauth_verifier: The checkout verifier token that is used to retrieve the access token in Step 6.
- oauth_token: The checkout request token that is used to retrieve the access token in Step 6. This token has the same value as the checkout request token that is generated in Step 1.
- pairing_verifier: The pairing verifier token that is used to retrieve the long access token in Step 6.
- pairing_token: The pairing request token used to retrieve the long access token in Step 6.
Example Callback URL (Success)
http://www.somemerchant.com/checkoutcomplete.htm
?mpstatus=success
&checkout_resource_url=https%3A%2F%2Fstage.api.mastercard.com%2Fmasterpass%2Fv6%2Fcheckout%2F
10706241%3Fwallet%3Dphw
&oauth_verifier=fbe45bcad30299c93765b1fb4b45bab208f84458
&oauth_token=d9382e34e0721a68a9952110cecdf89517e45498
&pairing_verifier=6c50838e31b7441e6eafa2229385452889255b13
&pairing_token=35b2a0cf87f8160fcb5d24996a12edb7cce4c530
Example Callback URL (Cancel)
http://www.somemerchant.com/checkoutcomplete.htm
?mpstatus=cancel
Example Callback URL (Failure)
http://www.somemerchant.com/checkoutcomplete.htm
?mpstatus=failure
6. Call Access Token Service (2 times)
If the checkout was completed successfully, the next step is to make two Access Token Service calls. The first call uses the checkout request token and the checkout verifier token from Step 5 to retrieve a checkout access token. This checkout access token will be used in the next step to retrieve checkout data from the current transaction.
The second call uses the pairing request token and the pairing verifier token from Step 5 to retrieve a long access token. The long access token will be used to retrieve pre-checkout data for this consumer in future transactions.
$checkoutAccessTokenResponse = AccessTokenApi::create(oauthCheckoutRequestToken, oauthCheckoutVerifierToken);
$checkoutAccessToken = checkoutAccessTokenResponse->getOauthToken();

$longAccessTokenResponse = AccessTokenApi::create(oauthPairingRequestToken, oauthPairingVerifierToken);
$longAccessToken = longAccessTokenResponse->getOauthToken(); // store for future requests
7. Retrieve payment, shipping data, rewards and 3DS details
Use the checkout resource URL received in Step 5 and the checkout access token from Step 6 to retrieve the consumer’s payment, shipping, reward and 3-D Secure information from MasterPass.
$explodedURL = explode("/", $checkoutResourceUrl);
$checkoutId = array_pop($explodedURL);
if(strpos($checkoutId, "?") !== false){
	$checkoutId = explode($checkoutId, "?")[0];
}

$logger->info($checkoutId);

$checkout = CheckoutApi::show($checkoutId, $accessToken);

$card = $checkout->getCard();
$billingAddress = $card->getBillingAddress();
$contact = $checkout->getContact();
$authOptions = checkout->getAuthenticationOptions();
$preCheckoutTransactionId = checkout->getPreCheckoutTransactionId();
$rewardProgram = checkout->getRewardProgram();
$shippingAddress = checkout->getShippingAddress();
$transactionId = checkout->getTransactionId();
$walletId = checkout->getWalletID();
8. Process payment through a payment gateway
Using the data retrieved in Step 7, process the payment through the merchant's payment gateway.
9. Log transactions with MasterPass
After the payment has been processed in Step 8, make a service call to communicate the result of the transaction to MasterPass.
//Create an instance of MerchantTransactions
$merchantTransaction = new MerchantTransaction(
	array(
		"TransactionId" => "4549794",
		"ConsumerKey" => "0zMKpm0nFtUv8lLXT97jDRo2bp4vNF8MFYyt3R5R87e3f3f4!414b48675861677159682b563745776b593652377939673d", //generated during onboarding process
		"Currency" => "USD",
		"OrderAmount" => 500, // total charged to card
		"TransactionStatus" => "Success",
		"ApprovalCode" => "888888", // authorization code returned by payment gateway
		"PrecheckoutTransactionId" => "a4a6x55-rgb1c5-hyaqkemj-1-hybxhplo-947",
		"ExpressCheckoutIndicator" => false,
		"PurchaseDate" => date("Y/m/d H:i:s")
	)
);
$request = new MerchantTransactions(array("MerchantTransactions" => array($merchantTransaction)));

//Call the PostbackService with required params
$response = PostbackApi::create($request);
Pairing without Checkout
1. Call Request Token Service
Call the Request Token Service to generate the pairing request token that will be used to invoke the MasterPass Lightbox. Pass a callbackUrl that the browser will redirect to when the Lightbox closes.
The Request Token Service must be called before the consumer clicks the Connect with MasterPass button.
$callbackUrl = "https://www.somemerchant.com/pairingcomplete.htm";
$requestTokenResponse = RequestTokenApi::create($callbackUrl);
$pairingRequestToken = $requestTokenResponse->getOauthToken();
2. Call Merchant Initialization Service
The Merchant Initialization Service is used to secure Lightbox connections between the merchant site and MasterPass. The OriginUrl identifies the origin of the page that will initialize the Lightbox. This service requires the pairing request token from Step 1.
//Create an instance of MerchantInitializationRequest
$merchantInitializationRequest = new MerchantInitializationRequest(
	array(
		"OriginUrl" => "https://somemerchant.com",
		"OAuthToken" => $pairingRequestToken
	)
);

//Call the MerchantInitializationApi with required params
$merchantInitializationResponse = MerchantInitializationApi::create($merchantInitializationRequest);
3. Invoke MasterPass UI (Lightbox) for pairing
Add the Connect with MasterPass button to the merchant site (for example, on the user account page) (see MasterPass Branding to customize size and locale).
<img src="https://www.mastercard.com/mc_us/wallet/img/en/US/mp_connect_with_button_126px.png"/>Import jQuery, and add the MasterPass Integration Script for either the sandbox or the production environment.
<!-- url to jquery 1.10.2 -->
 <script type="text/javascript" src="https://ajax.googleapis.com/ajax/libs/
jquery/1.10.2/jquery.min.js"></script>

<!-- url to sandbox MasterPass Lightbox -->
 <script type="text/javascript" src=" https://sandbox.masterpass.com/
lightbox/Switch/integration/MasterPass.client.js "></script>

<!-- url to production MasterPass Lightbox -->
 <!-- <script type="text/javascript" src=" https://masterpass.com/lightbox/
Switch/integration/MasterPass.client.js "></script> -->
Invoke the MasterPass lightbox when the user clicks the Connect with MasterPass button.
<script type="text/javascript" language="Javascript">
    MasterPass.client.connect({
       "requestPairing":true,                                            //required
       "pairingRequestToken":"insert_pairing_request_token_here",        //required
       "callbackUrl":"http://www.somemerchant.com/pairingcomplete.htm", //required
       "merchantCheckoutId":"insert_checkout_id_here",                   //required
       "requestedDataTypes":["REWARD_PROGRAM", "ADDRESS", "PROFILE", "CARD"],  //required
       "version":"v6"                                                    //optional
       "successCallback": function(mpLightboxResponse){ ... },           //optional
       "failureCallback": function(mpLightboxResponse){ ... },           //optional
       "cancelCallback": function(mpLightboxResponse){ ... }             //optional
    });
</script>- requestPairing: To enable pairing, value must be true.
- pairingRequestToken: Your pairing request token generated in Step 1.
- callbackUrl: The merchant URL to which the browser will redirect when the Lightbox closes.
- merchantCheckoutId: The unique checkout identifier obtained during the Merchant Onboarding process.
- requestedDataTypes: The data types the merchant requests for pairing. PROFILE and CARD are required.
- version: MasterPass API version (default is v6).
- successCallback: The function that will be called if the MasterPass flow ends successfully.
- failureCallback: The function that will be called if the MasterPass flow ends in failure.
- cancelCallback: The function that will be called if the user cancels the MasterPass flow.
4. Redirect to callback URL or call callback function
After the lightbox closes, MasterPass returns data to the merchant. By default, MasterPass redirects the browser to the callback URL, returning the data via URL parameters. Optionally, if callback functions were provided in Step 4, MasterPass returns control to the page that initiated the Lightbox, and the data is passed to the callback function.
Under certain conditions, the MasterPass UI may be forced to run in Full Screen display instead of launching the Lightbox. When this occurs, the browser will redirect to the callback URL when the MasterPass flow is complete, even if callback functions were supplied.
Example Callback URL (Success)
On Success, MasterPass returns the following parameters:
- mpstatus: String that indicates whether the MasterPass flow resulted in success, failure, or cancel.
- pairing_verifier: The pairing verifier token that is used to retrieve the long access token in Step 6.
- pairing_token: The pairing request token used to retrieve the long access token in Step 6.
http://www.somemerchant.com/pairingcomplete.htm
?mpstatus=success
&pairing_verifier=6c50838e31b7441e6eafa2229385452889255b13
&pairing_token=35b2a0cf87f8160fcb5d24996a12edb7cce4c530Example Callback URL (Cancel)
http://www.somemerchant.com/pairingcomplete.htm
?mpstatus=cancelExample Callback URL (Failure)
http://www.somemerchant.com/pairingcomplete.htm
?mpstatus=failureExample Callback Function (Success)
function handleCallbackSuccess (data) {
document.getElementById('pairingToken').value=data.pairing_token;
document.getElementById('pairingVerifer').value=data.pairing_verifier;
}5. Call Access Token Service
If the pairing was completed successfully, call the Access Token Service to retrieve a long access token. You will need the pairing request token and the pairing verifier token received in Step 4.
The long access token will be used to retrieve pre-checkout data for this consumer in the future. Store the long access token with this user's merchant account data so that it can be retrieved anytime the user logs into the merchant site.
$accessTokenResponse = AccessTokenApi::create($pairingRequestToken, $pairingVerifierToken);
$longAccessToken = $accessTokenResponse->getOauthToken(); // store for future requestsCheckout after Pairing
1. Consumer logs onto merchant site
A consumer's long access token should have been stored with their account data for the merchant's site. When the consumer logs into their merchant site account, get their long access token.
2. Call PreCheckout Data Service
Use the consumer's long access token to retrieve pre-checkout data. The data types returned will be the types that were requested via the requestedDataTypes parameter when the Lightbox was invoked (Step 4 of Pairing During Checkout or Step 3 of Pairing Without Checkout).
$requestedDataTypes = array("REWARD_PROGRAM", "ADDRESS", "PROFILE", "CARD");
$preCheckoutDataRequest = new PreCheckoutDataRequest();
$pairingDataTypes = new PairingDataTypes();
foreach ($requestedDataTypes as $pairingType){
$newPairingType = new PairingDataType(
array(
"Type" => $pairingType
)
);
$pairingDataTypes->setPairingDataType = $newPairingType;
}
$preCheckoutDataRequest->setPairingDataTypes($pairingDataTypes);
$preCheckoutDataResponse = PrecheckoutDataApi::create($longAccessToken, $preCheckoutDataRequest);3. Consumer makes card/shipping address selection
Display the wallet data retrieved in Step 2 to the consumer, and prompt the consumer to select from it. Save the selected cardId, shippingId, and (if applicable) rewardId to be used on the Place Order page of the merchant site.
4. Call Request Token Service
Call the Request Token Service to generate the request token that will be used to invoke the MasterPass Lightbox. Pass a callbackUrl that the browser will redirect to when the Lightbox closes.
The Request Token Service must be called before creating the Buy with MasterPass button.
$callbackUrl = "https://www.somemerchant.com/checkoutconfirm.htm";
$requestTokenResponse = RequestTokenApi::create($callbackUrl);
$requestToken = $requestTokenResponse->getOauthToken();5. Call Shopping Cart Service
The Shopping Cart Service enables shopping cart data to be displayed to users as they proceed through the MasterPass login and checkout. This service requires the request token from Step 4.
Each ShoppingCartItem must have a description, quantity, and value. Value is represented as an integer (for example, USD 100.00 is 10000), and is calculated as the cost of a single item multiplied by the quantity of that item. A ShoppingCartItem may also have an optional ImageURL.
The Shopping Cart Service must be called before creating the Buy with MasterPass button.
//Build Out ShoppingCartRequest object
$shoppingCartItem1 = new ShoppingCartItem(
array(
"Value" => 700,
"Description" => "This is one item",
"Quantity" => 1,
"ImageURL" => "https://somemerchant.com/someimage"
)
);
$shoppingCartItem2 = new ShoppingCartItem(
array(
"Value" => 300,
"Description" => "This is another item",
"Quantity" => 1,
"ImageURL" => "https://somemerchant.com/someotherimage"
)
);
$shoppingCart = new ShoppingCart(
array(
"CurrencyCode" => "USD",
"Subtotal" => 1000,
"ShoppingCartItem" => array($shoppingCartItem1, $shoppingCartItem2)
)
);
$shoppingCartRequest = new ShoppingCartRequest(
array(
"OAuthToken" => $requestToken,
"OriginUrl" => $callbackDomain,
"ShoppingCart" => $shoppingCart,
)
);
//Call the ShoppingCartService with required params
$shoppingCartResponse = ShoppingCartApi::create($shoppingCartRequest);6. Call Merchant Initialization Service
The Merchant Initialization Service is used to secure Lightbox connections between the merchant site and MasterPass. The OriginUrl identifies the origin of the page that will invoke the Lightbox. This service requires the request token from Step 4.
The Merchant Initialization Service must be called before creating the Buy with MasterPass button.
//Create an instance of MerchantInitializationRequest
$merchantInitializationRequest = new MerchantInitializationRequest(
array(
"OriginUrl" => "https://somemerchant.com",
"OAuthToken" => $requestToken
)
);
//Call the MerchantInitializationApi with required params
$merchantInitializationResponse = MerchantInitializationApi::create($merchantInitializationRequest);7. Create Buy With MasterPass Button
Import jQuery, and add the MasterPass Integration Script for either the sandbox or the production environment
<!-- url to jquery 1.10.2 -->
<script type="text/javascript" src="https://ajax.googleapis.com/ajax/libs/
jquery/1.10.2/jquery.min.js"></script>
<!-- url to sandbox MasterPass Lightbox -->
<script type="text/javascript" src=" https://sandbox.masterpass.com/
lightbox/Switch/integration/MasterPass.client.js "></script>
<!-- url to production MasterPass Lightbox -->
<!-- <script type="text/javascript" src=" https://masterpass.com/lightbox/
Switch/integration/MasterPass.client.js "></script> -->On the Place Order page of the merchant's website, create the Buy with MasterPass button using the cardId, addressId, and rewardId from Step 3 and the request token from Step 4.
<script type="text/javascript" language="Javascript">
MasterPass.client.checkout({
"requestToken":"insert_request_token_here", //required
"callbackUrl":"http://www.somemerchant.com/checkoutcomplete.htm", //required
"merchantCheckoutId":"insert_checkout_id_here", //required
"cardId":"insert_selected_card_id_here", //required
"shippingId":"insert_selected_shipping_address_id_here", //required
"precheckoutTransactionId":"insert_prechechout_txn_id_here", //required
"walletName":"insert_wallet_name_here", //required
"consumerWalletId":"insert_consumer_walletid_here", //required
"loyaltyId":"insert_loyalty_id_here", //optional
"requireShippingDestination": "true" //optional
"version":"v6", //optional
"successCallback": function(mpLightboxResponse){ ... }, //optional
"failureCallback": function(mpLightboxResponse){ ... }, //optional
"cancelCallback": function(mpLightboxResponse){ ... } //optional
});
</script>- requestToken: The request token generated in Step 4.
- callbackUrl: The merchant URL to which the browser will redirect when the Lightbox closes.
- merchantCheckoutId: The unique checkout identifier obtained during the Merchant Onboarding process.
- cardId: The identifier of the selected card collected in Step 3.
- shippingId: The identifier of the shipping information collected in Step 3.
- precheckoutTransactionId: The pre-checkout transaction identifier collected in Step 3.
- walletName: The consumer's wallet name collected in Step 3.
- consumerWalletId: The consumer's wallet identifier collected in Step 3.
- loyaltyId: The rewardId, optionally collected in Step 3.
- requireShippingDestination: Denotes whether the consumer's shipping information is required.
- version: MasterPass API version (default is v6).
- successCallback: The function that will be called if the MasterPass flow ends successfully.
- failureCallback: The function that will be called if the MasterPass flow ends in failure.
- cancelCallback: The function that will be called if the user cancels the MasterPass flow.
8. Redirect to callback URL or call callback function
After the consumer completes checkout, MasterPass returns data to the merchant. By default, MasterPass redirects the browser to the callback URL, returning the data via URL parameters. Optionally, if callback functions were provided in Step 4, MasterPass returns control to the page that initiated the Lightbox, and the data is passed to the callback function.
Under certain conditions, the MasterPass UI may be forced to run in Full Screen display instead of launching the Lightbox. When this occurs, the browser will redirected to the callback URL when the MasterPass flow is complete, even if callback functions were supplied.
On Success
On Success, MasterPass returns the following parameters:
- mpstatus: String that indicates whether the MasterPass flow resulted in success, failure, or cancel.
- checkout_resource_url: The API URL that will be used to retrieve checkout information in Step 10.
- oauth_verifier: The verifier token that is used in conjunction with the request token to retrieve the access token in Step 9.
- oauth_token: The request token that is used in conjunction with the verifier token to retrieve the access token in Step 9. This token has the same value as the request token that is generated in Step 1.
Example Callback URL (Success)
http://www.somemerchant.com/checkoutcomplete.htm
?mpstatus=success
&checkout_resource_url=https%3A%2F%2Fsandbox.api.mastercard.com%2Fmasterpass\%2Fv6%2Fcheckout%2F10189977%3Fwallet%3Dphw
&oauth_verifier=6c50838e31b7441e6eafa2229385452889255b13
&oauth_token=d6fa60984308aebb6183d44fb9688fb9dc8332dcExample Callback URL (Cancel)
http://www.somemerchant.com/checkoutcomplete.htm
?mpstatus=cancelExample Callback URL (Failure)
http://www.somemerchant.com/checkoutcomplete.htm
?mpstatus=failureExample Callback Function (Success)
function handleCallbackSuccess (data) {
callYourServerWith(data.oauth_token, data.oauth_verifier, data.checkout_resource_url);
}9. Call Access Token Service
If the checkout was completed successfully, call the Access Token Service to retrieve an access token. You will need the request token and the verifier token received in Step 8.
As there is no need to retrieve a long access token again, only this one call to the Access Token Service will be made.
$accessTokenResponse = AccessTokenApi::create($requestToken, $verifierToken);
$accessToken = $accessTokenResponse->getOauthToken();10. Retrieve Payment, Shipping Data, Rewards and 3-D Secure Details
Use the Checkout Resource URL received in Step 8 and the access token from Step 9 to retrieve the constomer’s payment, shipping, reward and 3-D Secure information from MasterPass.
$explodedURL = explode("/", $checkoutResourceUrl);
$checkoutId = array_pop($explodedURL);
if(strpos($checkoutId, "?") !== false){
$checkoutId = explode($checkoutId, "?")[0];
}
$logger->info($checkoutId);
$checkout = CheckoutApi::show($checkoutId, $accessToken);
$card = $checkout->getCard();
$billingAddress = $card->getBillingAddress();
$contact = $checkout->getContact();
$authOptions = checkout->getAuthenticationOptions();
$preCheckoutTransactionId = checkout->getPreCheckoutTransactionId();
$rewardProgram = checkout->getRewardProgram();
$shippingAddress = checkout->getShippingAddress();
$transactionId = checkout->getTransactionId();
$walletId = checkout->getWalletID();11. Process Payment through a payment gateway
Using the data retrieved in Step 10, process the payment through the merchant's payment gateway.
12. Log Transactions with MasterPass
After the payment has been processed in Step 11, make a service call to communicate the result of the transaction to MasterPass.
//Create an instance of MerchantTransactions
$merchantTransaction = new MerchantTransaction(
array(
"TransactionId" => "4549794",
"ConsumerKey" => "0zMKpm0nFtUv8lLXT97jDRo2bp4vNF8MFYyt3R5R87e3f3f4!414b48675861677159682b563745776b593652377939673d", //generated during onboarding process
"Currency" => "USD",
"OrderAmount" => 500, // total charged to card
"TransactionStatus" => "Success",
"ApprovalCode" => "888888", // authorization code returned by payment gateway
"PrecheckoutTransactionId" => "a4a6x55-rgb1c5-hyaqkemj-1-hybxhplo-947",
"ExpressCheckoutIndicator" => false,
"PurchaseDate" => date("Y/m/d H:i:s")
)
);
$request = new MerchantTransactions(array("MerchantTransactions" => array($merchantTransaction)));
//Call the PostbackService with required params
$response = PostbackApi::create($request);Express Checkout Integration
Pairing During Checkout
1. Call Request Token Service (2 times)
Call the Request Token Service twice. The first call generates a pairing request token, which will be used to gain the long access token needed to pair the consumer's wallet and merchant account.
The second call generates a checkout request token that will be used to invoke the MasterPass Lightbox. Pass a callback_url that the browser will redirect to when the Lightbox closes.
The Request Token Service calls must be made before the consumer clicks the Buy with MasterPass button.
String callback_url = "https://www.somemerchant.com/checkoutconfirm.htm";
RequestTokenResponse pairingResponse = RequestTokenApi.create(callback_url);
String pairing_request_token = pairingResponse.getOauthToken();
RequestTokenResponse checkoutResponse = RequestTokenApi.create(callback_url);
String checkout_request_token = checkoutResponse.getOauthToken();
2. Call Shopping Cart Service
The Shopping Cart Service enables shopping cart data to be displayed to users as they proceed through the MasterPass login and checkout. This service requires the checkout request token from Step 1.
Each ShoppingCartItem must have a description, quantity, and value. Value is represented as an integer (for example, USD 100.00 is 10000), and is calculated as the cost of a single item multiplied by the quantity of that item. A ShoppingCartItem may also have an optional imageURL.
The Shopping Cart Service must be called before the consumer clicks the Buy with MasterPass button.
//Create an instance of ShoppingCartRequest
ShoppingCartRequest shoppingCartRequest = new ShoppingCartRequest()
.shoppingCart(new ShoppingCart()
.subtotal(11900L)
.currencyCode("USD")
.shoppingCartItem(new ShoppingCartItem()
.value(1900L)
.description("This is one item")
.quantity(1))
.shoppingCartItem(new ShoppingCartItem()
.imageURL("https://somemerchant.com/someimage")
.value(10000L)
.description("Five items")
.quantity(5)))
.oAuthToken(request_token);
//Call the ShoppingCartService with required params
ShoppingCartResponse shoppingCartResponse = ShoppingCartApi.create(shoppingCartRequest);3. Call Merchant Initialization Service
The Merchant Initialization Service is used to secure Lightbox connections between the merchant and MasterPass. The originUrl identifies the origin of the page that will initialize the Lightbox. This service requires the checkout request token from Step 1.
The Merchant Initialization Service must be called before the consumer clicks the Buy with MasterPass button.
//Create an instance of MerchantInitializationRequest
MerchantInitializationRequest merchantInitializationRequest = new MerchantInitializationRequest()
.originUrl("https://somemerchant.com")
.oAuthToken(checkout_request_token);
//Call the MerchantInitializationApi with required params
MerchantInitializationResponse merchantInitializationResponse = MerchantInitializationApi.create(merchantInitializationRequest);4. Invoke MasterPass UI (Lightbox) for checkout
On the Checkout Page of the merchant's website, add the Buy with MasterPass button to your HTML (see MasterPass Branding to customize size and locale).
<img src="https://www.mastercard.com/mc_us/wallet/img/en/US/mcpp_wllt_btn_chk_147x034px.png"/>Import jQuery, and add the MasterPass Integration Script for either the sandbox or the production environment.
<!-- url to jquery 1.10.2 -->
<script type="text/javascript" src="https://ajax.googleapis.com/ajax/libs/
jquery/1.10.2/jquery.min.js"></script>
<!-- url to sandbox MasterPass Lightbox -->
<script type="text/javascript" src=" https://sandbox.masterpass.com/
lightbox/Switch/integration/MasterPass.client.js "></script>
<!-- url to production MasterPass Lightbox -->
<!-- <script type="text/javascript" src=" https://masterpass.com/lightbox/
Switch/integration/MasterPass.client.js "></script> -->Invoke the MasterPass lightbox when the user clicks the Buy with MasterPass button.
<script type="text/javascript" language="Javascript">
MasterPass.client.checkout({
"requestPairing":true, //required
"requestToken":"insert_checkout_request_token_here", //required
"pairingRequestToken":"insert_pairing_request_token_here", //required
"callbackUrl":"http://www.somemerchant.com/checkoutcomplete.htm", //required
"merchantCheckoutId":"insert_checkout_id_here", //required
"requestedDataTypes":["REWARD_PROGRAM", "ADDRESS", "PROFILE", "CARD"], //required
"requestExpressCheckout": true, //required
"allowedCardTypes":["master","amex","diners","discover","maestro","visa"], //optional
"version":"v6", //optional
"successCallback": function(mpLightboxResponse){ ... }, //optional
"failureCallback": function(mpLightboxResponse){ ... }, //optional
"cancelCallback": function(mpLightboxResponse){ ... } //optional
});
</script>- requestPairing: To enable pairing, value must be true.
- requestToken: The checkout request token generated in Step 1.
- pairingRequestToken: The pairing request token generated in Step 1.
- callbackUrl: The merchant URL to which the browser will redirect when the Lightbox closes.
- merchantCheckoutId: The unique checkout identifier obtained during the merchant onboarding process.
- requestedDataTypes: The data types the merchant requests for pairing. PROFILE and CARD are required.
- requestExpressCheckout: Set this property to true to request pairing for Express Checkout.
- allowedCardTypes: Card types accepted by the merchant (default is all card types).
- version: MasterPass API version (default is v6).
- successCallback: The function that will be called if the MasterPass Lightbox flow ends successfully.
- failureCallback: The function that will be called if the MasterPass Lightbox flow ends in failure.
- cancelCallback: The function that will be called if the user cancels the MasterPass Lightbox flow.
5. Redirect to callback URL or call callback function
After the consumer completes checkout, MasterPass returns data to the merchant. By default, MasterPass redirects the browser to the callback URL, returning the data via URL parameters. Optionally, if callback functions were provided in Step 4, MasterPass returns control to the page that initiated the Lightbox, and the data is passed to the callback function.
Under certain conditions, the MasterPass UI may be forced to run in Full Screen display instead of launching the Lightbox. When this occurs, the browser will redirect to the callback URL when the MasterPass flow is complete, even if callback functions were supplied.
On success
On success, MasterPass returns the following parameters:
- mpstatus: String that indicates whether the MasterPass flow resulted in success, failure, or cancel.
- checkout_resource_url: The API URL that will be used to retrieve checkout information in Step 7.
- oauth_verifier: The checkout verifier token that is used to retrieve the access token in Step 6.
- oauth_token: The checkout request token that is used to retrieve the access token in Step 6. This token has the same value as the checkout request token that is generated in Step 1.
- pairing_verifier: The pairing verifier token that is used to retrieve the long access token in Step 6.
- pairing_token: The pairing request token used to retrieve the long access token in Step 6.
Example Callback URL (Success)
http://www.somemerchant.com/checkoutcomplete.htm
?mpstatus=success
&checkout_resource_url=https%3A%2F%2Fstage.api.mastercard.com%2Fmasterpass%2Fv6%2Fcheckout%2F
10706241%3Fwallet%3Dphw
&oauth_verifier=fbe45bcad30299c93765b1fb4b45bab208f84458
&oauth_token=d9382e34e0721a68a9952110cecdf89517e45498
&pairing_verifier=6c50838e31b7441e6eafa2229385452889255b13
&pairing_token=35b2a0cf87f8160fcb5d24996a12edb7cce4c530Example Callback URL (Cancel)
http://www.somemerchant.com/checkoutcomplete.htm
?mpstatus=cancelExample Callback URL (Failure)
http://www.somemerchant.com/checkoutcomplete.htm
?mpstatus=failure6. Call Access Token Service (2 times)
If the checkout was completed successfully, the next step is to make two Access Token Service calls. The first call uses the checkout request token and the checkout verifier token from Step 5 to retrieve a checkout access token. This checkout access token will be used in the next step to retrieve checkout data from the current transaction.
The second call uses the pairing request token and the pairing verifier token from Step 5 to retrieve a long access token. The long access token will be used to retrieve pre-checkout data for this consumer in future transactions.
AccessTokenResponse checkoutAccessTokenResponse = AccessTokenApi.create(oauth_checkout_request_token, oauth_checkout_verifier_token);
String checkout_access_token = checkoutAccessTokenResponse.getOauthToken();
AccessTokenResponse longAccessTokenResponse = AccessTokenApi.create(oauth_pairing_request_token, oauth_pairing_verifier_token);
String long_access_token = longAccessTokenResponse.getOauthToken(); // store for future requests7. Retrieve payment, shipping data, rewards and 3DS details
Use the checkout resource URL received in Step 5 and the checkout access token from Step 6 to retrieve the consumer's payment, shipping, reward and 3-D Secure information from MasterPass.
int startIndex = checkoutResourceUrl.lastIndexOf('/') + 1;
int endIndex = checkoutResourceUrl.indexOf('?') != -1 ?
checkoutResourceUrl.indexOf('?')
: checkoutResourceUrl.length();
String checkoutId = checkoutResourceUrl.substring(startIndex, endIndex);
Checkout checkout = CheckoutApi.show(checkoutId, accessToken);
Card card = checkout.getCard();
Address billingAddress = card.getBillingAddress();
Contact contact = checkout.getContact();
AuthenticationOptions authOptions = checkout.getAuthenticationOptions();
String preCheckoutTransactionId = checkout.getPreCheckoutTransactionId();
RewardProgram rewardProgram = checkout.getRewardProgram();
ShippingAddress shippingAddress = checkout.getShippingAddress();
String transactionId = checkout.getTransactionId();
String walletId = checkout.getWalletID();8. Process payment through a payment gateway
Using the data retrieved in Step 7, process the payment through the merchant's payment gateway.
9. Log transactions with MasterPass
After the payment has been processed in Step 8, make a service call to communicate the result of the transaction to MasterPass.
//Create an instance of MerchantTransactions
MerchantTransactions request = new MerchantTransactions()
.merchantTransactions(new MerchantTransaction()
.transactionId("4549794") // from Step 7
.purchaseDate("2014-08-01T14:52:57.539-05:00")
.expressCheckoutIndicator(false)
.approvalCode("888888") // authorization code returned by payment gateway
.transactionStatus(TransactionStatusEnum.valueOf("Success"))
.orderAmount(1229L) // total charged to card
.preCheckoutTransactionId("a4a6x55-rgb1c5-hyaqkemj-1-hybxhplo-947") // from Step 7
.currency("USD")
.consumerKey("0zMKpm0nFtUv8lLXT97jDRo2bp4vNF8MFYyt3R5R87e3f3f4!414b48675861677159682b563745776b593652377939673d")); //generated during onboarding process
//Call the PostbackService with required params
MerchantTransactions response = PostbackApi.create(request);Pairing without Checkout
1. Call Request Token Service
Call the Request Token Service to generate the pairing request token that will be used to invoke the MasterPass Lightbox. Pass a callback_url that the browser will redirect to when the Lightbox closes.
The Request Token Service must be called before the consumer clicks the Connect with MasterPass button.
String callback_url = "https://www.somemerchant.com/pairingcomplete.htm";
RequestTokenResponse requestTokenResponse = RequestTokenApi.create(callback_url);
String pairing_request_token = requestTokenResponse.getOauthToken();2. Call Merchant Initialization Service
The Merchant Initialization Service is used to secure Lightbox connections between the merchant site and MasterPass. The originUrl identifies the origin of the page that will initialize the Lightbox. This service requires the pairing request token from Step 1.
//Create an instance of MerchantInitializationRequest
MerchantInitializationRequest merchantInitializationRequest = new MerchantInitializationRequest()
.originUrl("https://somemerchant.com")
.oAuthToken(pairing_request_token);
//Call the MerchantInitializationApi with required params
MerchantInitializationResponse merchantInitializationResponse = MerchantInitializationApi.create(merchantInitializationRequest);
3. Invoke MasterPass UI (Lightbox) for pairing
Add the Connect with MasterPass button to the merchant site (for example, on the user account page) (see MasterPass Branding to customize size and locale).
<img src="https://www.mastercard.com/mc_us/wallet/img/en/US/mp_connect_with_button_126px.png"/>Import jQuery, and add the MasterPass Integration Script for either the sandbox or the production environment.
<!-- url to jquery 1.10.2 -->
<script type="text/javascript" src="https://ajax.googleapis.com/ajax/libs/
jquery/1.10.2/jquery.min.js"></script>
<!-- url to sandbox MasterPass Lightbox -->
<script type="text/javascript" src=" https://sandbox.masterpass.com/
lightbox/Switch/integration/MasterPass.client.js "></script>
<!-- url to production MasterPass Lightbox -->
<!-- <script type="text/javascript" src=" https://masterpass.com/lightbox/
Switch/integration/MasterPass.client.js "></script> -->Invoke the MasterPass lightbox when the user clicks the Connect with MasterPass button.
<script type="text/javascript" language="Javascript">
MasterPass.client.connect({
"requestPairing":true, //required
"pairingRequestToken":"insert_pairing_request_token_here", //required
"callbackUrl":"http://www.somemerchant.com/pairingcomplete.htm", //required
"merchantCheckoutId":"insert_checkout_id_here", //required
"requestedDataTypes":["REWARD_PROGRAM", "ADDRESS", "PROFILE", "CARD"], //required
"requestExpressCheckout":true, //required
"version":"v6", //optional
"successCallback": function(mpLightboxResponse){ ... }, //optional
"failureCallback": function(mpLightboxResponse){ ... }, //optional
"cancelCallback": function(mpLightboxResponse){ ... } //optional
});
</script>- requestPairing: To enable pairing, value must be true.
- pairingRequestToken: Your pairing request token generated in Step 1.
- callbackUrl: The merchant URL to which the browser will redirect when the Lightbox closes.
- merchantCheckoutId: The unique checkout identifier obtained during the Merchant Onboarding process.
- requestedDataTypes: The data types the merchant requests for pairing. PROFILE and CARD are required.
- requestExpressCheckout: Set to true to indicate pairing for Express Checkout.
- version: MasterPass API version (default is v6).
- successCallback: The function that will be called if the MasterPass flow ends successfully.
- failureCallback: The function that will be called if the MasterPass flow ends in failure.
- cancelCallback: The function that will be called if the user cancels the MasterPass flow.
4. Redirect to callback URL or call callback function
After the lightbox closes, MasterPass returns data to the merchant. By default, MasterPass redirects the browser to the callback URL, returning the data via URL parameters. Optionally, if callback functions were provided in Step 4, MasterPass returns control to the page that initiated the Lightbox, and the data is passed to the callback function.
Under certain conditions, the MasterPass UI may be forced to run in Full Screen display instead of launching the Lightbox. When this occurs, the browser will redirect to the callback URL when the MasterPass flow is complete, even if callback functions were supplied.
Example Callback URL (Success)
On Success, MasterPass returns the following parameters:
- mpstatus: String that indicates whether the MasterPass flow resulted in success, failure, or cancel.
- pairing_verifier: The pairing verifier token that is used to retrieve the long access token in Step 6.
- pairing_token: The pairing request token used to retrieve the long access token in Step 6.
http://www.somemerchant.com/pairingcomplete.htm
?mpstatus=success
&pairing_verifier=6c50838e31b7441e6eafa2229385452889255b13
&pairing_token=35b2a0cf87f8160fcb5d24996a12edb7cce4c530Example Callback URL (Cancel)
http://www.somemerchant.com/pairingcomplete.htm
?mpstatus=cancelExample Callback URL (Failure)
http://www.somemerchant.com/pairingcomplete.htm
?mpstatus=failureExample Callback Function (Success)
function handleCallbackSuccess (data) {
document.getElementById('pairingToken').value=data.pairing_token;
document.getElementById('pairingVerifer').value=data.pairing_verifier;
}5. Call Access Token Service
If the pairing was completed successfully, call the Access Token Service to retrieve a long access token. You will need the pairing request token and the pairing verifier token received in Step 4.
The long access token will be used to retrieve pre-checkout data for this consumer in the future. Store the long access token with this user's merchant account data so that it can be retrieved anytime the user logs into the merchant site.
AccessTokenResponse accessTokenResponse = AccessTokenApi.create(pairing_request_token, pairing_verifier_token);
String long_access_token = accessTokenResponse.getOauthToken(); // store for future requestsExpress Checkout
1. Consumer logs onto merchant site
A consumer's long access token should have been stored with their account data for the merchant's site. When the consumer logs into their merchant site account, get their long access token.
2. Call PreCheckout Data Service
Use the consumer's long access token to retrieve pre-checkout data. The data types returned will be the types that were requested via the requestedDataTypes parameter when the Lightbox was invoked (Step 4 of Pairing During Checkout or Step 3 of Pairing Without Checkout).
String[] requestedDataTypes = {"REWARD_PROGRAM", "ADDRESS", "PROFILE", "CARD"};
PrecheckoutDataRequest preCheckoutDataRequest = new PrecheckoutDataRequest();
PairingDataTypes pairingDataTypes = new PairingDataTypes();
for(int i = 0; i < requestedDataTypes.length; i++){
pairingDataTypes.pairingDataType(new PairingDataType().type(TypeEnum.valueOf(requestedDataTypes[i])));
}
preCheckoutDataRequest.pairingDataTypes(pairingDataTypes);
PrecheckoutDataResponse response = PrecheckoutDataApi.create(long_access_token, preCheckoutDataRequest);3. Consumer makes card/shipping address selection
Display the wallet data retrieved in Step 2 to the consumer, and prompt the consumer to select from it. Save the selected cardId, shippingId, and (if applicable) rewardId to be used to get the checkout details.
4. Display place order page
Show the place order button to the user. Use the selected precheckout data as placeholders for order details.
5. Retrieve Payment, Shipping Data, Rewards and 3-D Secure Details
Call the Express Checkout Service to retrieve the full details of the customer's payment, shipping, and reward information selected in Step 3 from MasterPass.
ExpressCheckoutRequest expressCheckoutRequest = new ExpressCheckoutRequest()
.precheckoutTransactionId("insert_precheckoutTransactionId_here") // from precheckout data
.merchantCheckoutId("insert_checkoutId_here")
.originUrl("http://www.somemerchant.com")
.currencyCode("USD")
.advancedCheckoutOverride(false) // set to true to disable 3-DS authentication
.orderAmount("1299")
.digitalGoods(false)
.cardId("consumer_selected_cardId")
.shippingAddressId("consumer_selected_shippingAddressId")
.rewardProgramId("consumer_selected_rewardId");
ExpressCheckoutResponse response = ExpressCheckoutApi.create("insert_longAccessToken_here", expressCheckoutRequest);
Checkout checkout = response.getCheckout();
Card card = checkout.getCard();
Address billingAddress = card.getBillingAddress();
Contact contact = checkout.getContact();
AuthenticationOptions authOptions = checkout.getAuthenticationOptions();
String preCheckoutTransactionId = checkout.getPreCheckoutTransactionId();
RewardProgram rewardProgram = checkout.getRewardProgram();
ShippingAddress shippingAddress = checkout.getShippingAddress();
String transactionId = checkout.getTransactionId();
String walletId = checkout.getWalletID();6. Handle 3-DS Authentication if needed
The Express Checkout Service may indicate that the consumer needs to pass 3-DS authentication before MasterPass can return the full credit card details. This will be indicated with an error on the response. See the section 3-DS Security and then return to this step.
7. Process Payment through a payment gateway
Using the data retrieved in Step 5, process the payment through the merchant's payment gateway.
8. Log Transactions with MasterPass
After the payment has been processed in Step 7, make a service call to communicate the result of the transaction to MasterPass.
//Create an instance of MerchantTransactions
MerchantTransactions request = new MerchantTransactions()
.merchantTransactions(new MerchantTransaction()
.transactionId("4549794")
.purchaseDate("2014-08-01T14:52:57.539-05:00")
.expressCheckoutIndicator(true) // mark this as true
.approvalCode("888888") // authorization code returned by payment gateway
.transactionStatus(TransactionStatusEnum.valueOf("Success"))
.orderAmount(1229L) // total charged to card
.preCheckoutTransactionId("a4a6x55-rgb1c5-hyaqkemj-1-hybxhplo-947")
.currency("USD")
.consumerKey("0zMKpm0nFtUv8lLXT97jDRo2bp4vNF8MFYyt3R5R87e3f3f4!414b48675861677159682b563745776b593652377939673d")); //generated during onboarding process
//Call the PostbackService with required params
MerchantTransactions response = PostbackApi.create(request);3-DS Security
If the merchant has enabled 3-D Secure, the consumer will be required to provide additional authentication before MasterPass can return full credit card details. When this is the case, the Express Checkout Service (Step 6 of the Express Checkout flow) will return an error message indicating the need for 3-DS authentication.
1. Determine if 3-DS Authentication is needed
Call the Express Checkout Service using your long access token. Check the response for an error that indicates 3-DS is needed.
ExpressCheckoutResponse response = ExpressCheckoutApi.create("insert_longAccessToken_here", expressCheckoutRequest);
boolean expressSecurityRequired = false;
for (Error error : response.getErrors().getError()) {
if (error.getSource().equals("3DS Needed")) {
expressSecurityRequired = true;
}
}2. Call Request Token Service
The Request Token Service must be called before creating the Buy with MasterPass button.
String callback_url = "https://www.somemerchant.com/checkoutconfirm.htm";
RequestTokenResponse requestTokenResponse = RequestTokenApi.create(callback_url);
String request_token = requestTokenResponse.getOauthToken();3. Call Merchant Initialization Service
The Merchant Initialization Service is used to secure Lightbox connections between the merchant site and MasterPass. The originUrl identifies the origin of the page that will invoke the Lightbox. This service requires the request token from Step 2.
The Merchant Initialization Service must be called before creating the Buy with MasterPass button.
//Create an instance of MerchantInitializationRequest
MerchantInitializationRequest merchantInitializationRequest = new MerchantInitializationRequest()
.originUrl("https://somemerchant.com")
.oAuthToken(request_token);
//Call the MerchantInitializationApi with required params
MerchantInitializationResponse merchantInitializationResponse = MerchantInitializationApi.create(merchantInitializationRequest);4. Initialize the MasterPass Card Security lightbox
Import jQuery, and add the MasterPass Integration Script for either the sandbox or the production environment
<!-- url to jquery 1.10.2 -->
<script type="text/javascript" src="https://ajax.googleapis.com/ajax/libs/
jquery/1.10.2/jquery.min.js"></script>
<!-- url to sandbox MasterPass Lightbox -->
<script type="text/javascript" src=" https://sandbox.masterpass.com/
lightbox/Switch/integration/MasterPass.client.js "></script>
<!-- url to production MasterPass Lightbox -->
<!-- <script type="text/javascript" src=" https://masterpass.com/lightbox/
Switch/integration/MasterPass.client.js "></script> -->On the Place Order page of the merchant's website, launch the Card Securty lightbox interface.
<script type="text/javascript" language="Javascript">
MasterPass.client.cardSecurity({
"requestToken":"insert_request_token_here", //required
"callbackUrl":"http://www.somemerchant.com/checkoutcomplete.htm", //required
"merchantCheckoutId":"insert_checkout_id_here", //required
"precheckoutTransactionId":"insert_prechechout_txn_id_here", //required
"successCallback": function(mpLightboxResponse){ ... }, //optional
"failureCallback": function(mpLightboxResponse){ ... }, //optional
"cancelCallback": function(mpLightboxResponse){ ... } //optional
});
</script>- requestToken: The request token generated in Step 2.
- callbackUrl: The merchant URL to which the browser will redirect when the Lightbox closes.
- merchantCheckoutId: The unique checkout identifier obtained during the Merchant Onboarding process.
- precheckoutTransactionId: The pre-checkout transaction identifier collected from the precheckout data.
- successCallback: The function that will be called if the MasterPass flow ends successfully.
- failureCallback: The function that will be called if the MasterPass flow ends in failure.
- cancelCallback: The function that will be called if the user cancels the MasterPass flow.
5. Redirect to callback URL or call callback function
After the consumer completes the security authentication, MasterPass returns data to the merchant. By default, MasterPass redirects the browser to the callback URL, returning the data via URL parameters. Optionally, if callback functions were provided in Step 4, MasterPass returns control to the page that initiated the Lightbox, and the data is passed to the callback function.
Under certain conditions, the MasterPass UI may be forced to run in Full Screen display instead of launching the Lightbox. When this occurs, the browser will redirected to the callback URL when the MasterPass flow is complete, even if callback functions were supplied.
on Success
On Success, MasterPass returns the following parameters:
- mpstatus: String that indicates whether the MasterPass Card Security flow resulted in success, failure, or cancel.
Example Callback URL (Success)
http://www.somemerchant.com/checkoutcomplete.htm
?mpstatus=successExample Callback URL (Cancel)
http://www.somemerchant.com/checkoutcomplete.htm
?mpstatus=cancelExample Callback URL (Failure)
http://www.somemerchant.com/checkoutcomplete.htm
?mpstatus=failureExample Callback Function (Success)
function handleCallbackSuccess (data) {
callYourServerWith(data.mpstatus);
}6. Retrieve Payment, Shipping Data, Rewards and 3-D Secure Details
If the authentication was completed successfully, call the Express Checkout Service to retrieve the full details of the customer's payment, shipping, and reward information selected by the consumer from MasterPass.
ExpressCheckoutRequest expressCheckoutRequest = new ExpressCheckoutRequest()
.precheckoutTransactionId("insert_precheckoutTransactionId_here") // from precheckout data
.merchantCheckoutId("insert_checkoutId_here")
.originUrl("http://www.somemerchant.com")
.currencyCode("USD")
.advancedCheckoutOverride(false) // set to true to disable 3-DS authentication
.orderAmount("1299")
.digitalGoods(false)
.cardId("consumer_selected_cardId")
.shippingAddressId("consumer_selected_shippingAddressId")
.rewardProgramId("consumer_selected_rewardId");
ExpressCheckoutResponse response = ExpressCheckoutApi.create("insert_longAccessToken_here", expressCheckoutRequest);
Checkout checkout = response.getCheckout();
Card card = checkout.getCard();
Address billingAddress = card.getBillingAddress();
Contact contact = checkout.getContact();
AuthenticationOptions authOptions = checkout.getAuthenticationOptions();
String preCheckoutTransactionId = checkout.getPreCheckoutTransactionId();
RewardProgram rewardProgram = checkout.getRewardProgram();
ShippingAddress shippingAddress = checkout.getShippingAddress();
String transactionId = checkout.getTransactionId();
String walletId = checkout.getWalletID();
Express Checkout Integration
Pairing During Checkout
1. Call Request Token Service (2 times)
Call the Request Token Service twice. The first call generates a pairing request token, which will be used to gain the long access token needed to pair the consumer's wallet and merchant account.
The second call generates a checkout request token that will be used to invoke the MasterPass Lightbox. Pass a callback_url that the browser will redirect to when the Lightbox closes.
The Request Token Service calls must be made before the consumer clicks the Buy with MasterPass button.
callback_url = "https://www.somemerchant.com/checkoutconfirm.htm"
pairing_token_response = MastercardCoreSdk::Api::RequestTokenApi.create(callback_url)
pairing_request_token = pairing_token_response.oauth_token;
request_token_response = MastercardCoreSdk::Api::RequestTokenApi.create(callback_url)
request_token = request_token_response.oauth_token;
2. Call Shopping Cart Service
The Shopping Cart Service enables shopping cart data to be displayed to users as they proceed through the MasterPass login and checkout. This service requires the checkout request token from Step 1.
Each ShoppingCartItem must have a description, quantity, and value. Value is represented as an integer (for example, USD 100.00 is 10000), and is calculated as the cost of a single item multiplied by the quantity of that item. A ShoppingCartItem may also have an optional imageURL.
The Shopping Cart Service must be called before the consumer clicks the Buy with MasterPass button.
//Create an instance of ShoppingCartRequest
ShoppingCartRequest shoppingCartRequest = new ShoppingCartRequest();
ShoppingCart shoppingCart = new ShoppingCart();
List<ShoppingCartItem> shoppingCartItems = new List<ShoppingCartItem>();
shoppingCartItems.Add(new ShoppingCartItem
{
Value = 1900L,
Description = "This is one item",
Quantity = 1
});
shoppingCartItems.Add(new ShoppingCartItem
{
ImageURL = "https://somemerchant.com/someimage",
Value = 10000L,
Description = "Five items",
Quantity = 5
});
shoppingCart.Subtotal = 11900L;
shoppingCart.CurrencyCode = "USD";
shoppingCart.ShoppingCartItem = shoppingCartItems;
shoppingCartRequest.ShoppingCart = shoppingCart;
shoppingCartRequest.OAuthToken = request_token;
//Call the ShoppingCartService with required params
ShoppingCartResponse shoppingCartResponse = ShoppingCartApi.Create(shoppingCartRequest);3. Call Merchant Initialization Service
The Merchant Initialization Service is used to secure Lightbox connections between the merchant and MasterPass. The originUrl identifies the origin of the page that will initialize the Lightbox. This service requires the checkout request token from Step 1.
The Merchant Initialization Service must be called before the consumer clicks the Buy with MasterPass button.
//Create an instance of MerchantInitializationRequest
MerchantInitializationRequest merchantInitializationRequest = new MerchantInitializationRequest
{
OriginUrl = "https://somemerchant.com",
OAuthToken = request_token
};
//Call the MerchantInitializationApi with required params
MerchantInitializationResponse merchantInitializationResponse = MerchantInitializationApi.Create(merchantInitializationRequest);4. Invoke MasterPass UI (Lightbox) for checkout
On the Checkout Page of the merchant's website, add the Buy with MasterPass button to your HTML (see MasterPass Branding to customize size and locale).
<img src="https://www.mastercard.com/mc_us/wallet/img/en/US/mcpp_wllt_btn_chk_147x034px.png"/>Import jQuery, and add the MasterPass Integration Script for either the sandbox or the production environment.
<!-- url to jquery 1.10.2 -->
<script type="text/javascript" src="https://ajax.googleapis.com/ajax/libs/
jquery/1.10.2/jquery.min.js"></script>
<!-- url to sandbox MasterPass Lightbox -->
<script type="text/javascript" src=" https://sandbox.masterpass.com/
lightbox/Switch/integration/MasterPass.client.js "></script>
<!-- url to production MasterPass Lightbox -->
<!-- <script type="text/javascript" src=" https://masterpass.com/lightbox/
Switch/integration/MasterPass.client.js "></script> -->Invoke the MasterPass lightbox when the user clicks the Buy with MasterPass button.
<script type="text/javascript" language="Javascript">
MasterPass.client.checkout({
"requestPairing":true, //required
"requestToken":"insert_checkout_request_token_here", //required
"pairingRequestToken":"insert_pairing_request_token_here", //required
"callbackUrl":"http://www.somemerchant.com/checkoutcomplete.htm", //required
"merchantCheckoutId":"insert_checkout_id_here", //required
"requestedDataTypes":["REWARD_PROGRAM", "ADDRESS", "PROFILE", "CARD"], //required
"requestExpressCheckout": true, //required
"allowedCardTypes":["master","amex","diners","discover","maestro","visa"], //optional
"version":"v6", //optional
"successCallback": function(mpLightboxResponse){ ... }, //optional
"failureCallback": function(mpLightboxResponse){ ... }, //optional
"cancelCallback": function(mpLightboxResponse){ ... } //optional
});
</script>- requestPairing: To enable pairing, value must be true.
- requestToken: The checkout request token generated in Step 1.
- pairingRequestToken: The pairing request token generated in Step 1.
- callbackUrl: The merchant URL to which the browser will redirect when the Lightbox closes.
- merchantCheckoutId: The unique checkout identifier obtained during the merchant onboarding process.
- requestedDataTypes: The data types the merchant requests for pairing. PROFILE and CARD are required.
- requestExpressCheckout: Set this property to true to request pairing for Express Checkout.
- allowedCardTypes: Card types accepted by the merchant (default is all card types).
- version: MasterPass API version (default is v6).
- successCallback: The function that will be called if the MasterPass Lightbox flow ends successfully.
- failureCallback: The function that will be called if the MasterPass Lightbox flow ends in failure.
- cancelCallback: The function that will be called if the user cancels the MasterPass Lightbox flow.
5. Redirect to callback URL or call callback function
After the consumer completes checkout, MasterPass returns data to the merchant. By default, MasterPass redirects the browser to the callback URL, returning the data via URL parameters. Optionally, if callback functions were provided in Step 4, MasterPass returns control to the page that initiated the Lightbox, and the data is passed to the callback function.
Under certain conditions, the MasterPass UI may be forced to run in Full Screen display instead of launching the Lightbox. When this occurs, the browser will redirect to the callback URL when the MasterPass flow is complete, even if callback functions were supplied.
On success
On success, MasterPass returns the following parameters:
- mpstatus: String that indicates whether the MasterPass flow resulted in success, failure, or cancel.
- checkout_resource_url: The API URL that will be used to retrieve checkout information in Step 7.
- oauth_verifier: The checkout verifier token that is used to retrieve the access token in Step 6.
- oauth_token: The checkout request token that is used to retrieve the access token in Step 6. This token has the same value as the checkout request token that is generated in Step 1.
- pairing_verifier: The pairing verifier token that is used to retrieve the long access token in Step 6.
- pairing_token: The pairing request token used to retrieve the long access token in Step 6.
Example Callback URL (Success)
http://www.somemerchant.com/checkoutcomplete.htm
?mpstatus=success
&checkout_resource_url=https%3A%2F%2Fstage.api.mastercard.com%2Fmasterpass%2Fv6%2Fcheckout%2F
10706241%3Fwallet%3Dphw
&oauth_verifier=fbe45bcad30299c93765b1fb4b45bab208f84458
&oauth_token=d9382e34e0721a68a9952110cecdf89517e45498
&pairing_verifier=6c50838e31b7441e6eafa2229385452889255b13
&pairing_token=35b2a0cf87f8160fcb5d24996a12edb7cce4c530Example Callback URL (Cancel)
http://www.somemerchant.com/checkoutcomplete.htm?mpstatus=cancelExample Callback URL (Failure)
http://www.somemerchant.com/checkoutcomplete.htm?mpstatus=failure6. Call Access Token Service (2 times)
If the checkout was completed successfully, the next step is to make two Access Token Service calls. The first call uses the checkout request token and the checkout verifier token from Step 5 to retrieve a checkout access token. This checkout access token will be used in the next step to retrieve checkout data from the current transaction.
The second call uses the pairing request token and the pairing verifier token from Step 5 to retrieve a long access token. The long access token will be used to retrieve pre-checkout data for this consumer in future transactions.
AccessTokenResponse checkoutAccessTokenResponse = AccessTokenApi.Create(oauth_checkout_request_token, oauth_checkout_verifier_token);
string checkout_access_token = checkoutAccessTokenResponse.OauthToken;
AccessTokenResponse longAccessTokenResponse = AccessTokenApi.Create(oauth_pairing_request_token, oauth_pairing_verifier_token);
string long_access_token = longAccessTokenResponse.OauthToken; // store for future requests7. Retrieve payment, shipping data, rewards and 3DS details
Use the checkout resource URL received in Step 5 and the checkout access token from Step 6 to retrieve the consumer's payment, shipping, reward and 3-D Secure information from MasterPass.
string checkoutId = checkoutResourceUrl.IndexOf('?') != -1 ? checkoutResourceUrl.Substring(checkoutResourceUrl.LastIndexOf('/') + 1).Split('?')[0] : checkoutResourceUrl.Substring(checkoutResourceUrl.LastIndexOf('/') + 1);
Checkout checkout = CheckoutApi.Show(checkoutId, accessToken);
Card card = checkout.Card;
Address billingAddress = card.BillingAddress;
Contact contact = checkout.Contact;
AuthenticationOptions authOptions = checkout.AuthenticationOptions;
string preCheckoutTransactionId = checkout.PreCheckoutTransactionId;
RewardProgram rewardProgram = checkout.RewardProgram;
ShippingAddress shippingAddress = checkout.ShippingAddress;
string transactionId = checkout.TransactionId;
string walletId = checkout.WalletID;8. Process payment through a payment gateway
Using the data retrieved in Step 7, process the payment through the merchant's payment gateway.
9. Log transactions with MasterPass
After the payment has been processed in Step 8, make a service call to communicate the result of the transaction to MasterPass.
//Create an instance of MerchantTransactions
MerchantTransactions objMerchantTransactions = new MerchantTransactions();
List<MerchantTransaction> merchantTransactions = new List<MerchantTransaction>();
MerchantTransaction merchantTransaction = new MerchantTransaction
{
TransactionId = "4549794", // from Step 7
PurchaseDate = "2014-08-01T14:52:57.539-05:00",
ExpressCheckoutIndicator = false,
ApprovalCode = "888888", // authorization code returned by payment gateway
TransactionStatus = "Success",
OrderAmount = 1229L, // total charged to card
PreCheckoutTransactionId = "a4a6x55-rgb1c5-hyaqkemj-1-hybxhplo-947",
Currency = "USD",
ConsumerKey = "0zMKpm0nFtUv8lLXT97jDRo2bp4vNF8MFYyt3R5R87e3f3f4!414b48675861677159682b563745776b593652377939673d" //generated during onboarding process
};
merchantTransactions.Add(merchantTransaction);
objMerchantTransactions._MerchantTransactions = merchantTransactions;
//Call the PostbackService with required params
MerchantTransactions response = PostbackApi.Create(objMerchantTransactions);Pairing without Checkout
1. Call Request Token Service
Call the Request Token Service to generate the pairing request token that will be used to invoke the MasterPass Lightbox. Pass a callback_url that the browser will redirect to when the Lightbox closes.
The Request Token Service must be called before the consumer clicks the Connect with MasterPass button.
string callback_url = "https://www.somemerchant.com/pairingcomplete.htm";
RequestTokenResponse requestTokenResponse = RequestTokenApi.Create(callback_url);
string pairing_request_token = requestTokenResponse.OauthToken;2. Call Merchant Initialization Service
The Merchant Initialization Service is used to secure Lightbox connections between the merchant site and MasterPass. The originUrl identifies the origin of the page that will initialize the Lightbox. This service requires the pairing request token from Step 1.
//Create an instance of MerchantInitializationRequest
MerchantInitializationRequest merchantInitializationRequest = new MerchantInitializationRequest
{
OriginUrl = "https://somemerchant.com",
OAuthToken = pairing_request_token
};
//Call the MerchantInitializationApi with required params
MerchantInitializationResponse merchantInitializationResponse = MerchantInitializationApi.Create(merchantInitializationRequest);
3. Invoke MasterPass UI (Lightbox) for pairing
Add the Connect with MasterPass button to the merchant site (for example, on the user account page) (see MasterPass Branding to customize size and locale).
<img src="https://www.mastercard.com/mc_us/wallet/img/en/US/mp_connect_with_button_126px.png"/>Import jQuery, and add the MasterPass Integration Script for either the sandbox or the production environment.
<!-- url to jquery 1.10.2 -->
<script type="text/javascript" src="https://ajax.googleapis.com/ajax/libs/
jquery/1.10.2/jquery.min.js"></script>
<!-- url to sandbox MasterPass Lightbox -->
<script type="text/javascript" src=" https://sandbox.masterpass.com/
lightbox/Switch/integration/MasterPass.client.js "></script>
<!-- url to production MasterPass Lightbox -->
<!-- <script type="text/javascript" src=" https://masterpass.com/lightbox/
Switch/integration/MasterPass.client.js "></script> -->Invoke the MasterPass lightbox when the user clicks the Connect with MasterPass button.
<script type="text/javascript" language="Javascript">
MasterPass.client.connect({
"requestPairing":true, //required
"pairingRequestToken":"insert_pairing_request_token_here", //required
"callbackUrl":"http://www.somemerchant.com/pairingcomplete.htm", //required
"merchantCheckoutId":"insert_checkout_id_here", //required
"requestedDataTypes":["REWARD_PROGRAM", "ADDRESS", "PROFILE", "CARD"], //required
"requestExpressCheckout":true, //required
"version":"v6", //optional
"successCallback": function(mpLightboxResponse){ ... }, //optional
"failureCallback": function(mpLightboxResponse){ ... }, //optional
"cancelCallback": function(mpLightboxResponse){ ... } //optional
});
</script>- requestPairing: To enable pairing, value must be true.
- pairingRequestToken: Your pairing request token generated in Step 1.
- callbackUrl: The merchant URL to which the browser will redirect when the Lightbox closes.
- merchantCheckoutId: The unique checkout identifier obtained during the Merchant Onboarding process.
- requestedDataTypes: The data types the merchant requests for pairing. PROFILE and CARD are required.
- requestExpressCheckout: Set to true to indicate pairing for Express Checkout.
- version: MasterPass API version (default is v6).
- successCallback: The function that will be called if the MasterPass flow ends successfully.
- failureCallback: The function that will be called if the MasterPass flow ends in failure.
- cancelCallback: The function that will be called if the user cancels the MasterPass flow.
4. Redirect to callback URL or call callback function
After the lightbox closes, MasterPass returns data to the merchant. By default, MasterPass redirects the browser to the callback URL, returning the data via URL parameters. Optionally, if callback functions were provided in Step 4, MasterPass returns control to the page that initiated the Lightbox, and the data is passed to the callback function.
Under certain conditions, the MasterPass UI may be forced to run in Full Screen display instead of launching the Lightbox. When this occurs, the browser will redirect to the callback URL when the MasterPass flow is complete, even if callback functions were supplied.
Example Callback URL (Success)
On Success, MasterPass returns the following parameters:
- mpstatus: String that indicates whether the MasterPass flow resulted in success, failure, or cancel.
- pairing_verifier: The pairing verifier token that is used to retrieve the long access token in Step 6.
- pairing_token: The pairing request token used to retrieve the long access token in Step 6.
http://www.somemerchant.com/pairingcomplete.htm
?mpstatus=success
&pairing_verifier=6c50838e31b7441e6eafa2229385452889255b13
&pairing_token=35b2a0cf87f8160fcb5d24996a12edb7cce4c530Example Callback URL (Cancel)
http://www.somemerchant.com/pairingcomplete.htm
?mpstatus=cancelExample Callback URL (Failure)
http://www.somemerchant.com/pairingcomplete.htm
?mpstatus=failureExample Callback Function (Success)
function handleCallbackSuccess (data) {
document.getElementById('pairingToken').value=data.pairing_token;
document.getElementById('pairingVerifer').value=data.pairing_verifier;
}5. Call Access Token Service
If the pairing was completed successfully, call the Access Token Service to retrieve a long access token. You will need the pairing request token and the pairing verifier token received in Step 4.
The long access token will be used to retrieve pre-checkout data for this consumer in the future. Store the long access token with this user's merchant account data so that it can be retrieved anytime the user logs into the merchant site.
AccessTokenResponse accessTokenResponse = AccessTokenApi.create(pairing_request_token, pairing_verifier_token);
String long_access_token = accessTokenResponse.getOauthToken(); // store for future requestsExpress Checkout
1. Consumer logs onto merchant site
A consumer's long access token should have been stored with their account data for the merchant's site. When the consumer logs into their merchant site account, get their long access token.
2. Call PreCheckout Data Service
Use the consumer's long access token to retrieve pre-checkout data. The data types returned will be the types that were requested via the requestedDataTypes parameter when the Lightbox was invoked (Step 4 of Pairing During Checkout or Step 3 of Pairing Without Checkout).
string[] requestedDataTypes = { "REWARD_PROGRAM", "ADDRESS", "PROFILE", "CARD" };
PrecheckoutDataRequest preCheckoutDataRequest = new PrecheckoutDataRequest();
List<PairingDataType> lstPairingDataType = new List<PairingDataType>();
//foreach (var item in requestedDataTypes)
//{
// lstPairingDataType.Add(new PairingDataType
// {
// Type = item
// });
//}
lstPairingDataType = requestedDataTypes.Select(item => new PairingDataType() { Type = item }).ToList();
preCheckoutDataRequest.PairingDataTypes.PairingDataType = lstPairingDataType;
PrecheckoutDataResponse response = PrecheckoutDataApi.Create(long_access_token, preCheckoutDataRequest);3. Consumer makes card/shipping address selection
Display the wallet data retrieved in Step 2 to the consumer, and prompt the consumer to select from it. Save the selected cardId, shippingId, and (if applicable) rewardId to be used to get the checkout details.
4. Display place order page
Show the place order button to the user. Use the selected precheckout data as placeholders for order details.
5. Retrieve Payment, Shipping Data, Rewards and 3-D Secure Details
Call the Express Checkout Service to retrieve the full details of the customer's payment, shipping, and reward information selected in Step 3 from MasterPass.
ExpressCheckoutRequest expressCheckoutRequest = new ExpressCheckoutRequest
{
PrecheckoutTransactionId = "insert_precheckoutTransactionId_here", // from precheckout data
MerchantCheckoutId = "insert_checkoutId_here",
OriginUrl = "http://www.somemerchant.com",
CurrencyCode = "USD",
AdvancedCheckoutOverride = false, // set to true to disable 3-DS authentication
OrderAmount = "1299",
DigitalGoods = false,
CardId = "consumer_selected_cardId",
ShippingAddressId = "consumer_selected_shippingAddressId",
RewardProgramId = "consumer_selected_rewardId",
};
ExpressCheckoutResponse response = ExpressCheckoutApi.Create("insert_longAccessToken_here", expressCheckoutRequest);
Checkout checkout = response.Checkout;
Card card = checkout.Card;
Address billingAddress = card.BillingAddress;
Contact contact = checkout.Contact;
AuthenticationOptions authOptions = checkout.AuthenticationOptions;
string preCheckoutTransactionId = checkout.PreCheckoutTransactionId;
RewardProgram rewardProgram = checkout.RewardProgram;
ShippingAddress shippingAddress = checkout.ShippingAddress;
string transactionId = checkout.TransactionId;
string walletId = checkout.WalletID;6. Handle 3-DS Authentication if needed
The Express Checkout Service may indicate that the consumer needs to pass 3-DS authentication before MasterPass can return the full credit card details. This will be indicated with an error on the response. See the section 3-DS Security and then return to this step.
7. Process Payment through a payment gateway
Using the data retrieved in Step 5, process the payment through the merchant's payment gateway.
8. Log Transactions with MasterPass
After the payment has been processed in Step 7, make a service call to communicate the result of the transaction to MasterPass.
//Create an instance of MerchantTransactions
MerchantTransactions objMerchantTransactions = new MerchantTransactions();
List<MerchantTransaction> merchantTransactions = new List<MerchantTransaction>();
MerchantTransaction merchantTransaction = new MerchantTransaction
{
TransactionId = "4549794", // from Step 7
PurchaseDate = "2014-08-01T14:52:57.539-05:00",
ExpressCheckoutIndicator = true, // mark this as true
ApprovalCode = "888888", // authorization code returned by payment gateway
TransactionStatus = "Success",
OrderAmount = 1229L, // total charged to card
PreCheckoutTransactionId = "a4a6x55-rgb1c5-hyaqkemj-1-hybxhplo-947",
Currency = "USD",
ConsumerKey = "0zMKpm0nFtUv8lLXT97jDRo2bp4vNF8MFYyt3R5R87e3f3f4!414b48675861677159682b563745776b593652377939673d" //generated during onboarding process
};
merchantTransactions.Add(merchantTransaction);
objMerchantTransactions._MerchantTransactions = merchantTransactions;
//Call the PostbackService with required params
MerchantTransactions response = PostbackApi.Create(objMerchantTransactions);3-DS Security
If the merchant has enabled 3-D Secure, the consumer will be required to provide additional authentication before MasterPass can return full credit card details. When this is the case, the Express Checkout Service (Step 6 of the Express Checkout flow) will return an error message indicating the need for 3-DS authentication.
1. Determine if 3-DS Authentication is needed
Call the Express Checkout Service using your long access token. Check the response for an error that indicates 3-DS is needed.
ExpressCheckoutResponse response = ExpressCheckoutApi.Create("insert_longAccessToken_here", expressCheckoutRequest);
bool expressSecurityRequired = false;
if (response.Errors != null && response.Errors.Error.Count > 0)
{
expressSecurityRequired = response.Errors.Error.Any(x => x.Source == "3DS Needed");
}2. Call Request Token Service
The Request Token Service must be called before creating the Buy with MasterPass button.
string callback_url = "https://www.somemerchant.com/checkoutconfirm.htm";
RequestTokenResponse requestTokenResponse = RequestTokenApi.Create(callback_url);
string request_token = requestTokenResponse.OauthToken;3. Call Merchant Initialization Service
The Merchant Initialization Service is used to secure Lightbox connections between the merchant site and MasterPass. The originUrl identifies the origin of the page that will invoke the Lightbox. This service requires the request token from Step 2.
The Merchant Initialization Service must be called before creating the Buy with MasterPass button.
//Create an instance of MerchantInitializationRequest
MerchantInitializationRequest merchantInitializationRequest = new MerchantInitializationRequest
{
OriginUrl = "https://somemerchant.com",
OAuthToken = request_token
};
//Call the MerchantInitializationApi with required params
MerchantInitializationResponse merchantInitializationResponse = MerchantInitializationApi.Create(merchantInitializationRequest);4. Initialize the MasterPass Card Security lightbox
Import jQuery, and add the MasterPass Integration Script for either the sandbox or the production environment
<!-- url to jquery 1.10.2 -->
<script type="text/javascript" src="https://ajax.googleapis.com/ajax/libs/
jquery/1.10.2/jquery.min.js"></script>
<!-- url to sandbox MasterPass Lightbox -->
<script type="text/javascript" src=" https://sandbox.masterpass.com/
lightbox/Switch/integration/MasterPass.client.js "></script>
<!-- url to production MasterPass Lightbox -->
<!-- <script type="text/javascript" src=" https://masterpass.com/lightbox/
Switch/integration/MasterPass.client.js "></script> -->On the Place Order page of the merchant's website, launch the Card Securty lightbox interface.
<script type="text/javascript" language="Javascript">
MasterPass.client.cardSecurity({
"requestToken":"insert_request_token_here", //required
"callbackUrl":"http://www.somemerchant.com/checkoutcomplete.htm", //required
"merchantCheckoutId":"insert_checkout_id_here", //required
"precheckoutTransactionId":"insert_prechechout_txn_id_here", //required
"successCallback": function(mpLightboxResponse){ ... }, //optional
"failureCallback": function(mpLightboxResponse){ ... }, //optional
"cancelCallback": function(mpLightboxResponse){ ... } //optional
});
</script>- requestToken: The request token generated in Step 2.
- callbackUrl: The merchant URL to which the browser will redirect when the Lightbox closes.
- merchantCheckoutId: The unique checkout identifier obtained during the Merchant Onboarding process.
- precheckoutTransactionId: The pre-checkout transaction identifier collected from the precheckout data.
- successCallback: The function that will be called if the MasterPass flow ends successfully.
- failureCallback: The function that will be called if the MasterPass flow ends in failure.
- cancelCallback: The function that will be called if the user cancels the MasterPass flow.
5. Redirect to callback URL or call callback function
After the consumer completes the security authentication, MasterPass returns data to the merchant. By default, MasterPass redirects the browser to the callback URL, returning the data via URL parameters. Optionally, if callback functions were provided in Step 4, MasterPass returns control to the page that initiated the Lightbox, and the data is passed to the callback function.
Under certain conditions, the MasterPass UI may be forced to run in Full Screen display instead of launching the Lightbox. When this occurs, the browser will redirected to the callback URL when the MasterPass flow is complete, even if callback functions were supplied.
on Success
On Success, MasterPass returns the following parameters:
- mpstatus: String that indicates whether the MasterPass Card Security flow resulted in success, failure, or cancel.
Example Callback URL (Success)
http://www.somemerchant.com/checkoutcomplete.htm?mpstatus=successExample Callback URL (Cancel)
http://www.somemerchant.com/checkoutcomplete.htm?mpstatus=cancelExample Callback URL (Failure)
http://www.somemerchant.com/checkoutcomplete.htm?mpstatus=failureExample Callback Function (Success)
function handleCallbackSuccess (data) {
callYourServerWith(data.mpstatus);
}6. Retrieve Payment, Shipping Data, Rewards and 3-D Secure Details
If the authentication was completed successfully, call the Express Checkout Service to retrieve the full details of the customer's payment, shipping, and reward information selected by the consumer from MasterPass.
ExpressCheckoutRequest expressCheckoutRequest = new ExpressCheckoutRequest
{
PrecheckoutTransactionId = "insert_precheckoutTransactionId_here", // from precheckout data
MerchantCheckoutId = "insert_checkoutId_here",
OriginUrl = "http://www.somemerchant.com",
CurrencyCode = "USD",
AdvancedCheckoutOverride = false, // set to true to disable 3-DS authentication
OrderAmount = "1299",
DigitalGoods = false,
CardId = "consumer_selected_cardId",
ShippingAddressId = "consumer_selected_shippingAddressId",
RewardProgramId = "consumer_selected_rewardId",
};
ExpressCheckoutResponse response = ExpressCheckoutApi.Create("insert_longAccessToken_here", expressCheckoutRequest);
Checkout checkout = response.Checkout;
Card card = checkout.Card;
Address billingAddress = card.BillingAddress;
Contact contact = checkout.Contact;
AuthenticationOptions authOptions = checkout.AuthenticationOptions;
string preCheckoutTransactionId = checkout.PreCheckoutTransactionId;
RewardProgram rewardProgram = checkout.RewardProgram;
ShippingAddress shippingAddress = checkout.ShippingAddress;
string transactionId = checkout.TransactionId;
string walletId = checkout.WalletID;
Express Checkout Integration
Pairing During Checkout
1. Call Request Token Service (2 times)
Call the Request Token Service twice. The first call generates a pairing request token, which will be used to gain the long access token needed to pair the consumer's wallet and merchant account.
The second call generates a checkout request token that will be used to invoke the MasterPass Lightbox. Pass a callback_url that the browser will redirect to when the Lightbox closes.
The Request Token Service calls must be made before the consumer clicks the Buy with MasterPass button.
callback_url = "https://www.somemerchant.com/checkoutconfirm.htm"
pairing_token_response = MastercardCoreSdk::Api::RequestTokenApi.create(callback_url)
pairing_request_token = pairing_token_response.oauth_token;
request_token_response = MastercardCoreSdk::Api::RequestTokenApi.create(callback_url)
request_token = request_token_response.oauth_token;2. Call Shopping Cart Service
The Shopping Cart Service enables shopping cart data to be displayed to users as they proceed through the MasterPass login and checkout. This service requires the checkout request token from Step 1.
Each shopping_cart_item must have a description, quantity, and value. Value is represented as an integer (for example, USD 100.00 is 10000), and is calculated as the cost of a single item multiplied by the quantity of that item. A shopping_cart_item may also have an optional image_url.
The Shopping Cart Service must be called before the consumer clicks the Buy with MasterPass button.
shopping_cart_request = MastercardMasterpassMerchant::ShoppingCartRequest.new(
:o_auth_token => request_token,
:shopping_cart => MastercardMasterpassMerchant::ShoppingCart.new(
:currency_code => 'USD',
:subtotal => '11900',
:shopping_cart_item => [
MastercardMasterpassMerchant::ShoppingCartItem.new(
:description => 'One Item',
:quantity => 1,
:value => 1900
),
MastercardMasterpassMerchant::ShoppingCartItem.new(
:description => 'Five of an Item',
:quantity => 5,
:value => 10000,
:image_url => 'http://somemerchant.com/someimage'
)
]
)
)
shopping_cart_response = MastercardMasterpassMerchant::Api::ShoppingCartApi.create(shopping_cart_request)3. Call Merchant Initialization Service
The Merchant Initialization Service is used to secure Lightbox connections between the merchant and MasterPass. The originUrl identifies the origin of the page that will initialize the Lightbox. This service requires the checkout request token from Step 1.
The Merchant Initialization Service must be called before the consumer clicks the Buy with MasterPass button.
merchant_init_request = MastercardMasterpassMerchant::MerchantInitializationRequest.new(
:o_auth_token => request_token,
:origin_url => 'https://somemerchant.com'
)
merchant_init_response = MastercardMasterpassMerchant::Api::MerchantInitializationApi.create(merchant_init_request)4. Invoke MasterPass UI (Lightbox) for checkout
On the Checkout Page of the merchant's website, add the Buy with MasterPass button to your HTML (see MasterPass Branding to customize size and locale).
<img src="https://www.mastercard.com/mc_us/wallet/img/en/US/mcpp_wllt_btn_chk_147x034px.png"/>Import jQuery, and add the MasterPass Integration Script for either the sandbox or the production environment.
<!-- url to jquery 1.10.2 -->
<script type="text/javascript" src="https://ajax.googleapis.com/ajax/libs/
jquery/1.10.2/jquery.min.js"></script>
<!-- url to sandbox MasterPass Lightbox -->
<script type="text/javascript" src=" https://sandbox.masterpass.com/
lightbox/Switch/integration/MasterPass.client.js "></script>
<!-- url to production MasterPass Lightbox -->
<!-- <script type="text/javascript" src=" https://masterpass.com/lightbox/
Switch/integration/MasterPass.client.js "></script> -->Invoke the MasterPass lightbox when the user clicks the Buy with MasterPass button.
<script type="text/javascript" language="Javascript">
MasterPass.client.checkout({
"requestPairing":true, //required
"requestToken":"insert_checkout_request_token_here", //required
"pairingRequestToken":"insert_pairing_request_token_here", //required
"callbackUrl":"http://www.somemerchant.com/checkoutcomplete.htm", //required
"merchantCheckoutId":"insert_checkout_id_here", //required
"requestedDataTypes":["REWARD_PROGRAM", "ADDRESS", "PROFILE", "CARD"], //required
"requestExpressCheckout": true, //required
"allowedCardTypes":["master","amex","diners","discover","maestro","visa"], //optional
"version":"v6", //optional
"successCallback": function(mpLightboxResponse){ ... }, //optional
"failureCallback": function(mpLightboxResponse){ ... }, //optional
"cancelCallback": function(mpLightboxResponse){ ... } //optional
});
</script>- requestPairing: To enable pairing, value must be true.
- requestToken: The checkout request token generated in Step 1.
- pairingRequestToken: The pairing request token generated in Step 1.
- callbackUrl: The merchant URL to which the browser will redirect when the Lightbox closes.
- merchantCheckoutId: The unique checkout identifier obtained during the merchant onboarding process.
- requestedDataTypes: The data types the merchant requests for pairing. PROFILE and CARD are required.
- requestExpressCheckout: Set this property to true to request pairing for Express Checkout.
- allowedCardTypes: Card types accepted by the merchant (default is all card types).
- version: MasterPass API version (default is v6).
- successCallback: The function that will be called if the MasterPass Lightbox flow ends successfully.
- failureCallback: The function that will be called if the MasterPass Lightbox flow ends in failure.
- cancelCallback: The function that will be called if the user cancels the MasterPass Lightbox flow.
5. Redirect to callback URL or call callback function
After the consumer completes checkout, MasterPass returns data to the merchant. By default, MasterPass redirects the browser to the callback URL, returning the data via URL parameters. Optionally, if callback functions were provided in Step 4, MasterPass returns control to the page that initiated the Lightbox, and the data is passed to the callback function.
Under certain conditions, the MasterPass UI may be forced to run in Full Screen display instead of launching the Lightbox. When this occurs, the browser will redirect to the callback URL when the MasterPass flow is complete, even if callback functions were supplied.
On success
On success, MasterPass returns the following parameters:
- mpstatus: String that indicates whether the MasterPass flow resulted in success, failure, or cancel.
- checkout_resource_url: The API URL that will be used to retrieve checkout information in Step 7.
- oauth_verifier: The checkout verifier token that is used to retrieve the access token in Step 6.
- oauth_token: The checkout request token that is used to retrieve the access token in Step 6. This token has the same value as the checkout request token that is generated in Step 1.
- pairing_verifier: The pairing verifier token that is used to retrieve the long access token in Step 6.
- pairing_token: The pairing request token used to retrieve the long access token in Step 6.
Example Callback URL (Success)
http://www.somemerchant.com/checkoutcomplete.htm
?mpstatus=success
&checkout_resource_url=https%3A%2F%2Fstage.api.mastercard.com%2Fmasterpass%2Fv6%2Fcheckout%2F
10706241%3Fwallet%3Dphw
&oauth_verifier=fbe45bcad30299c93765b1fb4b45bab208f84458
&oauth_token=d9382e34e0721a68a9952110cecdf89517e45498
&pairing_verifier=6c50838e31b7441e6eafa2229385452889255b13
&pairing_token=35b2a0cf87f8160fcb5d24996a12edb7cce4c530Example Callback URL (Cancel)
http://www.somemerchant.com/checkoutcomplete.htm
?mpstatus=cancelExample Callback URL (Failure)
http://www.somemerchant.com/checkoutcomplete.htm
?mpstatus=failure6. Call Access Token Service (2 times)
If the checkout was completed successfully, the next step is to make two Access Token Service calls. The first call uses the checkout request token and the checkout verifier token from Step 5 to retrieve a checkout access token. This checkout access token will be used in the next step to retrieve checkout data from the current transaction.
The second call uses the pairing request token and the pairing verifier token from Step 5 to retrieve a long access token. The long access token will be used to retrieve pre-checkout data for this consumer in future transactions.
access_token_response = MastercardCoreSdk::Api::AccessTokenApi.create(verifier_token, request_token)
access_token = access_token_response.oauth_token
long_access_token_response = MastercardCoreSdk::Api::AccessTokenApi.create(pairing_verifier_token, pairing_request_token)
long_access_token = long_access_token_response.oauth_token7. Retrieve payment, shipping data, rewards and 3DS details
Use the checkout resource URL received in Step 5 and the checkout access token from Step 6 to retrieve the consumer's payment, shipping, reward and 3-D Secure information from MasterPass.
start_index = checkout_resource_url.rindex('/') + 1
end_index = checkout_resource_url.index('?').nil? ? -1 : checkout_resource_url.index('?')
path_id = checkout_resource_url[start_index..end_index]
checkout = MastercardMasterpassMerchant::Api::CheckoutApi.show(path_id, access_token)
card = checkout.card
billing_address = card.billing_address
contact = checkout.contact
auth_options = checkout.authentication_options
precheckout_transaction_id = checkout.pre_checkout_transaction_id
reward_program = checkout.reward_program
shipping_address = checkout.shipping_address
transaction_id = checkout.transaction_id
wallet_id = checkout.wallet_id8. Process payment through a payment gateway
Using the data retrieved in Step 7, process the payment through the merchant's payment gateway.
9. Log transactions with MasterPass
After the payment has been processed in Step 8, make a service call to communicate the result of the transaction to MasterPass.
merchant_transactions = MastercardMasterpassMerchant::MerchantTransactions.new(
:merchant_transactions => [
MastercardMasterpassMerchant::MerchantTransaction.new(
:transaction_id => 4549794,
:consumer_key => '0zMKpm0nFtUv8lLXT97jDRo2bp4vNF8MFYyt3R5R87e3f3f4!414b48675861677159682b563745776b593652377939673d',
:currency => 'USD',
:order_amount => 1800,
:transaction_status => 'Success',
:approval_code => '888888',
:pre_checkout_transaction_id => 'a4a6x55-rgb1c5-hyaqkemj-1-hybxhplo-947',
:express_checkout_indicator => false,
:purchase_date => '2016-06-23T15:09:32+00:00'
)
]
)
merchant_trans_response = MastercardMasterpassMerchant::Api::PostbackApi.create(merchant_transactions)Pairing without Checkout
1. Call Request Token Service
Call the Request Token Service to generate the pairing request token that will be used to invoke the MasterPass Lightbox. Pass a callback_url that the browser will redirect to when the Lightbox closes.
The Request Token Service must be called before the consumer clicks the Connect with MasterPass button.
callback_url = "https://www.somemerchant.com/checkoutconfirm.htm"
pairing_token_response = MastercardCoreSdk::Api::RequestTokenApi.create(callback_url)
pairing_request_token = pairing_token_response.oauth_token;2. Call Merchant Initialization Service
The Merchant Initialization Service is used to secure Lightbox connections between the merchant site and MasterPass. The originUrl identifies the origin of the page that will initialize the Lightbox. This service requires the pairing request token from Step 1.
merchant_init_request = MastercardMasterpassMerchant::MerchantInitializationRequest.new(
:o_auth_token => pairing_request_token,
:origin_url => 'https://somemerchant.com'
)
merchant_init_response = MastercardMasterpassMerchant::Api::MerchantInitializationApi.create(merchant_init_request)3. Invoke MasterPass UI (Lightbox) for pairing
Add the Connect with MasterPass button to the merchant site (for example, on the user account page) (see MasterPass Branding to customize size and locale).
<img src="https://www.mastercard.com/mc_us/wallet/img/en/US/mp_connect_with_button_126px.png"/>Import jQuery, and add the MasterPass Integration Script for either the sandbox or the production environment.
<!-- url to jquery 1.10.2 -->
<script type="text/javascript" src="https://ajax.googleapis.com/ajax/libs/
jquery/1.10.2/jquery.min.js"></script>
<!-- url to sandbox MasterPass Lightbox -->
<script type="text/javascript" src=" https://sandbox.masterpass.com/
lightbox/Switch/integration/MasterPass.client.js "></script>
<!-- url to production MasterPass Lightbox -->
<!-- <script type="text/javascript" src=" https://masterpass.com/lightbox/
Switch/integration/MasterPass.client.js "></script> -->Invoke the MasterPass lightbox when the user clicks the Connect with MasterPass button.
<script type="text/javascript" language="Javascript">
MasterPass.client.connect({
"requestPairing":true, //required
"pairingRequestToken":"insert_pairing_request_token_here", //required
"callbackUrl":"http://www.somemerchant.com/pairingcomplete.htm", //required
"merchantCheckoutId":"insert_checkout_id_here", //required
"requestedDataTypes":["REWARD_PROGRAM", "ADDRESS", "PROFILE", "CARD"], //required
"requestExpressCheckout":true, //required
"version":"v6", //optional
"successCallback": function(mpLightboxResponse){ ... }, //optional
"failureCallback": function(mpLightboxResponse){ ... }, //optional
"cancelCallback": function(mpLightboxResponse){ ... } //optional
});
</script>- requestPairing: To enable pairing, value must be true.
- pairingRequestToken: Your pairing request token generated in Step 1.
- callbackUrl: The merchant URL to which the browser will redirect when the Lightbox closes.
- merchantCheckoutId: The unique checkout identifier obtained during the Merchant Onboarding process.
- requestedDataTypes: The data types the merchant requests for pairing. PROFILE and CARD are required.
- requestExpressCheckout: Set to true to indicate pairing for Express Checkout.
- version: MasterPass API version (default is v6).
- successCallback: The function that will be called if the MasterPass flow ends successfully.
- failureCallback: The function that will be called if the MasterPass flow ends in failure.
- cancelCallback: The function that will be called if the user cancels the MasterPass flow.
4. Redirect to callback URL or call callback function
After the lightbox closes, MasterPass returns data to the merchant. By default, MasterPass redirects the browser to the callback URL, returning the data via URL parameters. Optionally, if callback functions were provided in Step 4, MasterPass returns control to the page that initiated the Lightbox, and the data is passed to the callback function.
Under certain conditions, the MasterPass UI may be forced to run in Full Screen display instead of launching the Lightbox. When this occurs, the browser will redirect to the callback URL when the MasterPass flow is complete, even if callback functions were supplied.
Example Callback URL (Success)
On Success, MasterPass returns the following parameters:
- mpstatus: String that indicates whether the MasterPass flow resulted in success, failure, or cancel.
- pairing_verifier: The pairing verifier token that is used to retrieve the long access token in Step 6.
- pairing_token: The pairing request token used to retrieve the long access token in Step 6.
http://www.somemerchant.com/pairingcomplete.htm
?mpstatus=success
&pairing_verifier=6c50838e31b7441e6eafa2229385452889255b13
&pairing_token=35b2a0cf87f8160fcb5d24996a12edb7cce4c530Example Callback URL (Cancel)
http://www.somemerchant.com/pairingcomplete.htm
?mpstatus=cancelExample Callback URL (Failure)
http://www.somemerchant.com/pairingcomplete.htm
?mpstatus=failureExample Callback Function (Success)
function handleCallbackSuccess (data) {
document.getElementById('pairingToken').value=data.pairing_token;
document.getElementById('pairingVerifer').value=data.pairing_verifier;
}5. Call Access Token Service
If the pairing was completed successfully, call the Access Token Service to retrieve a long access token. You will need the pairing request token and the pairing verifier token received in Step 4.
The long access token will be used to retrieve pre-checkout data for this consumer in the future. Store the long access token with this user's merchant account data so that it can be retrieved anytime the user logs into the merchant site.
long_access_token_response = MastercardCoreSdk::Api::AccessTokenApi.create(pairing_verifier_token, pairing_request_token)
long_access_token = long_access_token_response.oauth_tokenExpress Checkout
1. Consumer logs onto merchant site
A consumer's long access token should have been stored with their account data for the merchant's site. When the consumer logs into their merchant site account, get their long access token.
2. Call PreCheckout Data Service
Use the consumer's long access token to retrieve pre-checkout data. The data types returned will be the types that were requested via the requestedDataTypes parameter when the Lightbox was invoked (Step 4 of Pairing During Checkout or Step 3 of Pairing Without Checkout).
requested_data_types = ['REWARD_PROGRAM', 'ADDRESS', 'PROFILE', 'CARD']
pairing_data_types = []
requested_data_types.each do |data_type|
pairing_data_type = MastercardMasterpassMerchant::PairingDataType.new
pairing_data_type.type = data_type
pairing_data_types.append(pairing_data_type)
end
pre_checkout_data_request = MastercardMasterpassMerchant::PrecheckoutDataRequest.new(
:pairing_data_types => MastercardMasterpassMerchant::PairingDataTypes.new(
:pairing_data_type => pairing_data_types
)
)
response = MastercardMasterpassMerchant::Api::PrecheckoutDataApi.create(long_access_token, pre_checkout_data_request)3. Consumer makes card/shipping address selection
Display the wallet data retrieved in Step 2 to the consumer, and prompt the consumer to select from it. Save the selected cardId, shippingId, and (if applicable) rewardId to be used to get the checkout details.
4. Display place order page
Show the place order button to the user. Use the selected precheckout data as placeholders for order details.
5. Retrieve Payment, Shipping Data, Rewards and 3-D Secure Details
Call the Express Checkout Service to retrieve the full details of the customer's payment, shipping, and reward information selected in Step 3 from MasterPass.
express_checkout_request = MastercardMasterpassMerchant::ExpressCheckoutRequest.new(
:merchant_checkout_id => 'insert_checkoutId_here',
:precheckout_transaction_id => 'insert_precheckoutTransactionId_here',
:currency_code => 'USD',
:order_amount => 1299,
:card_id => 'consumer_selected_cardId',
:digital_goods => false,
:shipping_address_id => 'consumer_selected_shippingAddressId',
:reward_program_id => 'consumer_selected_rewardId',
:advanced_checkout_override => false,
:origin_url => 'http://somemerchant.com'
)
express_checkout_response = MastercardMasterpassMerchant::Api::ExpressCheckoutApi.create(long_access_token, express_checkout_request)
checkout = express_checkout_response.checkout
card = checkout.card
billing_address = card.billing_address
contact = checkout.contact
auth_options = checkout.authentication_options
precheckout_transaction_id = checkout.pre_checkout_transaction_id
reward_program = checkout.reward_program
shipping_address = checkout.shipping_address
transaction_id = checkout.transaction_id
wallet_id = checkout.wallet_id
6. Handle 3-DS Authentication if needed
The Express Checkout Service may indicate that the consumer needs to pass 3-DS authentication before MasterPass can return the full credit card details. This will be indicated with an error on the response. See the section 3-DS Security and then return to this step.
7. Process Payment through a payment gateway
Using the data retrieved in Step 5, process the payment through the merchant's payment gateway.
8. Log Transactions with MasterPass
After the payment has been processed in Step 7, make a service call to communicate the result of the transaction to MasterPass.
merchant_transactions = MastercardMasterpassMerchant::MerchantTransactions.new(
:merchant_transactions => [
MastercardMasterpassMerchant::MerchantTransaction.new(
:transaction_id => 4549794,
:consumer_key => '0zMKpm0nFtUv8lLXT97jDRo2bp4vNF8MFYyt3R5R87e3f3f4!414b48675861677159682b563745776b593652377939673d',
:currency => 'USD',
:order_amount => 1800,
:transaction_status => 'Success',
:approval_code => '888888',
:pre_checkout_transaction_id => 'a4a6x55-rgb1c5-hyaqkemj-1-hybxhplo-947',
:express_checkout_indicator => false,
:purchase_date => '2016-06-23T15:09:32+00:00'
)
]
)
merchant_trans_response = MastercardMasterpassMerchant::Api::PostbackApi.create(merchant_transactions)3-DS Security
If the merchant has enabled 3-D Secure, the consumer will be required to provide additional authentication before MasterPass can return full credit card details. When this is the case, the Express Checkout Service (Step 6 of the Express Checkout flow) will return an error message indicating the need for 3-DS authentication.
1. Determine if 3-DS Authentication is needed
Call the Express Checkout Service using your long access token. Check the response for an error that indicates 3-DS is needed.
if !merchant_trans_response.errors.nil? && merchant_trans_response.errors.error.size > 0
merchant_trans_response.errors.error.each do |error|
if error.source == '3DS Needed'
express_security_required = true
end
end
end2. Call Request Token Service
The Request Token Service must be called before creating the Buy with MasterPass button.
callback_url = "https://www.somemerchant.com/checkoutconfirm.htm"
request_token_response = MastercardCoreSdk::Api::RequestTokenApi.create(callback_url)
request_token = request_token_response.oauth_token;3. Call Merchant Initialization Service
The Merchant Initialization Service is used to secure Lightbox connections between the merchant site and MasterPass. The originUrl identifies the origin of the page that will invoke the Lightbox. This service requires the request token from Step 2.
The Merchant Initialization Service must be called before creating the Buy with MasterPass button.
merchant_init_request = MastercardMasterpassMerchant::MerchantInitializationRequest.new(
:o_auth_token => request_token,
:origin_url => 'https://somemerchant.com'
)
merchant_init_response = MastercardMasterpassMerchant::Api::MerchantInitializationApi.create(merchant_init_request)4. Initialize the MasterPass Card Security lightbox
Import jQuery, and add the MasterPass Integration Script for either the sandbox or the production environment
<!-- url to jquery 1.10.2 -->
<script type="text/javascript" src="https://ajax.googleapis.com/ajax/libs/
jquery/1.10.2/jquery.min.js"></script>
<!-- url to sandbox MasterPass Lightbox -->
<script type="text/javascript" src=" https://sandbox.masterpass.com/
lightbox/Switch/integration/MasterPass.client.js "></script>
<!-- url to production MasterPass Lightbox -->
<!-- <script type="text/javascript" src=" https://masterpass.com/lightbox/
Switch/integration/MasterPass.client.js "></script> -->On the Place Order page of the merchant's website, launch the Card Securty lightbox interface.
<script type="text/javascript" language="Javascript">
MasterPass.client.cardSecurity({
"requestToken":"insert_request_token_here", //required
"callbackUrl":"http://www.somemerchant.com/checkoutcomplete.htm", //required
"merchantCheckoutId":"insert_checkout_id_here", //required
"precheckoutTransactionId":"insert_prechechout_txn_id_here", //required
"successCallback": function(mpLightboxResponse){ ... }, //optional
"failureCallback": function(mpLightboxResponse){ ... }, //optional
"cancelCallback": function(mpLightboxResponse){ ... } //optional
});
</script>- requestToken: The request token generated in Step 2.
- callbackUrl: The merchant URL to which the browser will redirect when the Lightbox closes.
- merchantCheckoutId: The unique checkout identifier obtained during the Merchant Onboarding process.
- precheckoutTransactionId: The pre-checkout transaction identifier collected from the precheckout data.
- successCallback: The function that will be called if the MasterPass flow ends successfully.
- failureCallback: The function that will be called if the MasterPass flow ends in failure.
- cancelCallback: The function that will be called if the user cancels the MasterPass flow.
5. Redirect to callback URL or call callback function
After the consumer completes the security authentication, MasterPass returns data to the merchant. By default, MasterPass redirects the browser to the callback URL, returning the data via URL parameters. Optionally, if callback functions were provided in Step 4, MasterPass returns control to the page that initiated the Lightbox, and the data is passed to the callback function.
Under certain conditions, the MasterPass UI may be forced to run in Full Screen display instead of launching the Lightbox. When this occurs, the browser will redirected to the callback URL when the MasterPass flow is complete, even if callback functions were supplied.
On Success
On Success, MasterPass returns the following parameters:
- mpstatus: String that indicates whether the MasterPass Card Security flow resulted in success, failure, or cancel.
Example Callback URL (Success)
http://www.somemerchant.com/checkoutcomplete.htm
?mpstatus=successExample Callback URL (Cancel)
http://www.somemerchant.com/checkoutcomplete.htm
?mpstatus=cancelExample Callback URL (Failure)
http://www.somemerchant.com/checkoutcomplete.htm
?mpstatus=failureExample Callback Function (Success)
function handleCallbackSuccess (data) {
callYourServerWith(data.mpstatus);
}6. Retrieve Payment, Shipping Data, Rewards and 3-D Secure Details
If the authentication was completed successfully, call the Express Checkout Service to retrieve the full details of the customer's payment, shipping, and reward information selected by the consumer from MasterPass.
express_checkout_request = MastercardMasterpassMerchant::ExpressCheckoutRequest.new(
:merchant_checkout_id => 'insert_checkoutId_here',
:precheckout_transaction_id => 'insert_precheckoutTransactionId_here',
:currency_code => 'USD',
:order_amount => 1299,
:card_id => 'consumer_selected_cardId',
:digital_goods => false,
:shipping_address_id => 'consumer_selected_shippingAddressId',
:reward_program_id => 'consumer_selected_rewardId',
:advanced_checkout_override => false,
:origin_url => 'http://somemerchant.com'
)
express_checkout_response = MastercardMasterpassMerchant::Api::ExpressCheckoutApi.create(long_access_token, express_checkout_request)
checkout = express_checkout_response.checkout
card = checkout.card
billing_address = card.billing_address
contact = checkout.contact
auth_options = checkout.authentication_options
precheckout_transaction_id = checkout.pre_checkout_transaction_id
reward_program = checkout.reward_program
shipping_address = checkout.shipping_address
transaction_id = checkout.transaction_id
wallet_id = checkout.wallet_id
Express Checkout Integration
Pairing During Checkout
1. Call Request Token Service (2 times)
Call the Request Token Service twice. The first call generates a pairing request token, which will be used to gain the long access token needed to pair the consumer's wallet and merchant account.
The second call generates a checkout request token that will be used to invoke the MasterPass Lightbox. Pass a callbackUrl that the browser will redirect to when the Lightbox closes.
The Request Token Service calls must be made before the consumer clicks the Buy with MasterPass button.
$callbackUrl = "https://www.somemerchant.com/checkoutconfirm.htm";
$pairingResponse = RequestTokenApi::create($callbackUrl);
$pairingRequestToken = $pairingResponse->getOauthToken();
$checkoutResponse = RequestTokenApi::create($callbackUrl);
$checkoutRequestToken = $checkoutResponse::getOauthToken();2. Call Shopping Cart Service
The Shopping Cart Service enables shopping cart data to be displayed to users as they proceed through the MasterPass login and checkout. This service requires the checkout request token from Step 1.
Each ShoppingCartItem must have a description, quantity, and value. Value is represented as an integer (for example, USD 100.00 is 10000), and is calculated as the cost of a single item multiplied by the quantity of that item. A ShoppingCartItem may also have an optional ImageURL.
The Shopping Cart Service must be called before the consumer clicks the Buy with MasterPass button.
//Build Out ShoppingCartRequest object
$shoppingCartItem1 = new ShoppingCartItem(
array(
"Value" => 700,
"Description" => "This is one item",
"Quantity" => 1,
"ImageURL" => "https://somemerchant.com/someimage"
)
);
$shoppingCartItem2 = new ShoppingCartItem(
array(
"Value" => 300,
"Description" => "This is another item",
"Quantity" => 1,
"ImageURL" => "https://somemerchant.com/someotherimage"
)
);
$shoppingCart = new ShoppingCart(
array(
"CurrencyCode" => "USD",
"Subtotal" => 1000,
"ShoppingCartItem" => array($shoppingCartItem1, $shoppingCartItem2)
)
);
$shoppingCartRequest = new ShoppingCartRequest(
array(
"OAuthToken" => $requestToken,
"OriginUrl" => $callbackDomain,
"ShoppingCart" => $shoppingCart,
)
);
//Call the ShoppingCartService with required params
$shoppingCartResponse = ShoppingCartApi::create($shoppingCartRequest);3. Call Merchant Initialization Service
The Merchant Initialization Service is used to secure Lightbox connections between the merchant and MasterPass. The OriginUrl identifies the origin of the page that will initialize the Lightbox. This service requires the checkout request token from Step 1.
The Merchant Initialization Service must be called before the consumer clicks the Buy with MasterPass button.
//Create an instance of MerchantInitializationRequest
$merchantInitializationRequest = new MerchantInitializationRequest(
array(
"OriginUrl" => "https://somemerchant.com",
"OAuthToken" => $checkoutRequestToken
)
);
//Call the MerchantInitializationApi with required params
$merchantInitializationResponse = MerchantInitializationApi::create($merchantInitializationRequest);4. Invoke MasterPass UI (Lightbox) for checkout
On the Checkout Page of the merchant's website, add the Buy with MasterPass button to your HTML (see MasterPass Branding to customize size and locale).
<img src="https://www.mastercard.com/mc_us/wallet/img/en/US/mcpp_wllt_btn_chk_147x034px.png"/>Import jQuery, and add the MasterPass Integration Script for either the sandbox or the production environment.
<!-- url to jquery 1.10.2 -->
<script type="text/javascript" src="https://ajax.googleapis.com/ajax/libs/
jquery/1.10.2/jquery.min.js"></script>
<!-- url to sandbox MasterPass Lightbox -->
<script type="text/javascript" src=" https://sandbox.masterpass.com/
lightbox/Switch/integration/MasterPass.client.js "></script>
<!-- url to production MasterPass Lightbox -->
<!-- <script type="text/javascript" src=" https://masterpass.com/lightbox/
Switch/integration/MasterPass.client.js "></script> -->Invoke the MasterPass lightbox when the user clicks the Buy with MasterPass button.
<script type="text/javascript" language="Javascript">
MasterPass.client.checkout({
"requestPairing":true, //required
"requestToken":"insert_checkout_request_token_here", //required
"pairingRequestToken":"insert_pairing_request_token_here", //required
"callbackUrl":"http://www.somemerchant.com/checkoutcomplete.htm", //required
"merchantCheckoutId":"insert_checkout_id_here", //required
"requestedDataTypes":["REWARD_PROGRAM", "ADDRESS", "PROFILE", "CARD"], //required
"requestExpressCheckout": true, //required
"allowedCardTypes":["master","amex","diners","discover","maestro","visa"], //optional
"version":"v6", //optional
"successCallback": function(mpLightboxResponse){ ... }, //optional
"failureCallback": function(mpLightboxResponse){ ... }, //optional
"cancelCallback": function(mpLightboxResponse){ ... } //optional
});
</script>- requestPairing: To enable pairing, value must be true.
- requestToken: The checkout request token generated in Step 1.
- pairingRequestToken: The pairing request token generated in Step 1.
- callbackUrl: The merchant URL to which the browser will redirect when the Lightbox closes.
- merchantCheckoutId: The unique checkout identifier obtained during the merchant onboarding process.
- requestedDataTypes: The data types the merchant requests for pairing. PROFILE and CARD are required.
- requestExpressCheckout: Set this property to true to request pairing for Express Checkout.
- allowedCardTypes: Card types accepted by the merchant (default is all card types).
- version: MasterPass API version (default is v6).
- successCallback: The function that will be called if the MasterPass Lightbox flow ends successfully.
- failureCallback: The function that will be called if the MasterPass Lightbox flow ends in failure.
- cancelCallback: The function that will be called if the user cancels the MasterPass Lightbox flow.
5. Redirect to callback URL or call callback function
After the consumer completes checkout, MasterPass returns data to the merchant. By default, MasterPass redirects the browser to the callback URL, returning the data via URL parameters. Optionally, if callback functions were provided in Step 4, MasterPass returns control to the page that initiated the Lightbox, and the data is passed to the callback function.
Under certain conditions, the MasterPass UI may be forced to run in Full Screen display instead of launching the Lightbox. When this occurs, the browser will redirect to the callback URL when the MasterPass flow is complete, even if callback functions were supplied.
On success
On success, MasterPass returns the following parameters:
- mpstatus: String that indicates whether the MasterPass flow resulted in success, failure, or cancel.
- checkout_resource_url: The API URL that will be used to retrieve checkout information in Step 7.
- oauth_verifier: The checkout verifier token that is used to retrieve the access token in Step 6.
- oauth_token: The checkout request token that is used to retrieve the access token in Step 6. This token has the same value as the checkout request token that is generated in Step 1.
- pairing_verifier: The pairing verifier token that is used to retrieve the long access token in Step 6.
- pairing_token: The pairing request token used to retrieve the long access token in Step 6.
Example Callback URL (Success)
http://www.somemerchant.com/checkoutcomplete.htm
?mpstatus=success
&checkout_resource_url=https%3A%2F%2Fstage.api.mastercard.com%2Fmasterpass%2Fv6%2Fcheckout%2F
10706241%3Fwallet%3Dphw
&oauth_verifier=fbe45bcad30299c93765b1fb4b45bab208f84458
&oauth_token=d9382e34e0721a68a9952110cecdf89517e45498
&pairing_verifier=6c50838e31b7441e6eafa2229385452889255b13
&pairing_token=35b2a0cf87f8160fcb5d24996a12edb7cce4c530Example Callback URL (Cancel)
http://www.somemerchant.com/checkoutcomplete.htm
?mpstatus=cancelExample Callback URL (Failure)
http://www.somemerchant.com/checkoutcomplete.htm
?mpstatus=failure6. Call Access Token Service (2 times)
If the checkout was completed successfully, the next step is to make two Access Token Service calls. The first call uses the checkout request token and the checkout verifier token from Step 5 to retrieve a checkout access token. This checkout access token will be used in the next step to retrieve checkout data from the current transaction.
The second call uses the pairing request token and the pairing verifier token from Step 5 to retrieve a long access token. The long access token will be used to retrieve pre-checkout data for this consumer in future transactions.
$checkoutAccessTokenResponse = AccessTokenApi::create(oauthCheckoutRequestToken, oauthCheckoutVerifierToken);
$checkoutAccessToken = checkoutAccessTokenResponse->getOauthToken();
$longAccessTokenResponse = AccessTokenApi::create(oauthPairingRequestToken, oauthPairingVerifierToken);
$longAccessToken = longAccessTokenResponse->getOauthToken(); // store for future requests7. Retrieve payment, shipping data, rewards and 3DS details
Use the checkout resource URL received in Step 5 and the checkout access token from Step 6 to retrieve the consumer's payment, shipping, reward and 3-D Secure information from MasterPass.
$explodedURL = explode("/", $checkoutResourceUrl);
$checkoutId = array_pop($explodedURL);
if(strpos($checkoutId, "?") !== false){
$checkoutId = explode($checkoutId, "?")[0];
}
$logger->info($checkoutId);
$checkout = CheckoutApi::show($checkoutId, $accessToken);
$card = $checkout->getCard();
$billingAddress = $card->getBillingAddress();
$contact = $checkout->getContact();
$authOptions = checkout->getAuthenticationOptions();
$preCheckoutTransactionId = checkout->getPreCheckoutTransactionId();
$rewardProgram = checkout->getRewardProgram();
$shippingAddress = checkout->getShippingAddress();
$transactionId = checkout->getTransactionId();
$walletId = checkout->getWalletID();8. Process payment through a payment gateway
Using the data retrieved in Step 7, process the payment through the merchant's payment gateway.
9. Log transactions with MasterPass
After the payment has been processed in Step 8, make a service call to communicate the result of the transaction to MasterPass.
//Create an instance of MerchantTransactions
$merchantTransaction = new MerchantTransaction(
array(
"TransactionId" => "4549794",
"ConsumerKey" => "0zMKpm0nFtUv8lLXT97jDRo2bp4vNF8MFYyt3R5R87e3f3f4!414b48675861677159682b563745776b593652377939673d", //generated during onboarding process
"Currency" => "USD",
"OrderAmount" => 500, // total charged to card
"TransactionStatus" => "Success",
"ApprovalCode" => "888888", // authorization code returned by payment gateway
"PrecheckoutTransactionId" => "a4a6x55-rgb1c5-hyaqkemj-1-hybxhplo-947",
"ExpressCheckoutIndicator" => false,
"PurchaseDate" => date("Y/m/d H:i:s")
)
);
$request = new MerchantTransactions(array("MerchantTransactions" => array($merchantTransaction)));
//Call the PostbackService with required params
$response = PostbackApi::create($request);Pairing without Checkout
1. Call Request Token Service
Call the Request Token Service to generate the pairing request token that will be used to invoke the MasterPass Lightbox. Pass a callbackUrl that the browser will redirect to when the Lightbox closes.
The Request Token Service must be called before the consumer clicks the Connect with MasterPass button.
$callbackUrl = "https://www.somemerchant.com/pairingcomplete.htm";
$requestTokenResponse = RequestTokenApi::create($callbackUrl);
$pairingRequestToken = $requestTokenResponse->getOauthToken();2. Call Merchant Initialization Service
The Merchant Initialization Service is used to secure Lightbox connections between the merchant site and MasterPass. The OriginUrl identifies the origin of the page that will initialize the Lightbox. This service requires the pairing request token from Step 1.
//Create an instance of MerchantInitializationRequest
$merchantInitializationRequest = new MerchantInitializationRequest(
array(
"OriginUrl" => "https://somemerchant.com",
"OAuthToken" => $pairingRequestToken
)
);
//Call the MerchantInitializationApi with required params
$merchantInitializationResponse = MerchantInitializationApi::create($merchantInitializationRequest);3. Invoke MasterPass UI (Lightbox) for pairing
Add the Connect with MasterPass button to the merchant site (for example, on the user account page) (see MasterPass Branding to customize size and locale).
<img src="https://www.mastercard.com/mc_us/wallet/img/en/US/mp_connect_with_button_126px.png"/>Import jQuery, and add the MasterPass Integration Script for either the sandbox or the production environment.
<!-- url to jquery 1.10.2 -->
<script type="text/javascript" src="https://ajax.googleapis.com/ajax/libs/
jquery/1.10.2/jquery.min.js"></script>
<!-- url to sandbox MasterPass Lightbox -->
<script type="text/javascript" src=" https://sandbox.masterpass.com/
lightbox/Switch/integration/MasterPass.client.js "></script>
<!-- url to production MasterPass Lightbox -->
<!-- <script type="text/javascript" src=" https://masterpass.com/lightbox/
Switch/integration/MasterPass.client.js "></script> -->Invoke the MasterPass lightbox when the user clicks the Connect with MasterPass button.
<script type="text/javascript" language="Javascript">
MasterPass.client.connect({
"requestPairing":true, //required
"pairingRequestToken":"insert_pairing_request_token_here", //required
"callbackUrl":"http://www.somemerchant.com/pairingcomplete.htm", //required
"merchantCheckoutId":"insert_checkout_id_here", //required
"requestedDataTypes":["REWARD_PROGRAM", "ADDRESS", "PROFILE", "CARD"], //required
"requestExpressCheckout":true, //required
"version":"v6", //optional
"successCallback": function(mpLightboxResponse){ ... }, //optional
"failureCallback": function(mpLightboxResponse){ ... }, //optional
"cancelCallback": function(mpLightboxResponse){ ... } //optional
});
</script>- requestPairing: To enable pairing, value must be true.
- pairingRequestToken: Your pairing request token generated in Step 1.
- callbackUrl: The merchant URL to which the browser will redirect when the Lightbox closes.
- merchantCheckoutId: The unique checkout identifier obtained during the Merchant Onboarding process.
- requestedDataTypes: The data types the merchant requests for pairing. PROFILE and CARD are required.
- requestExpressCheckout: Set to true to indicate pairing for Express Checkout.
- version: MasterPass API version (default is v6).
- successCallback: The function that will be called if the MasterPass flow ends successfully.
- failureCallback: The function that will be called if the MasterPass flow ends in failure.
- cancelCallback: The function that will be called if the user cancels the MasterPass flow.
4. Redirect to callback URL or call callback function
After the lightbox closes, MasterPass returns data to the merchant. By default, MasterPass redirects the browser to the callback URL, returning the data via URL parameters. Optionally, if callback functions were provided in Step 4, MasterPass returns control to the page that initiated the Lightbox, and the data is passed to the callback function.
Under certain conditions, the MasterPass UI may be forced to run in Full Screen display instead of launching the Lightbox. When this occurs, the browser will redirect to the callback URL when the MasterPass flow is complete, even if callback functions were supplied.
Example Callback URL (Success)
On Success, MasterPass returns the following parameters:
- mpstatus: String that indicates whether the MasterPass flow resulted in success, failure, or cancel.
- pairing_verifier: The pairing verifier token that is used to retrieve the long access token in Step 6.
- pairing_token: The pairing request token used to retrieve the long access token in Step 6.
http://www.somemerchant.com/pairingcomplete.htm
?mpstatus=success
&pairing_verifier=6c50838e31b7441e6eafa2229385452889255b13
&pairing_token=35b2a0cf87f8160fcb5d24996a12edb7cce4c530Example Callback URL (Cancel)
http://www.somemerchant.com/pairingcomplete.htm
?mpstatus=cancelExample Callback URL (Failure)
http://www.somemerchant.com/pairingcomplete.htm
?mpstatus=failureExample Callback Function (Success)
function handleCallbackSuccess (data) {
document.getElementById('pairingToken').value=data.pairing_token;
document.getElementById('pairingVerifer').value=data.pairing_verifier;
}5. Call Access Token Service
If the pairing was completed successfully, call the Access Token Service to retrieve a long access token. You will need the pairing request token and the pairing verifier token received in Step 4.
The long access token will be used to retrieve pre-checkout data for this consumer in the future. Store the long access token with this user's merchant account data so that it can be retrieved anytime the user logs into the merchant site.
$accessTokenResponse = AccessTokenApi::create($pairingRequestToken, $pairingVerifierToken);
$longAccessToken = $accessTokenResponse->getOauthToken(); // store for future requestsExpress Checkout
1. Consumer logs onto merchant site
A consumer's long access token should have been stored with their account data for the merchant's site. When the consumer logs into their merchant site account, get their long access token.
2. Call PreCheckout Data Service
Use the consumer's long access token to retrieve pre-checkout data. The data types returned will be the types that were requested via the requestedDataTypes parameter when the Lightbox was invoked (Step 4 of Pairing During Checkout or Step 3 of Pairing Without Checkout).
$requestedDataTypes = array("REWARD_PROGRAM", "ADDRESS", "PROFILE", "CARD");
$preCheckoutDataRequest = new PreCheckoutDataRequest();
$pairingDataTypes = new PairingDataTypes();
foreach ($requestedDataTypes as $pairingType){
$newPairingType = new PairingDataType(
array(
"Type" => $pairingType
)
);
$pairingDataTypes->setPairingDataType = $newPairingType;
}
$preCheckoutDataRequest->setPairingDataTypes($pairingDataTypes);
$preCheckoutDataResponse = PrecheckoutDataApi::create($longAccessToken, $preCheckoutDataRequest);3. Consumer makes card/shipping address selection
Display the wallet data retrieved in Step 2 to the consumer, and prompt the consumer to select from it. Save the selected cardId, shippingId, and (if applicable) rewardId to be used to get the checkout details.
4. Display place order page
Show the place order button to the user. Use the selected precheckout data as placeholders for order details.
5. Retrieve Payment, Shipping Data, Rewards and 3-D Secure Details
Call the Express Checkout Service to retrieve the full details of the customer's payment, shipping, and reward information selected in Step 3 from MasterPass.
$expressCheckoutRequest = new ExpressCheckoutRequest();
$expressCheckoutRequest->setMerchantCheckoutId("insert_checkoutId_here");
$expressCheckoutRequest->setPrecheckoutTransactionId("insert_precheckoutTransactionId_here"); // from precheckout data
$expressCheckoutRequest->setCurrencyCode("USD");
$expressCheckoutRequest->setCardId("consumer_selected_cardId");
$expressCheckoutRequest->setOriginUrl("http://www.somemerchant.com");
$expressCheckoutRequest->setAdvancedCheckoutOverride(false);
$expressCheckoutRequest->setOrderAmount("1299");
$expressCheckoutRequest->setDigitalGoods(false);
$expressCheckoutRequest->setShippingAddressId("consumer_selected_shippingAddressId");
$expressCheckoutRequest->setRewardProgramId("consumer_selected_rewardId");
$response = ExpressCheckoutApi::create("insert_longAccessToken_here", $expressCheckoutRequest);
$checkout = response->getCheckout();
$card = $checkout->getCard();
$billingAddress = $card->getBillingAddress();
$contact = $checkout->getContact();
$authOptions = checkout->getAuthenticationOptions();
$preCheckoutTransactionId = checkout->getPreCheckoutTransactionId();
$rewardProgram = checkout->getRewardProgram();
$shippingAddress = checkout->getShippingAddress();
$transactionId = checkout->getTransactionId();
$walletId = checkout->getWalletID();
6. Handle 3-DS Authentication if needed
The Express Checkout Service may indicate that the consumer needs to pass 3-DS authentication before MasterPass can return the full credit card details. This will be indicated with an error on the response. See the section 3-DS Security and then return to this step.
7. Process Payment through a payment gateway
Using the data retrieved in Step 5, process the payment through the merchant's payment gateway.
8. Log Transactions with MasterPass
After the payment has been processed in Step 7, make a service call to communicate the result of the transaction to MasterPass.
//Create an instance of MerchantTransactions
$merchantTransaction = new MerchantTransaction(
array(
"TransactionId" => "4549794",
"ConsumerKey" => "0zMKpm0nFtUv8lLXT97jDRo2bp4vNF8MFYyt3R5R87e3f3f4!414b48675861677159682b563745776b593652377939673d", //generated during onboarding process
"Currency" => "USD",
"OrderAmount" => 500, // total charged to card
"TransactionStatus" => "Success",
"ApprovalCode" => "888888", // authorization code returned by payment gateway
"PrecheckoutTransactionId" => "a4a6x55-rgb1c5-hyaqkemj-1-hybxhplo-947",
"ExpressCheckoutIndicator" => false,
"PurchaseDate" => date("Y/m/d H:i:s")
)
);
$request = new MerchantTransactions(array("MerchantTransactions" => array($merchantTransaction)));
//Call the PostbackService with required params
$response = PostbackApi::create($request);3-DS Security
If the merchant has enabled 3-D Secure, the consumer will be required to provide additional authentication before MasterPass can return full credit card details. When this is the case, the Express Checkout Service (Step 6 of the Express Checkout flow) will return an error message indicating the need for 3-DS authentication.
1. Determine if 3-DS Authentication is needed
Call the Express Checkout Service using your long access token. Check the response for an error that indicates 3-DS is needed.
$response = ExpressCheckoutApi::create("insert_longAccessToken_here", $expressCheckoutRequest);
$expressSecurityRequired = false;
foreach ($response->getErrors()->getError() as $error) {
if (error->getSource() === "3DS Needed") {
$expressSecurityRequired = true;
}
}2. Call Request Token Service
The Request Token Service must be called before creating the Buy with MasterPass button.
$callbackUrl = "https://www.somemerchant.com/checkoutconfirm.htm";
$requestTokenResponse = RequestTokenApi::create($callbackUrl);
$requestToken = $requestTokenResponse->getOauthToken();3. Call Merchant Initialization Service
The Merchant Initialization Service is used to secure Lightbox connections between the merchant site and MasterPass. The OriginUrl identifies the origin of the page that will invoke the Lightbox. This service requires the request token from Step 2.
The Merchant Initialization Service must be called before creating the Buy with MasterPass button.
//Create an instance of MerchantInitializationRequest
$merchantInitializationRequest = new MerchantInitializationRequest(
array(
"OriginUrl" => "https://somemerchant.com",
"OAuthToken" => $requestToken
)
);
//Call the MerchantInitializationApi with required params
$merchantInitializationResponse = MerchantInitializationApi::create($merchantInitializationRequest);4. Initialize the MasterPass Card Security lightbox
Import jQuery, and add the MasterPass Integration Script for either the sandbox or the production environment
<!-- url to jquery 1.10.2 -->
<script type="text/javascript" src="https://ajax.googleapis.com/ajax/libs/
jquery/1.10.2/jquery.min.js"></script>
<!-- url to sandbox MasterPass Lightbox -->
<script type="text/javascript" src=" https://sandbox.masterpass.com/
lightbox/Switch/integration/MasterPass.client.js "></script>
<!-- url to production MasterPass Lightbox -->
<!-- <script type="text/javascript" src=" https://masterpass.com/lightbox/
Switch/integration/MasterPass.client.js "></script> -->On the Place Order page of the merchant's website, launch the Card Securty lightbox interface.
<script type="text/javascript" language="Javascript">
MasterPass.client.cardSecurity({
"requestToken":"insert_request_token_here", //required
"callbackUrl":"http://www.somemerchant.com/checkoutcomplete.htm", //required
"merchantCheckoutId":"insert_checkout_id_here", //required
"precheckoutTransactionId":"insert_prechechout_txn_id_here", //required
"successCallback": function(mpLightboxResponse){ ... }, //optional
"failureCallback": function(mpLightboxResponse){ ... }, //optional
"cancelCallback": function(mpLightboxResponse){ ... } //optional
});
</script>- requestToken: The request token generated in Step 2.
- callbackUrl: The merchant URL to which the browser will redirect when the Lightbox closes.
- merchantCheckoutId: The unique checkout identifier obtained during the Merchant Onboarding process.
- precheckoutTransactionId: The pre-checkout transaction identifier collected from the precheckout data.
- successCallback: The function that will be called if the MasterPass flow ends successfully.
- failureCallback: The function that will be called if the MasterPass flow ends in failure.
- cancelCallback: The function that will be called if the user cancels the MasterPass flow.
5. Redirect to callback URL or call callback function
After the consumer completes the security authentication, MasterPass returns data to the merchant. By default, MasterPass redirects the browser to the callback URL, returning the data via URL parameters. Optionally, if callback functions were provided in Step 4, MasterPass returns control to the page that initiated the Lightbox, and the data is passed to the callback function.
Under certain conditions, the MasterPass UI may be forced to run in Full Screen display instead of launching the Lightbox. When this occurs, the browser will redirected to the callback URL when the MasterPass flow is complete, even if callback functions were supplied.
On Success
On Success, MasterPass returns the following parameters:
- mpstatus: String that indicates whether the MasterPass Card Security flow resulted in success, failure, or cancel.
Example Callback URL (Success)
http://www.somemerchant.com/checkoutcomplete.htm
?mpstatus=successExample Callback URL (Cancel)
http://www.somemerchant.com/checkoutcomplete.htm
?mpstatus=cancelExample Callback URL (Failure)
http://www.somemerchant.com/checkoutcomplete.htm
?mpstatus=failureExample Callback Function (Success)
function handleCallbackSuccess (data) {
callYourServerWith(data.mpstatus);
}6. Retrieve Payment, Shipping Data, Rewards and 3-D Secure Details
If the authentication was completed successfully, call the Express Checkout Service to retrieve the full details of the customer's payment, shipping, and reward information selected by the consumer from MasterPass.
$expressCheckoutRequest = new ExpressCheckoutRequest();
$expressCheckoutRequest->setMerchantCheckoutId("insert_checkoutId_here");
$expressCheckoutRequest->setPrecheckoutTransactionId("insert_precheckoutTransactionId_here"); // from precheckout data
$expressCheckoutRequest->setCurrencyCode("USD");
$expressCheckoutRequest->setCardId("consumer_selected_cardId");
$expressCheckoutRequest->setOriginUrl("http://www.somemerchant.com");
$expressCheckoutRequest->setAdvancedCheckoutOverride(false);
$expressCheckoutRequest->setOrderAmount("1299");
$expressCheckoutRequest->setDigitalGoods(false);
$expressCheckoutRequest->setShippingAddressId("consumer_selected_shippingAddressId");
$expressCheckoutRequest->setRewardProgramId("consumer_selected_rewardId");
$response = ExpressCheckoutApi::create("insert_longAccessToken_here", $expressCheckoutRequest);
$checkout = response->getCheckout();
$card = $checkout->getCard();
$billingAddress = $card->getBillingAddress();
$contact = $checkout->getContact();
$authOptions = checkout->getAuthenticationOptions();
$preCheckoutTransactionId = checkout->getPreCheckoutTransactionId();
$rewardProgram = checkout->getRewardProgram();
$shippingAddress = checkout->getShippingAddress();
$transactionId = checkout->getTransactionId();
$walletId = checkout->getWalletID();
Mobile App Implementation
The MasterPass Merchant Mobile Checkout Libraries/SDK enables developers to quickly implement native, app-to-app checkout experiences with EMV-like security
Android
The following content is currently applicable to US merchants with Android smartphone applications only. Information and Documentation for the MasterPass Merchant Android SDK is available here
iOS
The MasterPass Merchant iOS SDK is coming soon.
Common Errors
The following are the procedures to troubleshoot the most common errors that you may encounter.
If you get Error 400 when calling MasterPass web services:
- Verify Authorization header is not missing from the request.
- Verify Authorization header has the following:
- Consumer Key (exists and correct length)
- Callback URL (Request Token call only)
- oauth_verifier (Access Token call only)
- oauth_token (Access Token call only)
401 Error
If you get Error 401 when calling MasterPass web services:
- Verify that you are passing the Access Token in the get CheckoutXML call.
403 Error
If you get Error 403 - Forbidden when calling MasterPass services:
- Verify correct credentials or correct environment (that is, sandbox credentials with the prod URL).
500 Error
If you get Error 500 when calling MasterPass web services:
- Verify oauth_body_hash exists and is correct (Post Transaction call only).
- Verify correct private key.
Support
Refer to the FAQs at https://developer.mastercard.com/portal/display/api/MasterPass+- +Merchant+Checkout+-+FAQs. (should be removed if there are no FAQS in the new site)
If you have any questions or comments relating to MasterPass merchant testing, contact your assigned implementation manager. If you don’t have an assigned implementation manager, send an email with the following information (as applicable) to merchant_testing_support@masterpass.com:
- Merchant/Service Provider Name Troubleshooting Common Errors
- Email Address
- Country/Region
- Onboarding Model (Direct Merchant, Service Provider Merchant-by-Merchant or Service
Provider File and API Onboarding)
- Integration Environment (Sandbox or Production)
- Checkout Version and Checkout Identifier
- Consumer Key
- Postback Details (Amount, Date and Time of recent Checkout)
- Detailed description of the issue, including expected and actual test results (if applicable)
- Error Message(s)
- Screenshot(s)
- Exact Timestamp
MasterPass Sandbox Testing
In order to access the necessary information to test in the sandbox environment, you must submit an approval request to the merchant and obtain a sandbox consumer key as explained earlier in the guide. Testing can be conducted in the sandbox environment, using the test consumer account.
Your code must gracefully handle the error states and scenarios listed here.
NOTE: You cannot add cards to a sandbox account. Only shipping addresses can be added to sandbox accounts.
The sandbox consumer accounts are shared by all sandbox testers. If you experience difficulty using these accounts, wait at least 30 minutes and try again.
| Sandbox Accounts | Test Account 1 | Test Account 2 | 3DS Test - MasterCard SecureCode | 3DS Test - Visa Verified by Visa |
|---|---|---|---|---|
| Login Email | Joe.test@email.com | Joe.test2@email.com | 3ds.masterpass+securecode@gmail.com | 3ds.masterpass+verifiedbyvisa@gmail.com |
| Password | abc123 | abc123 | tester123 | tester123 |
| Security Question | Pet's Name | Pet's Name | Pet's Name | Pet's Name |
| Security Answer | fido | fido | fido | fido |
Select the Remember me and Remember this device options when testing so that you do not have to rekey the entire test account information every time you login to MasterPass.
Once you are redirected to the sandbox environment, select MasterPass wallet to sign-in to Sandbox Consumer Wallet Account.
3-D Secure Test Cases
MasterCard SecureCode
Use the “3DS Test - MasterCard SecureCode” from the Sandbox Consumer Account table above to test Maestro® and MasterCard SecureCode 3-D Secure functionality.
The following table provides the expected outputs for each of the test cases for MasterCard SecureCode:
| Test Cases | Scenario | Enrolled | ACSUrl | Payload | Error No | ECI Flag | Error Description | PARes Status | Sig Ver | Eci Flag | Xid | Cavv | Error No | Error Description 2 |
|---|---|---|---|---|---|---|---|---|---|---|---|---|---|---|
| 1 | Full Auth | Y | <url> | <value> | 0 | <blank> | Y | Y | 2 | <Xid Value> | <Cavv Value> | 0 | <blank> | |
| 2 | Sig Ver Fail | Y | <url> | <value> | 0 | <blank> | Y | N | 2 | <Xid Value> | <Cavv Value> | 0 | <blank> | |
| 3 | Failed Auth | Y | <url> | <value> | 0 | <blank> | N | Y | 1 | <Xid Value> | <blank> | 0 | <blank> | |
| 4 | ADS; Consumer Declines | Y | <url> | <value> | 0 | <blank> | A | Y | 1 | <Xid Value> | <blank> | <blank> | ||
| 5 | Timeout | <blank> | <blank> | <blank> | Error sending / receiving XML message | cmpi_authenticate message does not apply | ||||||||
| 6 | Not Participating | N | <blank> | <blank> | 0 | 1 | <blank> | cmpi_authenticate message does not apply | ||||||
| 7 | Error | U | <blank> | <blank> | 0 | 1 | <blank> | cmpi_authenticate message does not apply | ||||||
| 8 | Error | <blank> | <blank> | <blank> | 1001 | 1 | Error processing message request | cmpi_authenticate message does not apply | ||||||
| 9 | Look up error | U | <blank> | <blank> | 1001 | 1 | Error processing message request | cmpi_authenticate message does not apply | ||||||
| 10 | Authenticate unavailable | Y | <url> | <value> | 0 | <blank> | <blank> | <blank> | 1 | <blank> | <blank> | 1050 | Error processing PARes | |
| 11 | Authenticate unavailable | Y | <url> | <value> | 0 | <blank> | U | Y | 1 | <Xid Value> | <blank> | 0 | <blank> | |
| 12 | Attempts | Y | <url> | <value> | 0 | <blank> | A | Y | 1 | <Xid Value> | <Cavv Value> | <blank> |
NOTE: With our 16.Q4 Release, SecureCode downgrades any transaction to Non-SecureCode if the CAVV is not submitted in Authorization (DE48, SE43). This is true in MasterPass if the Security Level Indicators in DE48, SE42 equal 221, 222, or 223.
Once you have logged into the “3DS Test - MasterCard SecureCode” account, choose the test case card nickname that corresponds to the test case number from the table above.
Verified by Visa
Use the “3DS Test - Visa Verified by Visa” Sandbox Consumer Account from the table above to test Visa’s Verified by Visa 3-D Secure functionality.
The following table provides the expected outputs for each of the test cases for Verified by Visa:
| Test Cases | Scenario | Enrolled | ACSUrl | Payload | Error No | ECI Flag | Error Description | PARes Status | Sig Ver | Eci Flag | Xid | Cavv | Error No | Error Description 2 |
|---|---|---|---|---|---|---|---|---|---|---|---|---|---|---|
| 1 | Full Auth | Y | <url> | <value> | 0 | <blank> | Y | Y | 05 | <Xid Value> | <Cavv Value> | 0 | <blank> | |
| 2 | Sig Ver Fail | Y | <url> | <value> | 0 | <blank> | Y | N | 05 | <Xid Value> | <Cavv Value> | 0 | <blank> | |
| 3 | Failed Auth | Y | <url> | <value> | 0 | <blank> | cmpi_authenticate message does not apply | 0 | <blank> | |||||
| 4 | Attempts | Y | <url> | <value> | 0 | <blank> | A | Y | 06 | <Xid Value> | <Cavv Value> | 0 | <blank> | |
| 5 | Timeout | <blank> | <blank> | <blank> | Error sending / receiving XML message | cmpi_authenticate message does not apply | ||||||||
| 6 | Not Participating | N | <blank> | <blank> | 0 | 06 | <blank> | cmpi_authenticate message does not apply | ||||||
| 7 | Error | U | <blank> | <blank> | 0 | 07 | <blank> | cmpi_authenticate message does not apply | ||||||
| 8 | Error | <blank> | <blank> | <blank> | 1001 | 07 | Error processing message request | cmpi_authenticate message does not apply | ||||||
| 9 | Look up error | U | <blank> | <blank> | 1001 | 07 | Error processing message request | cmpi_authenticate message does not apply | ||||||
| 10 | Authenticate unavailable | Y | <url> | <value> | 0 | <blank> | <blank> | <blank> | 07 | <blank> | <blank> | 1050 | Error processing PARes | |
| 11 | Authenticate unavailable | Y | <url> | <value> | 0 | <blank> | U | Y | 07 | <Xid Value> | <blank> | 0 | <blank> |
Once you have logged into the “3DS Test - Visa Verified by Visa” account, choose the Test Case Card nickname that corresponds to the test case number from the table above.
Q/A Checklist
This topic provides information on the Q/A checklist.
Checklist for MasterPass Asset Placement
- Verify your adherence to the MasterPass Merchant Branding Requirements document found on the MasterPass - Merchant Checkout Services - Documentation page.
- Verify that you are linking to MasterPass visual assets rather than hosting your own.
In-Wallet Experience
- Verify that the consumer can only select card/addresses that are supported by the merchant.
- Merchants requesting liability shift for MasterPass transactions should use Advanced Checkout within MasterPass.
Post Wallet Experience
- After clicking the Finish Shopping button, verify the consumer is taken to a valid page.
- Verify that MasterPass acceptance mark is displayed for all MasterPass transactions.
- It is recommended to not allow consumers to edit the payment information returned by MasterPass.
- Verify that your code gracefully handles consumers returning without selecting a card and address (as a result of user choice or login failure).
- Verify that your code handles the return of a consumer with an expired request token.
NOTE: The Request Token is valid for 15 minutes therefore if the process is not completed within the timeout, the request token will expire and the checkout will need to be restarted.
- Verify that your code is able to parse and ingest the returned data.
- Verify that any post wallet page has a clear call to action (for example, select preferred shipping method), versus simply having the consumer review the data they just selected in the wallet.
- Verify that consumer is not required to enter CVC/CVV in order to complete the transaction.
- Verify that the card PAN has not been provided to any entity that does not have the appropriate security in place for storage and transmission of card data (per PCI guidelines).
- Verify that if merchants are provided with the PAN, this value is not displayed on screen.
- Verify that your system can handle the PostalCode element of up to nine characters; this element is sent by MasterPass as part of the BillingAddress and the ShippingAddress elements in checkout XML.
Postback
- Verify that the transaction ID submitted as part of a postback was sourced from the associated MasterPass™ transaction.
- Verify that the transaction result (Postback) is reported immediately after card authorization.
Displaying the MasterPass Checkout Button and Acceptance Marks
Before reading these guidelines, make sure MasterPass is supported for your country and language. Refer to the following documents to ensure the best consumer experience.
- Downloading and locally hosting the MasterPass Checkout Button image and acceptance marks is against MasterPass integration guidelines. To minimize the impact of future branding updates, use the country-specific link in the MasterPass Digital Assets PDF.
- All MasterPass integrations must follow MasterPass branding guidelines as stated in the Merchant Branding Guidelines PDF.
Button Placement

To ensure the best consumer experience, the checkout button should be placed at the earliest possible entry point, prior to the collection of shipping and billing information.
Acceptance Mark

The acceptance mark must only be displayed in parity with other accepted payment forms, or by itself. The acceptance mark is NOT a checkout button and only serves to help merchants display accepted payment types.
Dynamic Checkout Button
The new MasterPass dynamic checkout button displays personalized content based on consumers past wallet usage. The dynamic button will be initially available to only a few wallet providers and merchants.

MasterPass “Learn More” Page
MasterPass also requires merchants and service providers to provide a link to MasterPass’ Learn More page, which can be used by consumers to get additional information about MasterPass.
- We recommend that you place the link in close proximity to the MasterPass Checkout button.
- Reference the MasterPass Digital Assets PDF for country specific learn more links and MasterPass checkout button links.

Checkout Button Example
The following is an example of how a merchant can include the checkout button and learn more link.
<div class=”MasterPassBtnExample”>
<a href=”/exampleredirect”>
<img src=”https://static.masterpass.com/dyn/img/btn/en/US/mp_chk_btn_147x034px.png”/>
</a>
<a href=” https://www.mastercard.com/mc_us/wallet/learnmore/en/US/”>Learn More</a>
</div>Developer Zone Key Renewal Process
Your keys will expire after one year. Prior to expiration, the email associated with the Developer Zone account will receive notification that the key needs to be renewed. To renew your key, please follow the instructions below.
- Log into the MasterPass Developer Zone.
- Select My Projects in the left-hand navigation.
- Select the project with the expiring key and click the Manage Keys button.
- Click the Renew link that corresponds to the expiring key. A modal will pop up.
- To renew your key, you may fill out the fields on the left to generate a Certificate Request File and download a P12 file. Alternately, you can instead supply a PEM encoded Certificate Request File using a tool of your choice, such as OpenSSL or Java Keytool. Choose your preferred method and complete the steps. NOTE: If you do not use the same CSR file that was used to originally create the key, the application will have to be modified to use the new P12 file. Otherwise, service calls to MasterPass will fail.